By: Team ET Since: Jan 2020 Licence: MIT
- 1. Introduction
- 2. Quick Start
- 3. About
- 4. Features
- 4.1. Trip Management
- 4.2. Activity Management
- 4.2.1. Activity Management Command Parameters
- 4.2.2. List all activities:
listactivity - 4.2.3. Add a new activity:
addactivity - 4.2.4. Edit an existing activity:
editactivity - 4.2.5. Delete an existing activity:
deleteactivity - 4.2.6. Sort the activity list:
sortactivity - 4.2.7. Find activities by name:
findactivity - 4.2.8. Find activities by tag:
findactivitytag - 4.2.9. Clear all activities:
clearactivity
- 4.3. Activity Scheduling
- 4.4. Transportation Booking Management
- 4.4.1. Transport Booking Management Command Parameters
- 4.4.2. List all transport bookings:
listtransport - 4.4.3. Add a new transport booking:
addtransport - 4.4.4. Edit an existing transportation booking:
edittransport - 4.4.5. Delete an existing transportation booking:
deletetransport - 4.4.6. Sort the transport booking list:
sorttransport - 4.4.7. Clear all transportation bookings:
cleartransport
- 4.5. Accommodation Booking
- 4.5.1. Accommodation Booking Management Command Parameters
- 4.5.2. List all accommodation bookings:
listacc - 4.5.3. Add a new accommodation booking:
addacc - 4.5.4. Edit an existing accommodation booking:
editacc - 4.5.5. Delete an existing accommodation booking:
deleteacc - 4.5.6. Sort the accommodation booking list:
sortacc - 4.5.7. Clear all accommodation bookings:
clearacc
- 4.6. Packing List
- 4.6.1. Packing List Item Management Command Parameters
- 4.6.2. List all packing list items:
listitem - 4.6.3. Add a new packing list item:
additem - 4.6.4. Edit an existing packing list item:
edititem - 4.6.5. Delete an existing packing list item:
deleteitem - 4.6.6. Mark an existing packing list item as packed:
checkitem - 4.6.7. Mark an existing packing list item as not packed:
uncheckitem - 4.6.8. Sort the packing list:
sortitem - 4.6.9. Find packing list items by name:
finditem - 4.6.10. Find packing list items by category:
finditemcategory - 4.6.11. Clear all packing list items:
clearitem - 4.6.12. Add a new preset (built-in list):
addpreset - 4.6.13. List all presets:
listpreset
- 4.7. Fixed Expense Management
- 4.7.1. Fixed Expense Management Command Parameters
- 4.7.2. List your fixed expenses: listexpense
- 4.7.3. Adding a new fixed expense entry:
addexpense - 4.7.4. Edit a fixed expense entry: editexpense
- 4.7.5. Deleting a fixed expense entry:
deleteexpense - 4.7.6. Sort fixed expenses:
sortexpense - 4.7.7. Clearing a fixed expense:
clearexpense
- 4.8. Features coming in Version 2.0
- 5. FAQ
- 6. Command Summary
1. Introduction
(Contributed by Joshua Wee)
Welcome to the User Guide of Easy Travel (E.T.)!
Do you enjoy going on overseas trips, but dislike or have trouble planning for it? Fret not, our application, E.T., will help reduce the amount of stress and anxiety when planning for a trip. E.T. is a desktop application that helps travellers manage and plan for their trips. This application uses a Command Line Interface (CLI); this means that you operate the application by typing commands into a Command Box. If you are fast at typing, you can manage your trips faster than other Graphical User Interface (GUI) applications; GUI applications allow users to interact with the application through graphical icons such as buttons.
The purpose of this user guide is to provide you with in-depth documentation on how to install and use our application. What are you waiting for? Head on to Section 2, “Quick Start”.
2. Quick Start
To get started with using E.T., you can follow these steps:
-
Ensure that you have Java 11 or above installed in your Computer. If you don’t you can install it using the link to Oracle here
-
Download the latest version of E.T. found here.
-
Copy the file to the folder you want to use as the home folder for E.T..
-
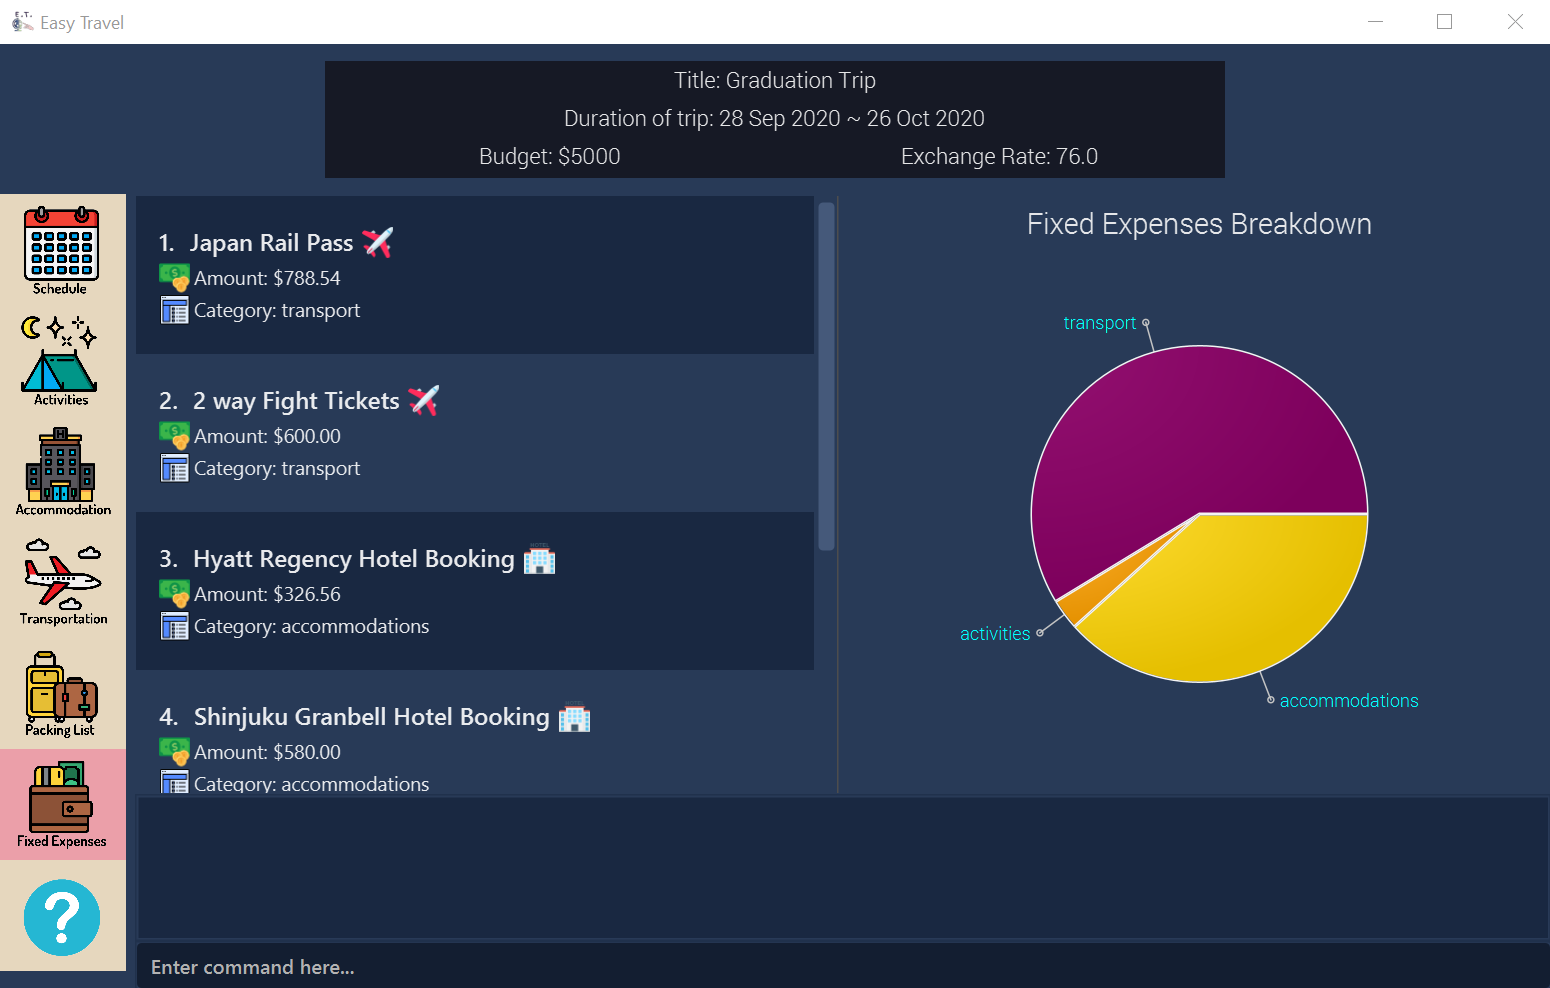
Double-click the file to start the app. The GUI shown in Figure 1 should appear in a few seconds.
-
You are now on the main page of E.T..
-
At the bottom of the screen, type your command in the Command Box (See Section 3.2.1, “Terminology related to the GUI.”) and press
Enteron your keyboard to execute it. E.g. typinghelpand pressingEnterwill open the help tab.
Refer to Section 3.2.3, “Command Syntax and Usage” on how to use commands and Section 4 - Features on the commands you can use for each feature.
Refer to Section 3.2.3, “Command Syntax and Usage” on how to use commands and Section 4, “Features” on the commands you can use for each feature.
3. About
3.1. Structure of this document
(Contributed by Teng Le)
There are many things you can do with E.T.. Thus, we have structured this User Guide in such a way that you can easily find what you need. In the next subsection, Section 3.2, “Reading this Document”, you will find useful tips on reading this document. It is then followed by Section 4, “Features” where the seven main features of E.T. and their commands are documented:
-
Trip Management
-
Activity Scheduling
-
Activity Management
-
Transportation Booking Management
-
Accommodation Booking Management
-
Packing List Management
-
Fixed Expense Management
3.2. Reading this Document
However, before moving on to the next section, you may want to familiarise yourself with some technical terms, symbols and syntax that are used throughout the document. In this subsection, you can find all the information you need to know when reading this document.
3.2.1. Terminology related to the GUI.
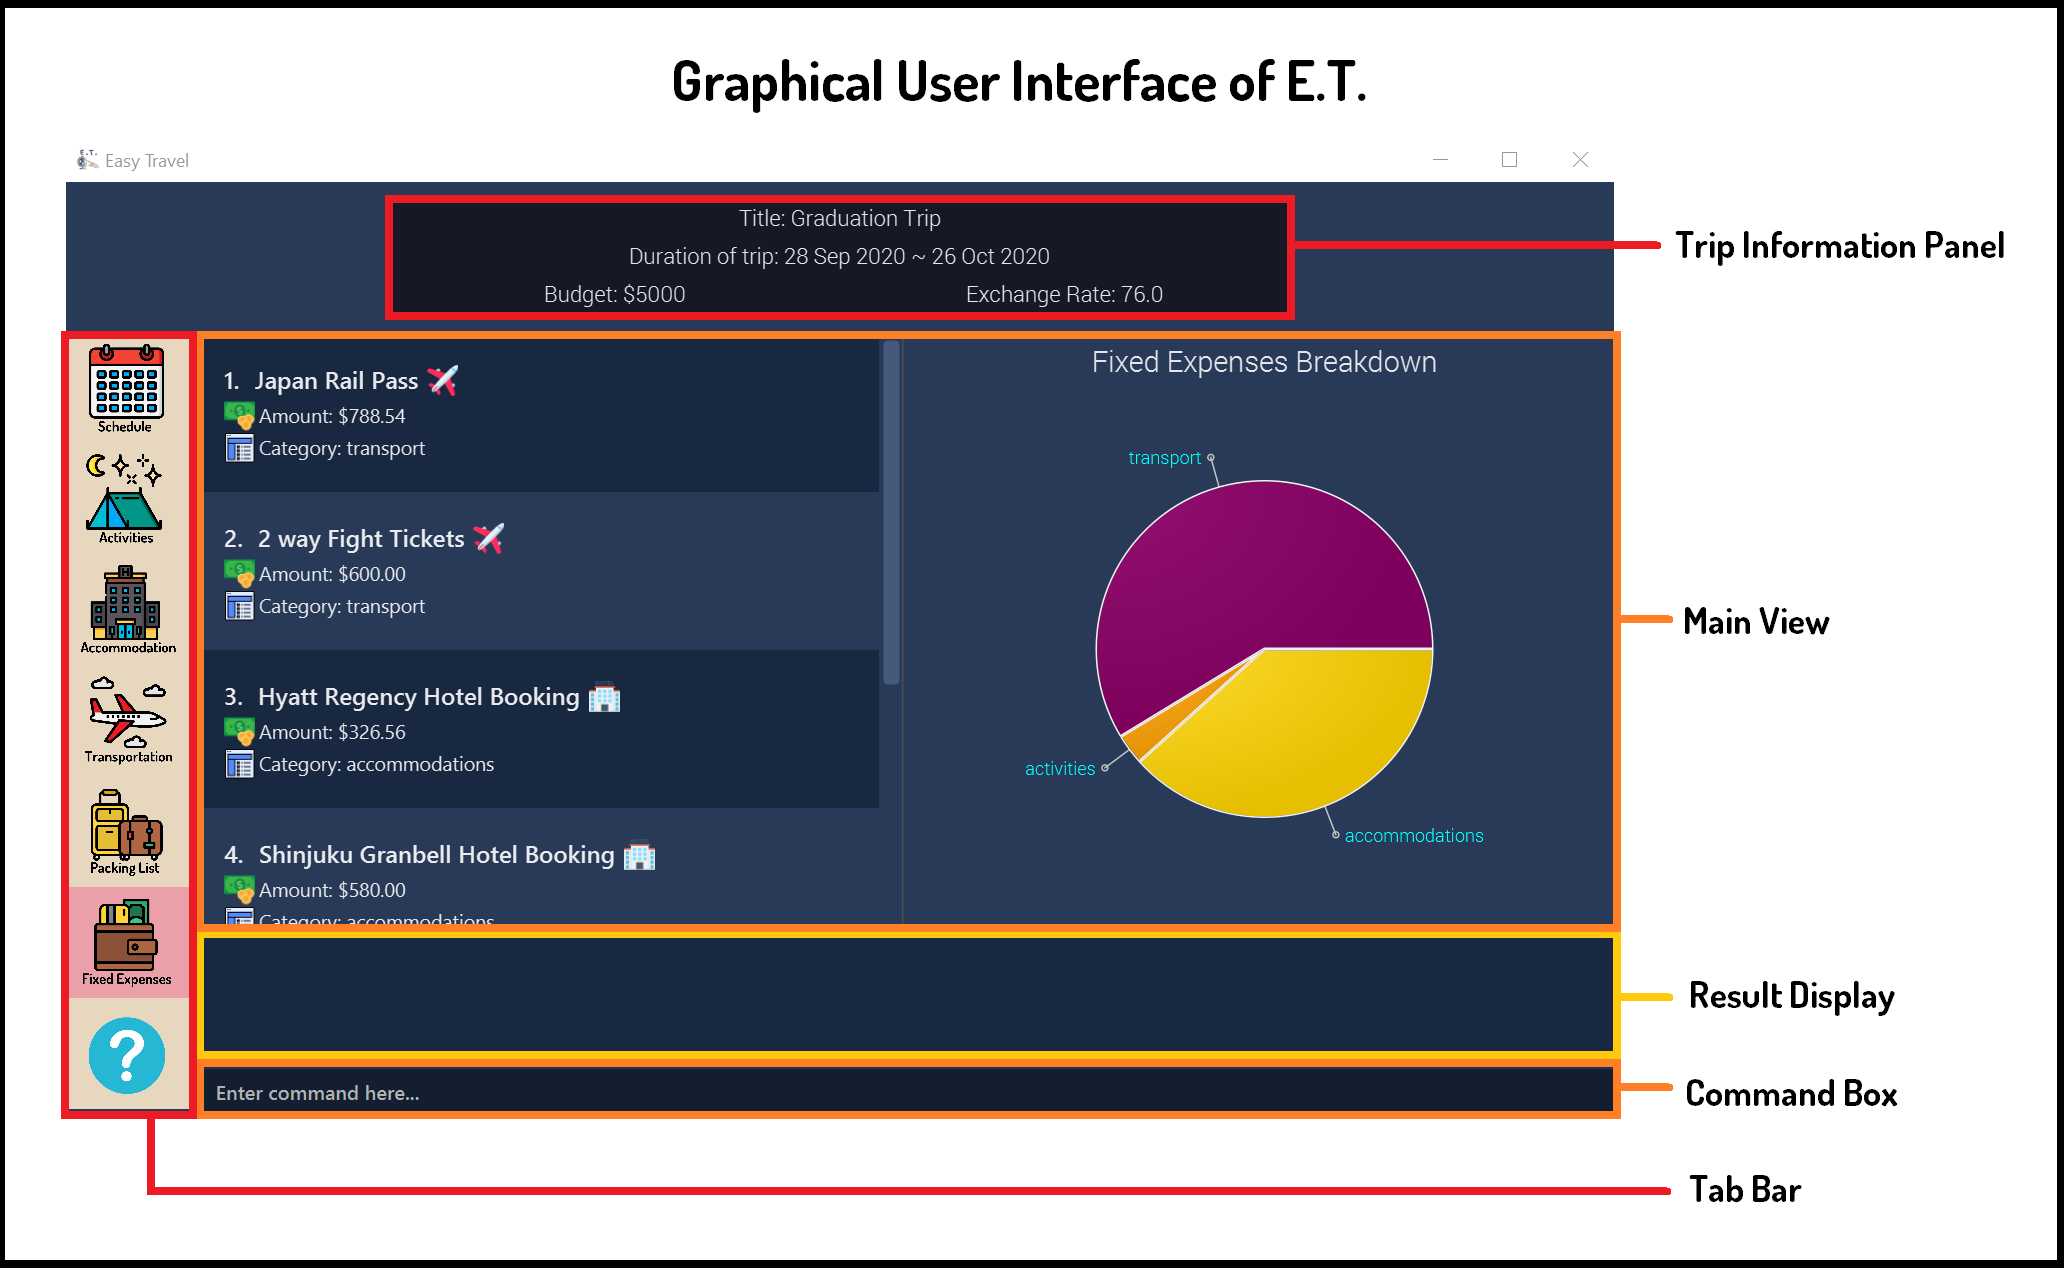
The following figure shows the GUI of E.T.. It is annotated with the name of the GUI components.
3.2.2. General Symbols and Syntax
The table below explains the general symbols and syntax used throughout the document.
| Symbol/syntax | What does it mean? |
|---|---|
italics, |
Italicised text indicates that the text has a definition that is specific to the application. Look out for the definitions of these words in the same paragraph or the glossary. |
|
A grey highlight (called a code-block markup) indicates that this is a command that can be typed into the command box and executed by the application. |
💡 |
A light bulb indicates that the enclosed text is a tip. |
⚠ |
A warning sign indicates that the enclosed text is important. |
3.2.3. Command Syntax and Usage
(Contributed by Charlotte)
Since E.T. is a CLI application, knowing how to use commands is very important. The following subsection will teach you how to read and use commands in E.T.. All commands in E.T. follow similar formats as described below and examples will be provided to help you understand their usage. Examples of commands and their formats will be written in code-blocks.
The table below explains some important technical terms. An example will be provided to help you visualize these terms.
| Technical Term | What does it mean? |
|---|---|
Command word |
The first word of a command. It determines the action that E.T. should perform. |
Parameter |
The word or group of words following the command word. They are values given to a command to perform the specified action. |
Prefix |
The word that at the start of a parameter. It distinguishes one parameter from another. |
Example:
additem name/NAME quantity/QUANTITY category/CATEGORY
Breakdown:
Command Word - additem
Parameters - NAME, QUANTITY, CATEGORY
Prefix - name/, quantity/, category/
The following 4 points explain how you can use a command with the provided format. More examples will be provided for each command in Section 4, “Features”. Words in the upper case are the parameters to be supplied by you.
-
Words in the upper case are the parameters to be supplied by you.
-
Format given:
deletetransport INDEX -
Acceptable input:
deletetransport 1
-
-
Items in square brackets are optional.
-
Format given:
edititem INDEX [name/NAME] [quantity/QUANTITY] [category/CATEGORY] -
Acceptable input:
edititem 1 quantity/5
-
-
Items with
…after them can be used zero or multiple times.-
Format given:
addactivity title/TITLE location/LOCATION duration/DURATION tag/TAG… -
Acceptable input 1 (two
tag/TAG):addactivity title/Shopping location/Treasure Factory duration/2 tag/shopping tag/tokyo -
Acceptable input 2 (no
tag/TAG):addactivity title/Osaka Castle View location/Treasure Factory duration/2 duration/1
-
-
Parameters with prefixes can be supplied in any order.
-
Format given:
addactivity title/TITLE location/LOCATION duration/DURATION tag/TAG… -
Acceptable input (same order as given format):
addactivity title/Shopping location/Treasure Factory duration/2 tag/shopping tag/tokyo -
Acceptable input (different order as given format):
addactivity duration/2 tag/shopping location/Treasure Factory tag/tokyo title/Shopping
-
With the above information, you can now move on to Section 4 - Feature to learn all the features of the application and start using the commands.
4. Features
This section contains all the information you need to know about the features of E.T.. To use each feature or sub-feature, you will need to enter the command into the Command Box.
You are required to set a trip before other features are unlocked. See Section 4.1.1.1, “Set a new trip: settrip” to learn how to set a trip.
|
4.1. Trip Management
(Contributed by Charlotte)
This feature allows you to manage your trip. You can record the following information about your trip: * Title * Budget * Exchange rate * Start date * End date
4.1.1. Trip Management Command Parameters
Before you jump right into using this feature, you may want to learn about all the common command parameters used in this feature. The table below shows the list of common command parameters that will be used for this feature.
| Parameter Name | Description |
|---|---|
|
The title of your trip. It must be alphanumeric words not more than 50 characters long. E.g. |
|
The budget of your trip. It must be a whole number not more than 1 000 000 000. E.g. |
|
The exchange rate for your country of visit. It must be a number greater than 0 and not more than 100. E.g. |
|
The starting date of your trip. It must be in the format of E.g. |
|
The ending date of your trip. It must be in the format of E.g. |
4.1.1.1. Set a new trip: settrip
You can use this command to set a new trip that you want to plan for.
Format:
settrip title/TITLE budget/BUDGET exchangerate/EXCHANGE_RATE startdate/START_DATE enddate/END_DATE
|
Refer to Section 4.1.1, “Trip Management Command Parameters” for more detail about each parameter. |
| Ensure that your date is correct as E.T. does not allow editing of dates once set. |
Example:
If you are all ready to start planning for your trip and you want to set a trip to get started, follow these steps below. You will learn how to set a graduation trip that starts on 28 September 2020 and ends on 5 October 2020 with a budget of $5000 and an exchange rate of 76.6.
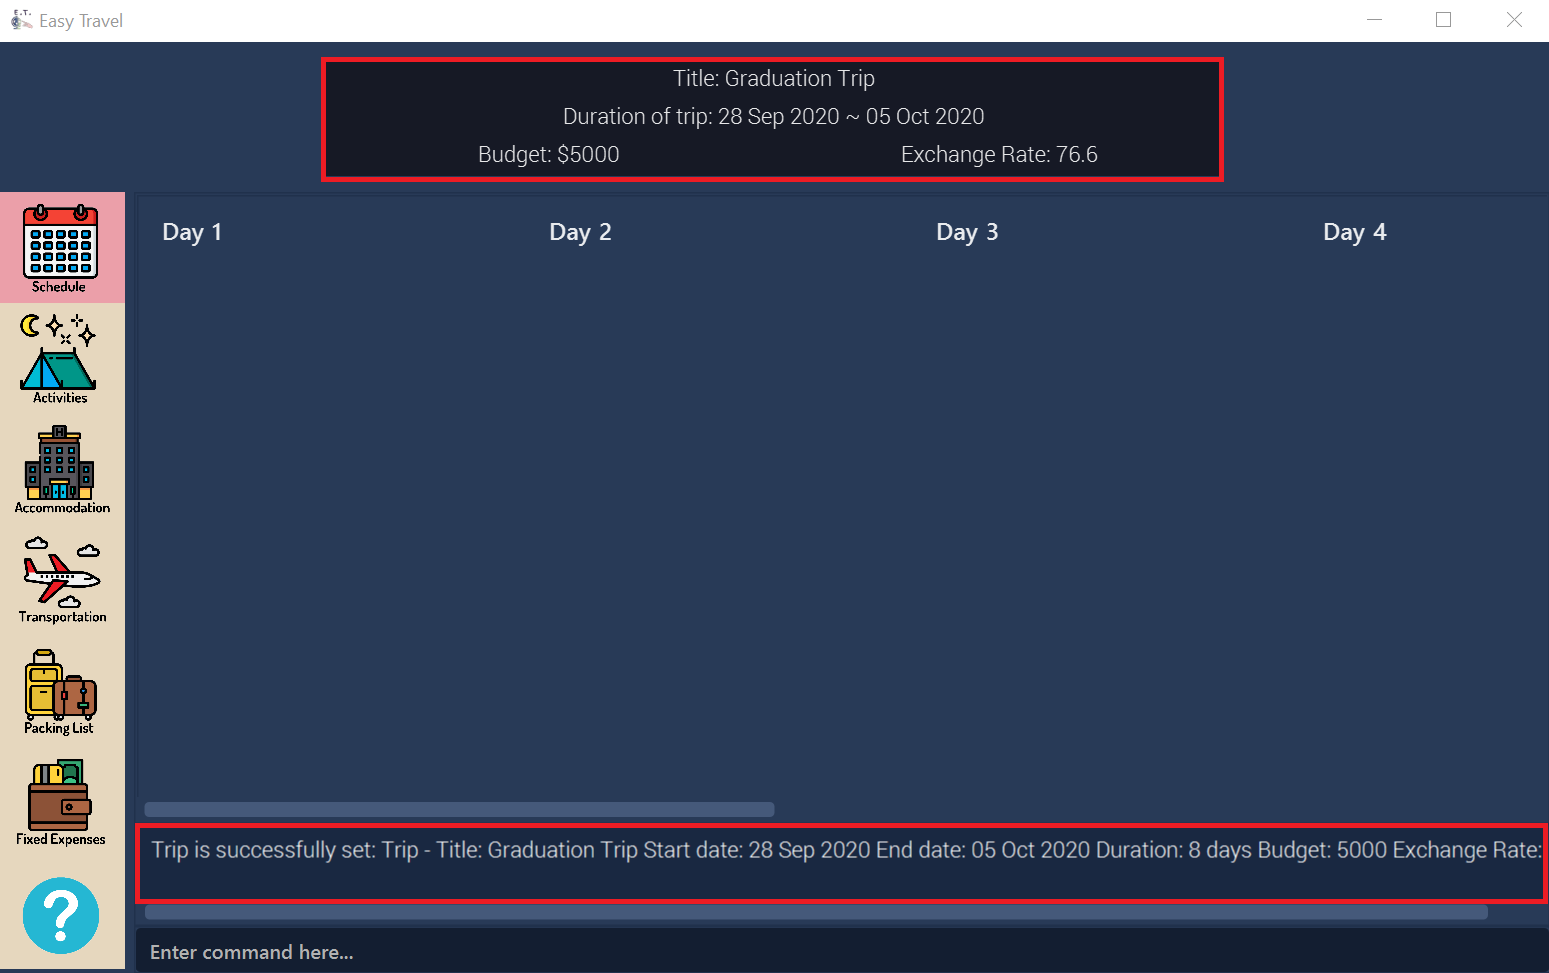
settrip command4.1.1.2. Rename the trip: rename
You can use this command to change the title of the trip.
Format:
rename TITLE
|
Refer to Section 4.1.1, “Trip Management Command Parameters” for more detail about each parameter. |
Example:
Assume that you have accidentally titled the trip wrongly to Craduation Trip instead of Graduation Trip, you can do the following steps.

rename command4.1.1.3. Edit the trip’s budget: editbudget
You can use this command to change the budget of the trip.
Format:
editbudget AMOUNT
|
Example:
Let’s say after planning your expenses, you realised that you would want to increase your budget to $6000. Follow the following steps to do that.
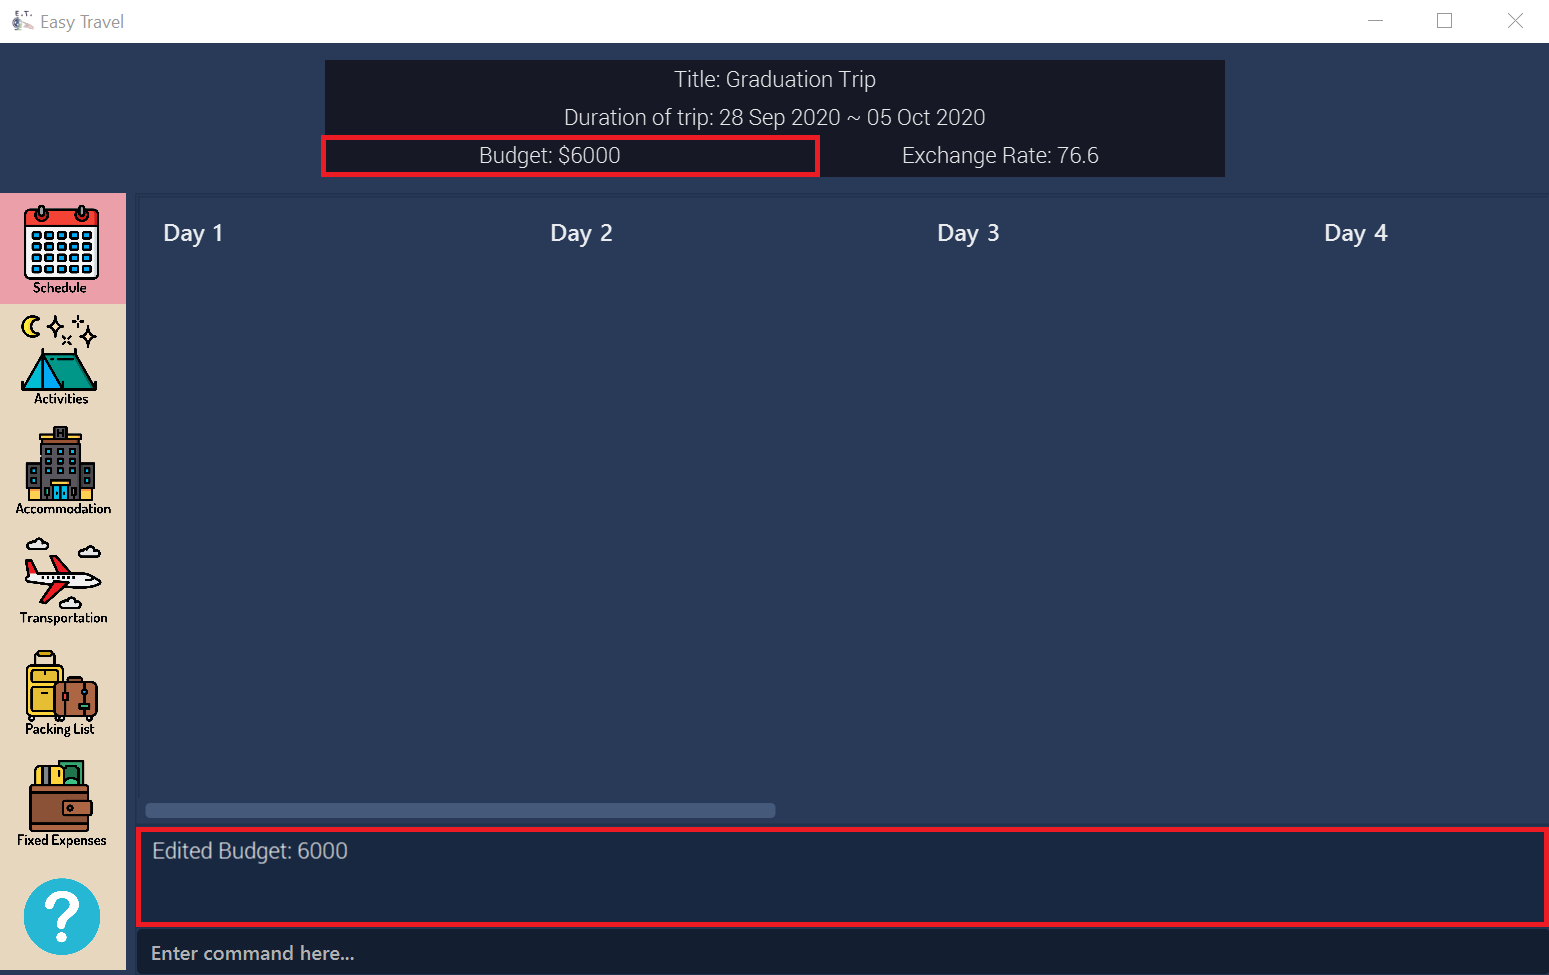
editbudget command4.1.1.4. Delete the current trip: deletetrip
You can use this command to delete the current trip.
| Deleting the trip will clear all your data from the app! Think twice before you do so. |
Format:
deletetrip
Example:
Assuming that you have finished planning for your trip and would like to start planning for a new one, follow these steps.
Deleting the current trip:
-
Type
deletetripinto the Command Box. -
Press
Enterto execute.
Outcome:
-
The Result Display will show a success message.
-
You can now see that no trip is set on the Trip Information Panel.

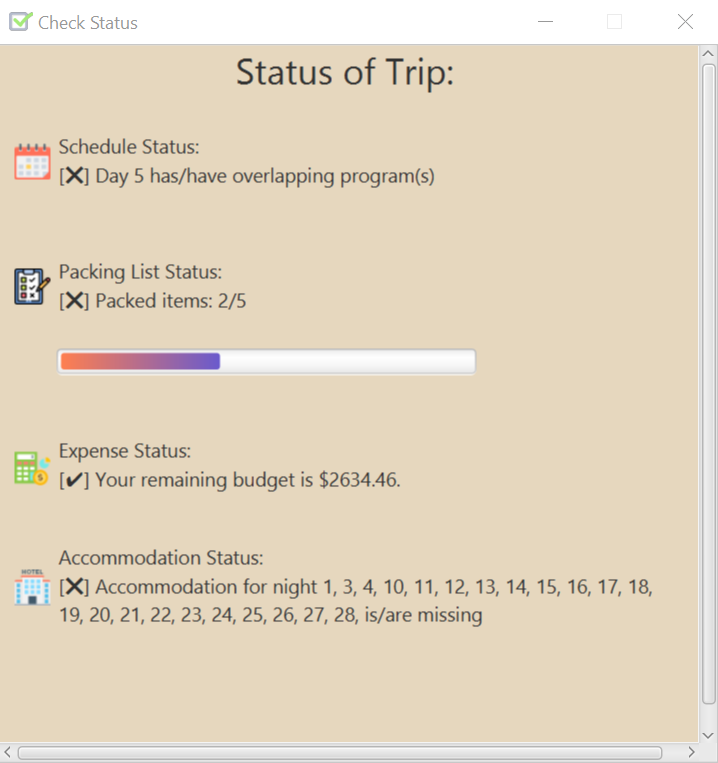
deletetrip command4.1.1.5. Check your progress: status
You can use this command to check the progress of your planning. This command will open a window which shows you the following information:
-
Schedule - If there are any overlapping programs.
-
Packing list - Number of items packed and left to pack.
-
Expense - Remaining budget.
-
Accommodation - The nights without accommodation bookings. Format:
status
Example: If you are planning for your trip halfway and feel lost, you can check your progress using the following steps. It can remind you of what you have to do next.
4.2. Activity Management
(Contributed by Charlotte)
If you are planning what to do for your trip, you will find this feature useful. This feature allows you to manage your activities for the trip. You can record the following information about your activities:
-
Title
-
Location
-
Duration
4.2.1. Activity Management Command Parameters
Before you jump right into using this feature, you may want to learn about all the common command parameters used in this feature. The table below shows the list of common command parameters that will be used for this feature.
| Parameter Name | Description |
|---|---|
|
The title of the activity. It must be alphanumeric words not more than 50 characters long. E.g. |
|
The location of the activity. It must be alphanumeric words not more than 50 characters long. E.g. |
|
The duration of the activity in hours. It must be an integer from 1 to 24 (both inclusive). E.g. |
|
The tag you want to attach to an activity. It must be a single alphanumeric word not more than 30 characters long. E.g. |
|
The index number of the activity in the displayed list. The first entry of the list has an index number of It must be a valid index number. |
4.2.2. List all activities: listactivity
You can use this command to navigate to the Activities Tab and display all your activities in E.T..
Format:
listactivity
Example:
If you are in another tab and wish to look at your list of activities, you can follow these instructions.
4.2.3. Add a new activity: addactivity
You can use this command to add a new activity to E.T..
Format:
addactivity title/TITLE duration/DURATION location/LOCATION [tag/TAG]…
|
Refer to Section 4.2.1, “Activity Management Command Parameters” for more detail about each parameter. |
Example:
Let’s say you have an activity with the following information and wish to record it in E.T..
| Activity | |
|---|---|
Title |
plane |
Location |
Singapore |
Duration |
1 |
Tag |
sea, outdoor |
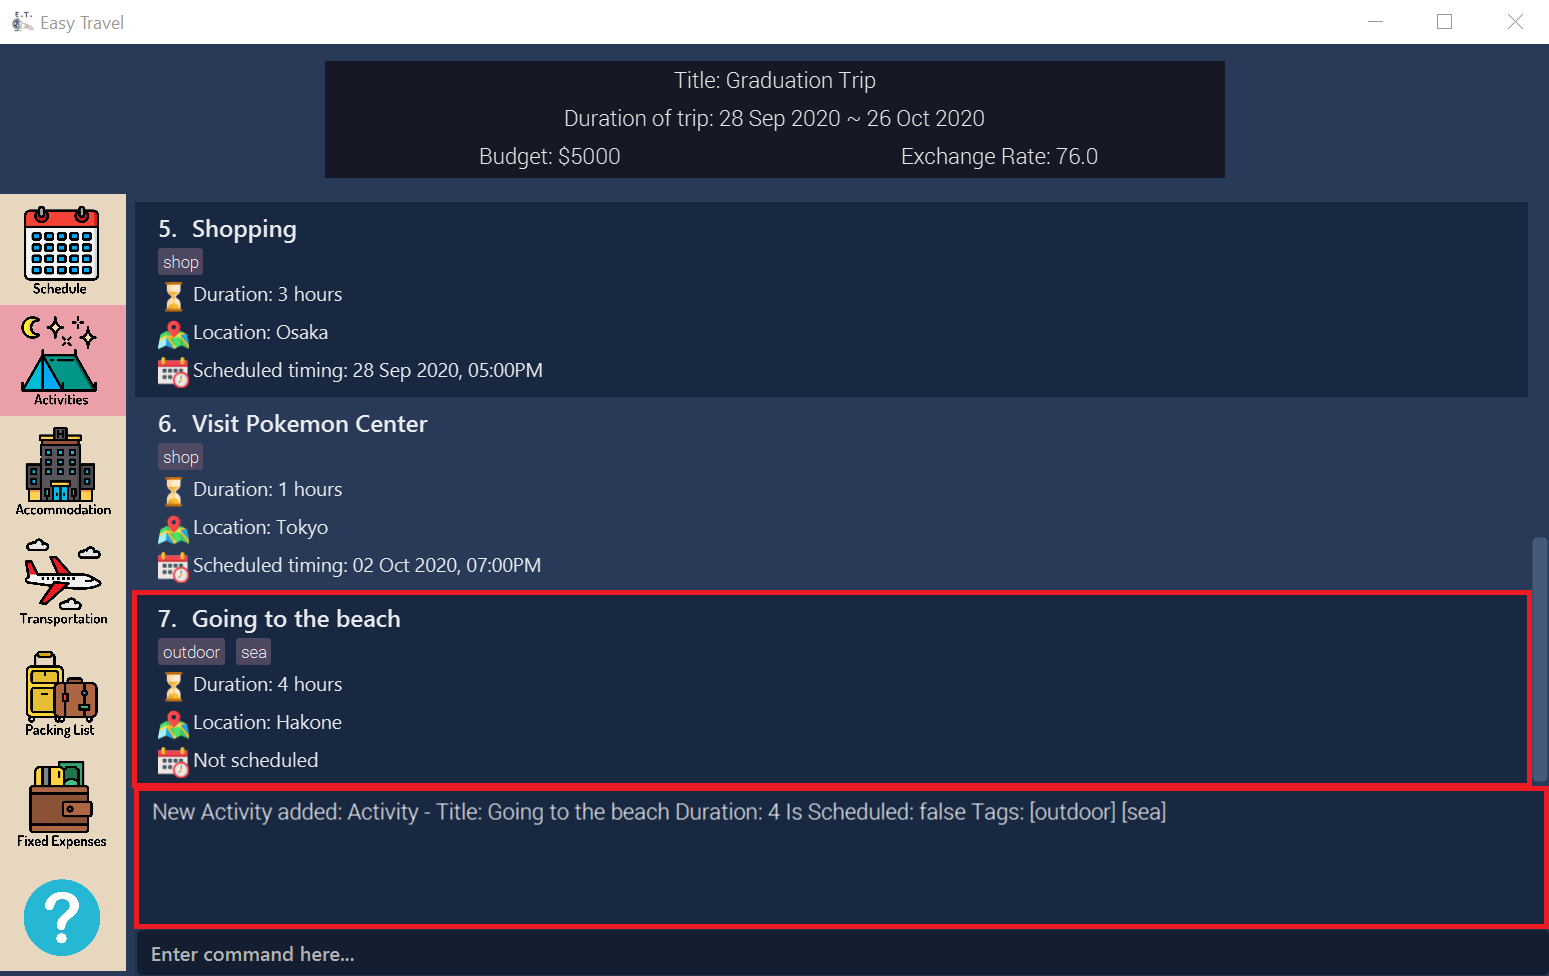
addactivity command4.2.4. Edit an existing activity: editactivity
You can use this command to edit an existing activity in E.T..
Format:
editactivity INDEX [title/TITLE] [duration/DURATION] [location/LOCATION] [tag/TAG]…
|
Editing the activity:
Example:
Assume you have accidentally made a mistake in the spelling of the title of the second activity in the displayed list and wish to change it to “Skiing”. You do perform the following steps.
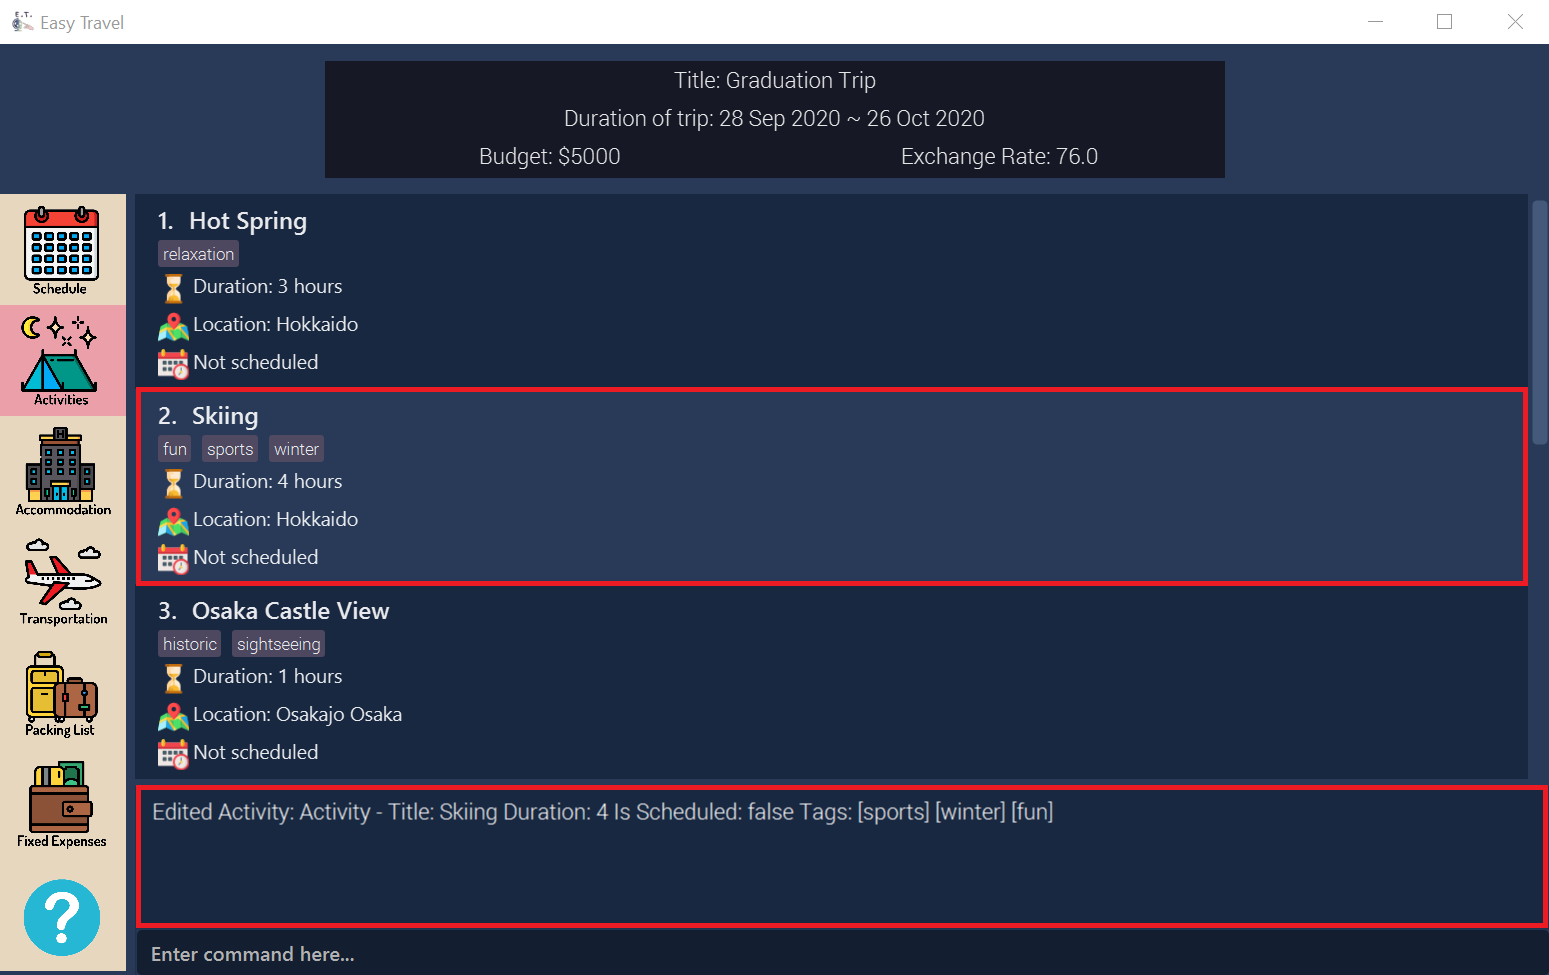
editactivity command4.2.5. Delete an existing activity: deleteactivity
You can use this command to delete an existing activity in E.T..
Format:
deleteactivity INDEX
|
Example:
If you change your mind and decide to remove the first activity in the displayed list from your plan, you can perform the steps below.
4.2.6. Sort the activity list: sortactivity
Format:
sortactivity CRITERIA ORDER
|
Example:
If you want to sort your list of activities in descending order of duration, to help you in your planning, you can do the following.
4.2.7. Find activities by name: findactivity
You can use this command to find activities by keywords. E.T. will help you search for your activities using the activity title, duration and location.
Format:
findactivity KEYWORD [MORE_KEYWORD]…
|
Example:
Let say your list has a bunch of activities and you want to search for a specific one about shopping. You can do so as follows.
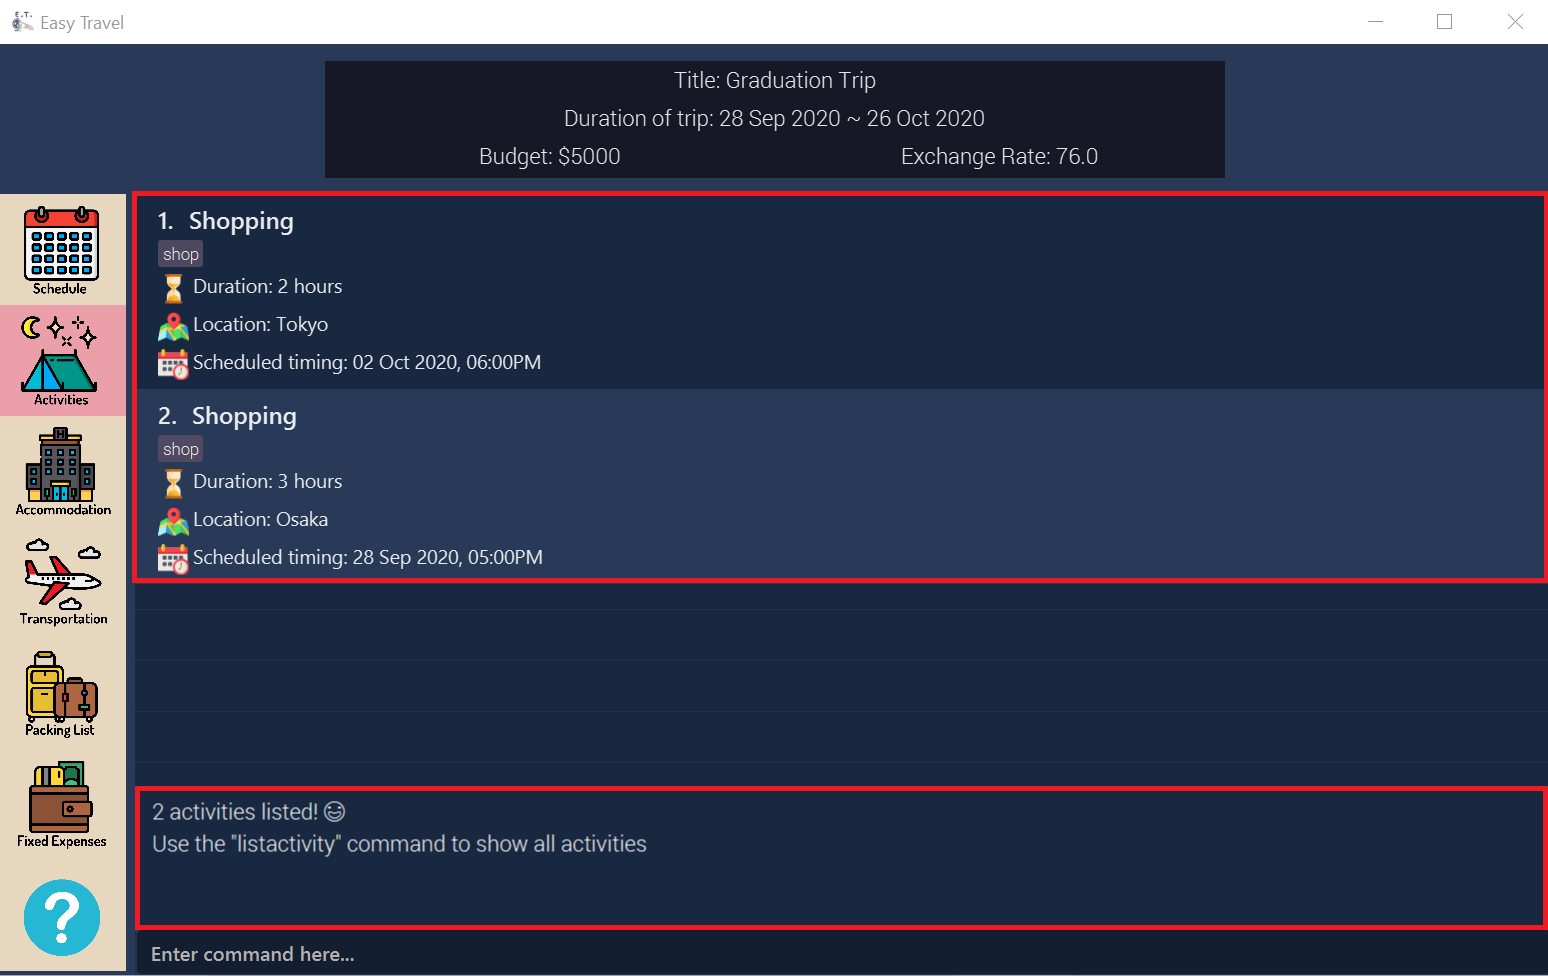
findactivity command4.2.8. Find activities by tag: findactivitytag
You can use this command to find activities by tags.
Format:
findactivitytag TAG_NAME [MORE_TAG_NAMES]…
|
4.2.9. Clear all activities: clearactivity
You can use this command to clear and delete the whole list of activities in E.T..
Format:
clearactivity
Example:
In the case that you want to restart your activity planning from scratch, you can do the following.
4.3. Activity Scheduling
(Contributed by Teng Le)
After brainstorming a bunch of activities to do, do you want to add them to your schedule? This feature will help you do that. In this feature, you can add and remove activities from your schedule. Just tell E.T. which activity to schedule at what time and it will be added to the Schedule Tab.
4.3.1. Activity Scheduling Command Parameters
Before you jump right into using this feature, you may want to learn about all the common command parameters used in this feature. The table below shows the list of common command parameters that will be used for this feature.
| Parameter name | Description |
|---|---|
|
The index number of the activity in the displayed list found in the Activities Tab. The first entry of the list has an index number of It must be a valid index number. |
|
The index number of the day Schedule Tab. It represents the day number of your trip. The first day of your trip is index It must be a valid index number. |
|
The time to schedule the activity. It must be in the format of E.g. |
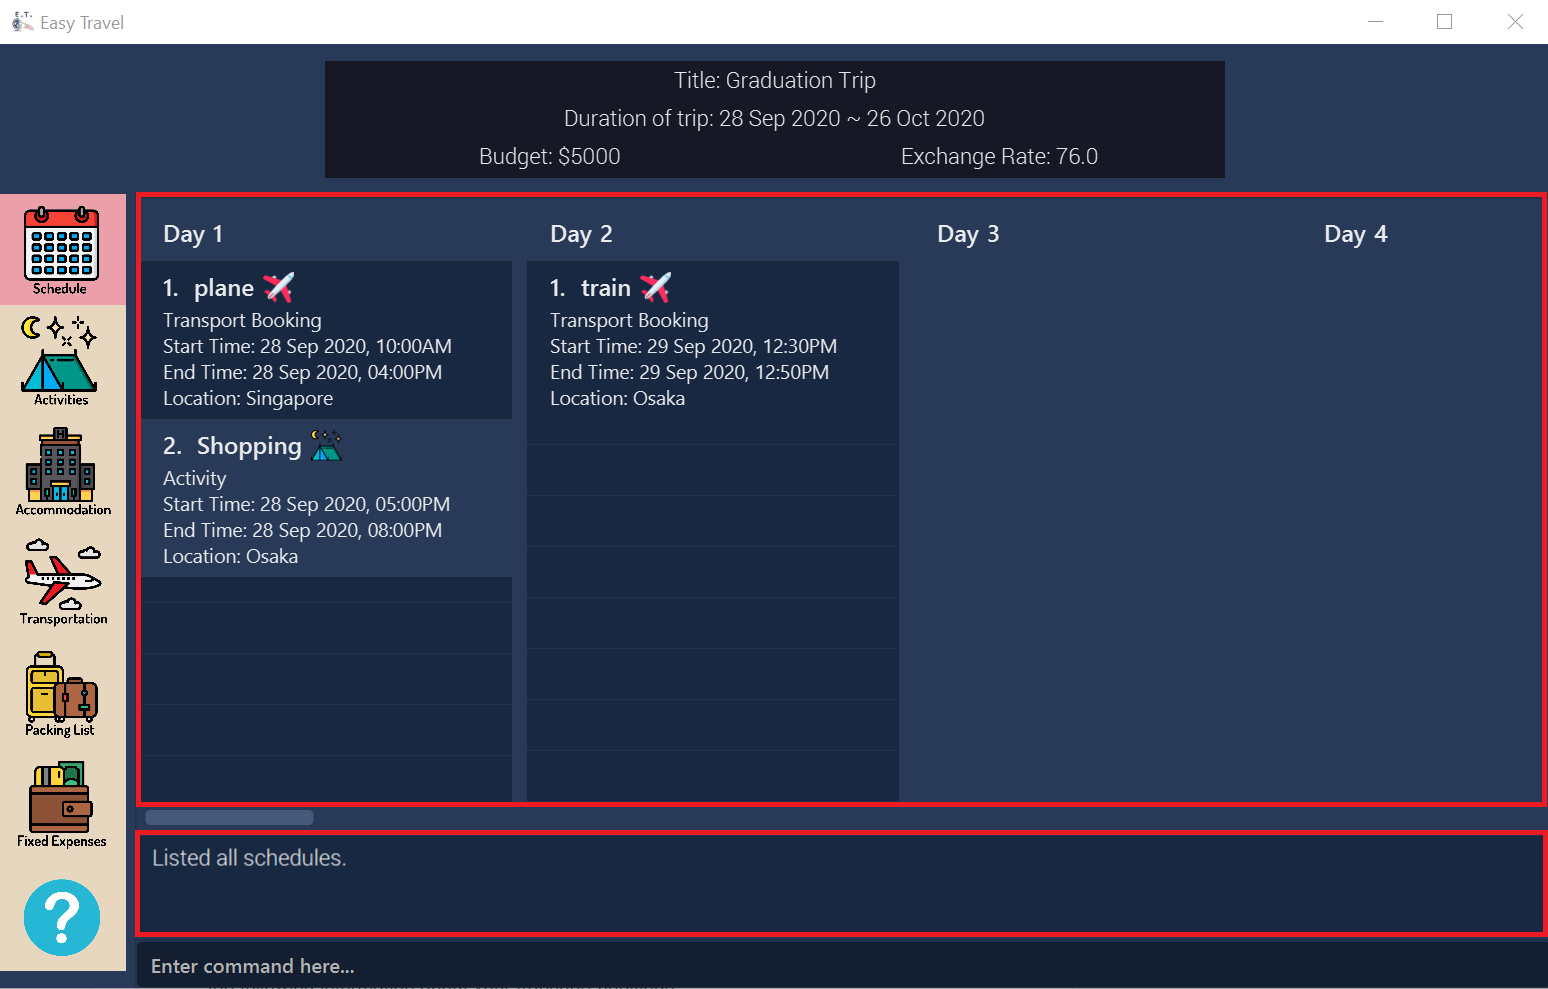
4.3.2. List all scheduled programs: listschedule
You can use this command to navigate to the Schedule Tab and display all your scheduled programs in E.T..
Format:
listschedule
Example:
If you are in another tab and wish to look at your schedule, you can follow these instructions.
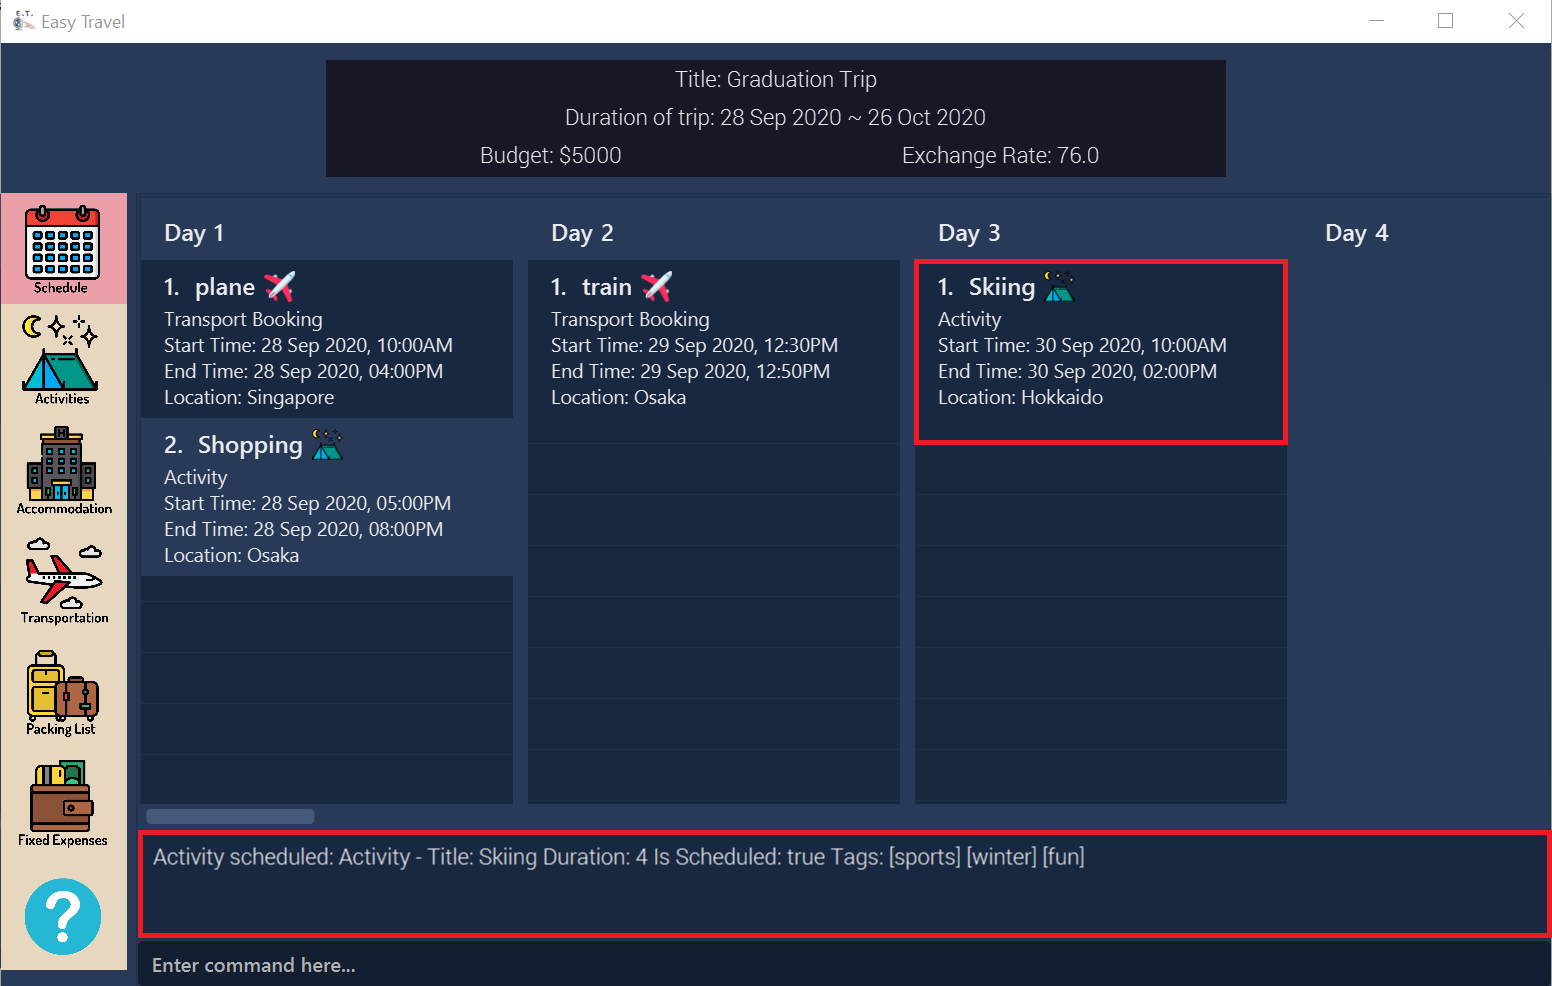
listschedule command4.3.3. Add an existing activity to the schedule: schedule
You can use this command to add an activity to your schedule in E.T..
Format:
schedule ACTIVITY_INDEX day/DAY_INDEX time/TIME
|
Refer to Section 4.3.1, “Activity Scheduling Command Parameters” for detail about each parameter. |
Example:
Let’s say you want to add the first activity in the Activities Tab to the third day of your schedule at 10 AM. You can do the following.
schedule command4.3.4. Remove an activity from the schedule: unschedule
You can use this command to remove an activity from your schedule in E.T..
| You cannot remove a transport booking entry from your schedule. Refer to Section 4.4.5 Delete an existing transport booking for instructions on how to remove a transport booking entry. |
Format:
unschedule ACTIVITY_INDEX day/DAY_INDEX
|
Refer to Section 4.3.1, “Activity Scheduling Command Parameters” for detail about each parameter. |
Example:
In case you want to remove the first activity of the third day because you have other plans at that time. You can do the following.
4.4. Transportation Booking Management
(Contributed by Teng Le)
If you want to be prepared, you have to book transportation for every overseas trip. Thus, if you want to manage your transportation bookings for the trip, you can use this feature. What’s more is that your transport bookings are automatically added to your schedule, unlike the manual scheduling you have to do with activities. You can record the following information about your transport bookings:
-
Mode of transport
-
Starting location
-
Destination
-
Time of departure
-
Time of arrival
4.4.1. Transport Booking Management Command Parameters
Before you jump right in to use this feature, you may want to learn about all the common command parameters used in this feature. The table below shows the list of common command parameters that will be used for this feature.
| Parameter Name | Description |
|---|---|
|
The mode of transport.
|
|
The starting location.
|
|
The destination.
|
|
The time of departure.
|
|
The time of arrival.
|
|
The index number of the transport booking entry in the displayed list. The first entry of the list has an index number of
|
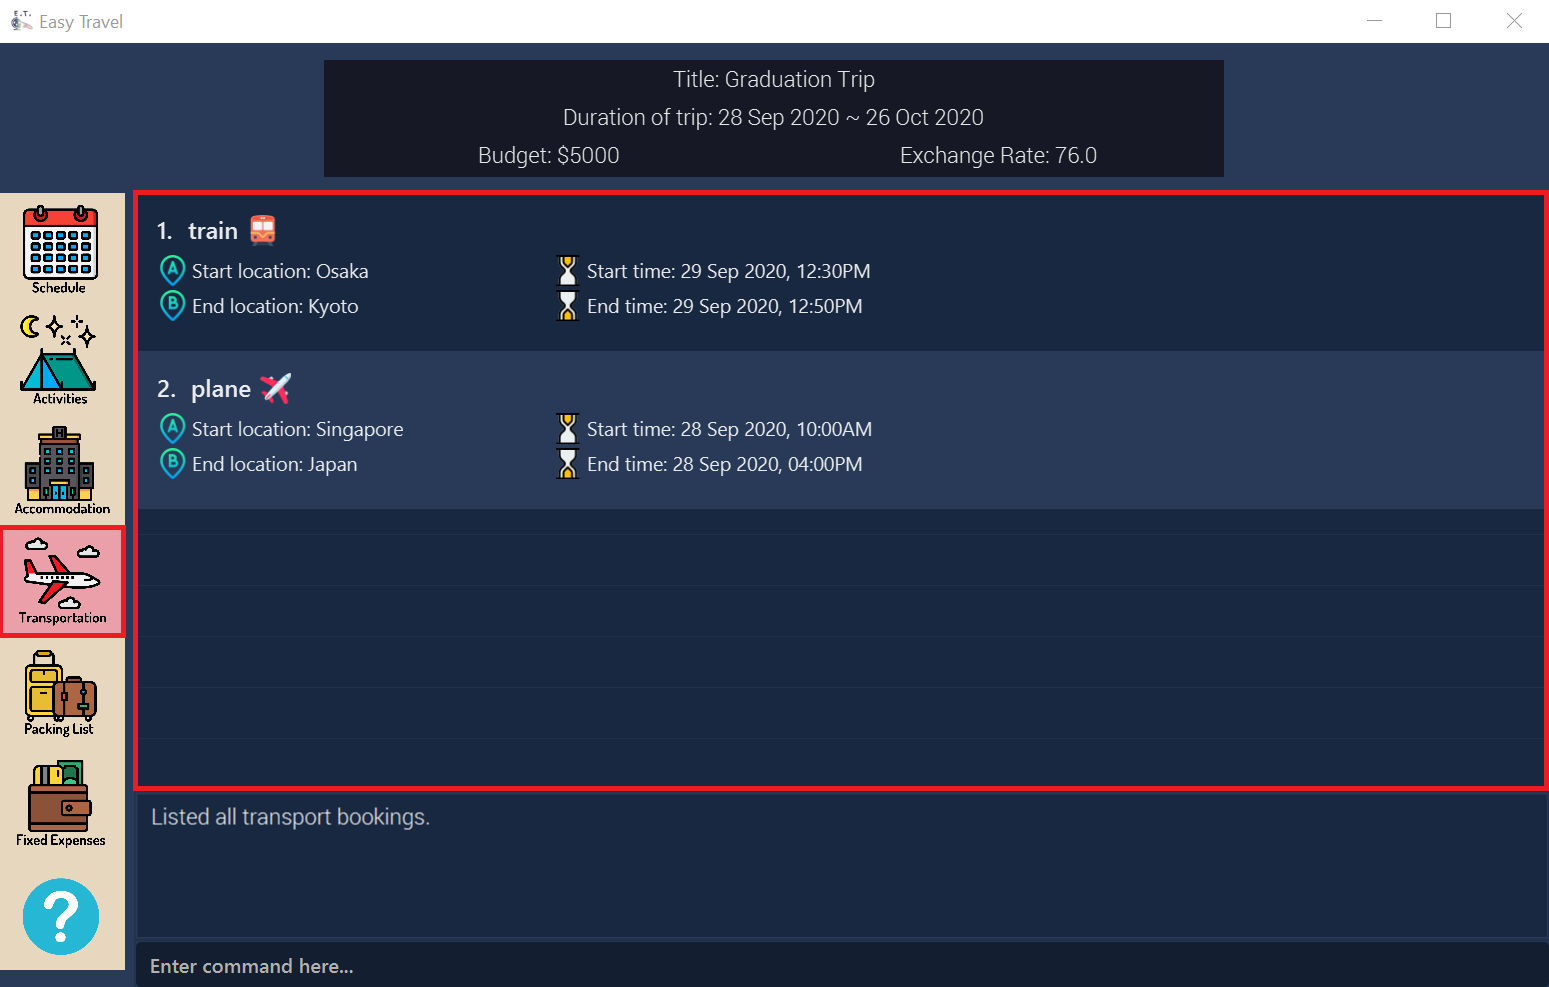
4.4.2. List all transport bookings: listtransport
You can use this command to navigate to the Transportation Tab and display all your transport bookings in E.T..
Format:
listtransport
Examples:
If you are in another tab and wish to look at your list of transport bookings, you can follow these instructions.
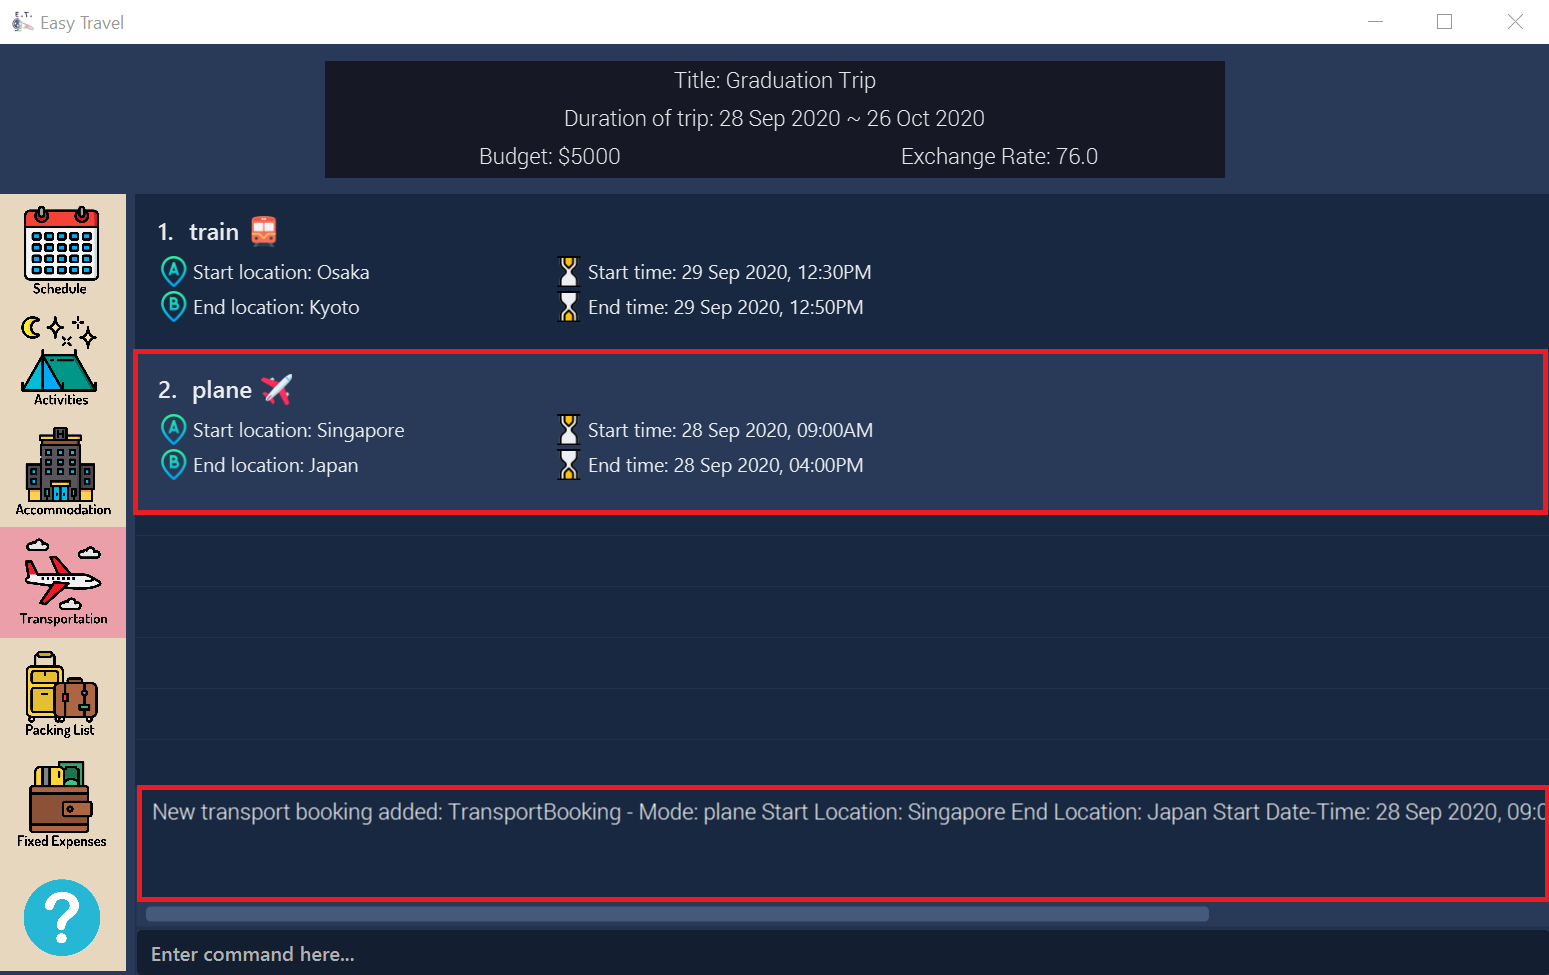
listransport command4.4.3. Add a new transport booking: addtransport
You can use this command to add a new transport booking to E.T.
Format:
addtransport mode/MODE startloc/START_LOCATION endloc/END_LOCATION starttime/START_TIME endtime/END_TIME
|
Example:
Let’s say you have a transport booking with the following information and wish to record it in E.T.
Mode of transport |
plane |
Starting location |
Singapore |
Destination |
Japan |
Time of departure |
28 September 2020 at 9:00 AM |
Time of arrival |
28 September 2020 at 4:00 PM |
You can follow these instructions:
addtransport command4.4.4. Edit an existing transportation booking: edittransport
You can use this command to edit an existing transport booking in E.T..
Format:
edittransport INDEX [mode/MODE] [startloc/START_LOCATION] [endloc/END_LOCATION] [starttime/START_TIME] [endtime/END_TIME]
|
Examples:
Assuming that you have entered the wrong time of departure for the second transport booking and want to change it to 28 September 2020, 10:00 AM.

edittransport command4.4.5. Delete an existing transportation booking: deletetransport
You can use this command to delete an existing transport booking in E.T..
Format:
deletetransport INDEX
|
Examples:
Suppose you cancelled the flight you booked previously and this flight is stored at index 1 in E.T.. You can follow the instructions below to delete this transport booking from E.T..
4.4.6. Sort the transport booking list: sorttransport
You can use this command to sort the displayed list of transport bookings.
Format:
sorttransport CRITERIA ORDER
|
Example:
If you want to look at your list of transport bookings in chronological order of departure time, you can do the following.
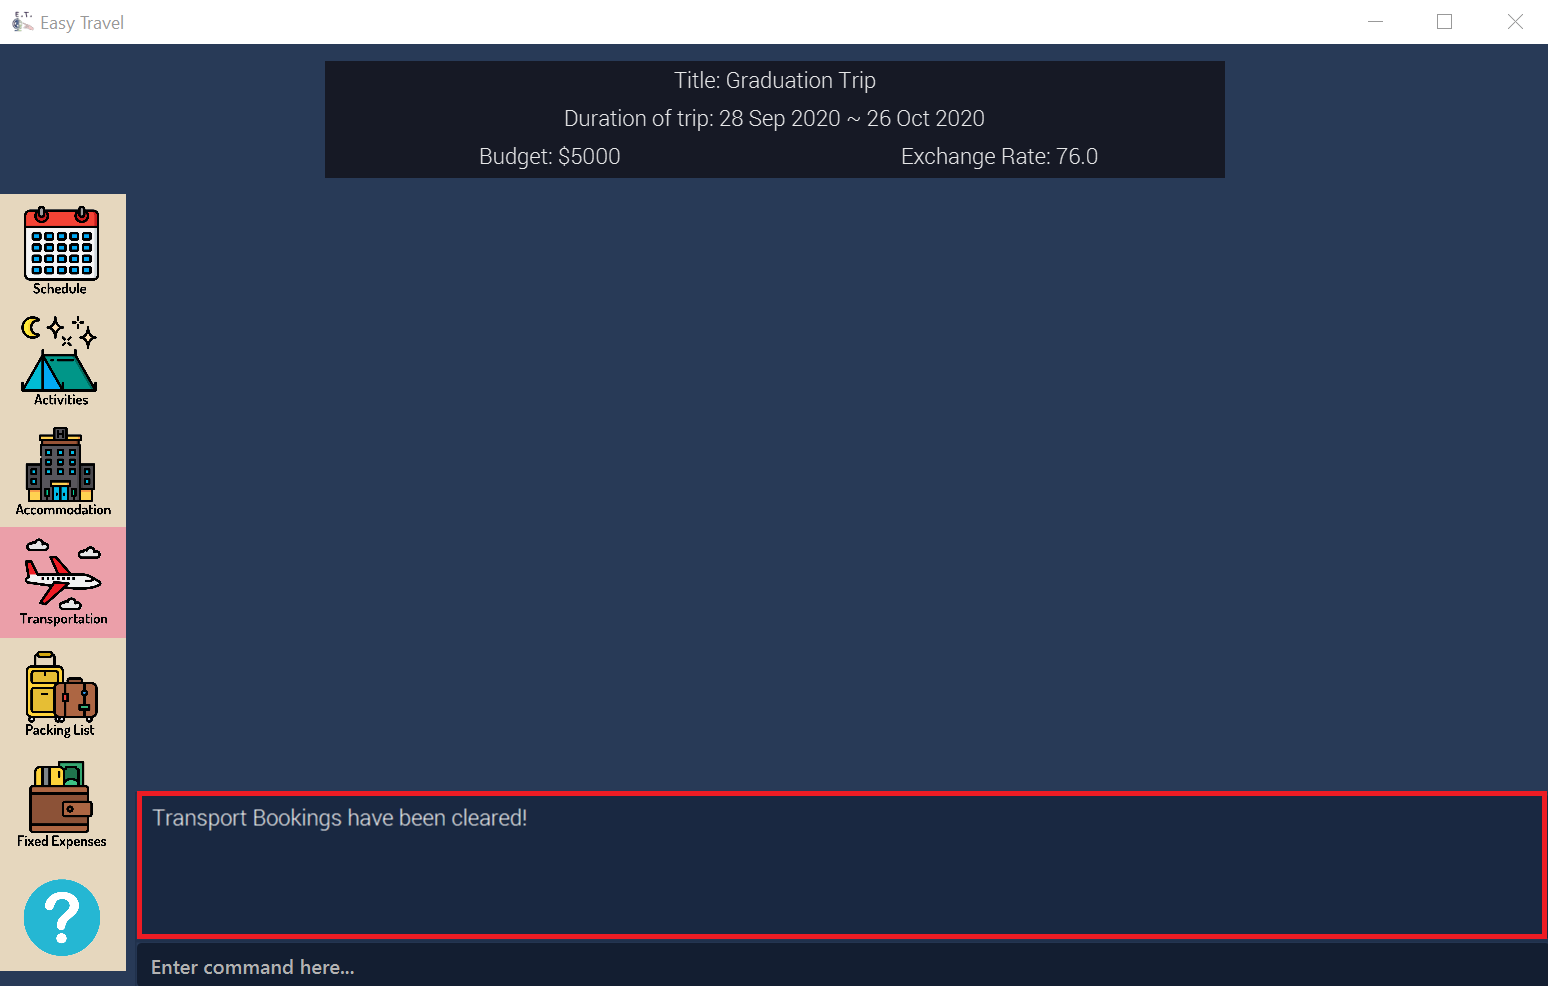
4.4.7. Clear all transportation bookings: cleartransport
You can use this command to clear and delete the whole list of transport bookings in E.T..
Format:
cleartransport
Example:
Assume you decided to cancel all your bookings at once but you do not want to delete the entire trip. You can use this command to easily wipe all traces of previous transportation booking entries and start on a clean slate by doing the following steps.
cleartransport command4.5. Accommodation Booking
(Contributed by Joshua Wee)
Accommodation is something you can miss out on planning and this feature is for you to plan for your accommodation and record them down. You can record the following information about your accommodation bookings:
-
Name of the accommodation
-
The location or address
-
The first day when you check-in
-
The last day when you check-out
-
Remarks you want to note for an accommodation booking
4.5.1. Accommodation Booking Management Command Parameters
Before you jump right into using this feature, you may want to learn about all the common command parameters used in this feature. The table below shows the list of common command parameters that will be used for this feature.
| Parameter Name | Description |
|---|---|
|
The name of the accommodation booking It must be alphanumeric words not more than 50 characters long. E.g. |
|
The location or address of the accommodation booking It must be alphanumeric words not more than 50 characters long. E.g. |
|
The first day of the accommodation booking, in terms of the day index. It must be a valid day index number. The day index number represents the number of days from the first day of your trip. The first day of your trip is index |
|
The last day of the accommodation booking, in terms of the day index. It must be a valid day index number. The day index number represents the number of days from the first day of your trip. The first day of your trip is index |
|
The remark you want to note for your accommodation booking. It must not be more than 150 characters (punctuations allowed) long. E.g. |
|
The index number of the accommodation booking in the displayed list. The first entry of the list has an index number of It must be a valid index number. |
4.5.2. List all accommodation bookings: listacc
You can use this command to navigate to the Accommodation Tab and display all your activities in E.T..
Format:
listacc
Example: If you are in another tab and wish to look at your list of accommodation bookings, you can follow these instructions.
4.5.3. Add a new accommodation booking: addacc
This command would add a new accommodation booking into your list of accommodations.
Format:
addacc name/NAME loc/LOCATION startday/START_DAY endday/END_DAY [remark/REMARK]
| Refer to Section 4.5.1, “Accommodation Booking Management Command Parameters” for more detail about each parameter. |
Examples:
Let’s say you have secured a booking of the accommodation with the following details. You can follow the following steps to record this into your list of accommodations.
Name |
JW Marriott Hotel |
Location |
KL |
Start Day |
2 |
End Day |
3 |

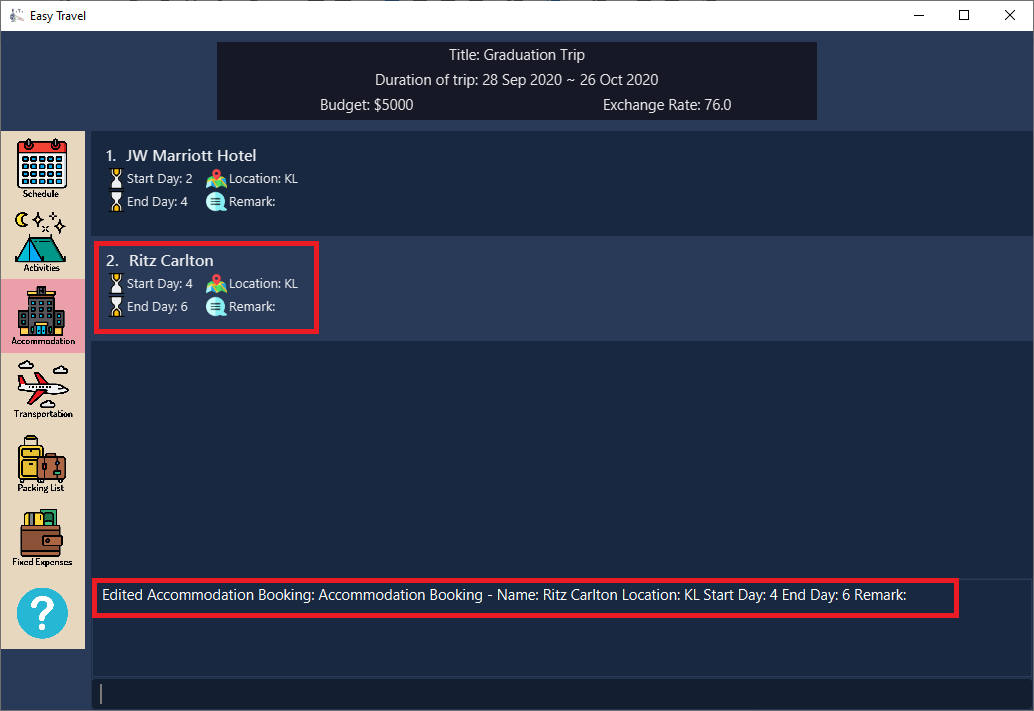
addacc command4.5.4. Edit an existing accommodation booking: editacc
This command will edit any mistakes made in the details of the accommodation booking using the specified INDEX.
Format: editacc INDEX [name/NAME] [loc/LOCATION] [startday/START_DAY] [endday/END_DAY] [remark/REMARK]
| Refer to Section 4.5.1, “Accommodation Booking Management Command Parameters” for more detail about each parameter. |
Examples:
Let’s say you decided to change the second accommodation booking to check in on day 4 and check out on day 6.
editacc command4.5.5. Delete an existing accommodation booking: deleteacc
This command would delete the accommodation booking you have added earlier using the specified INDEX
Format:
deleteacc INDEX
| Refer to Section 4.5.1, “Accommodation Booking Management Command Parameters” for more detail about the parameter. |
Examples:
Let’s say you decided to cancel on the accommodation booking that you have made earlier. The accommodation booking that you want to cancel is stored at INDEX 2 of E.T. , running the following command would delete the accommodation booking entry.
4.5.6. Sort the accommodation booking list: sortacc
You can use this command to sort the displayed list of accommodation bookings.
Format:
sortacc CRITERIA ORDER
|
|
Example:
If you want to sort your list of accommodation bookings in ascending order of name, to help you in your planning, you can do the following.
4.5.7. Clear all accommodation bookings: clearacc
This command allows you to clear all accommodation bookings you have made previously.
Format:
clearacc
Example:
Let’s say you decided to delete all accommodation bookings you have created without deleting the trip. Running this command would clear all prior accommodation booking created and let you start on a clean slate.
4.6. Packing List
(Contributed by Catherine)
If you are a forgetful person, this feature will be ideal for you. This feature allows you to manage your packing list for the trip. You can record the following information about your packing list items:
-
Name
-
Quantity
-
Category
4.6.1. Packing List Item Management Command Parameters
Before you jump right in to use this feature, you may want to learn about all the common command parameters used in this feature. The table below shows the list of common command parameters that will be used for this feature.
| Parameter Name | Description |
|---|---|
|
The name of the packing list item.
|
|
The quantity of the item. It must be a positive integer not more than 100000.
|
|
The category that the item is classified in.
|
|
The index number of the packing list item in the displayed list. The first entry of the list has an index number of
|
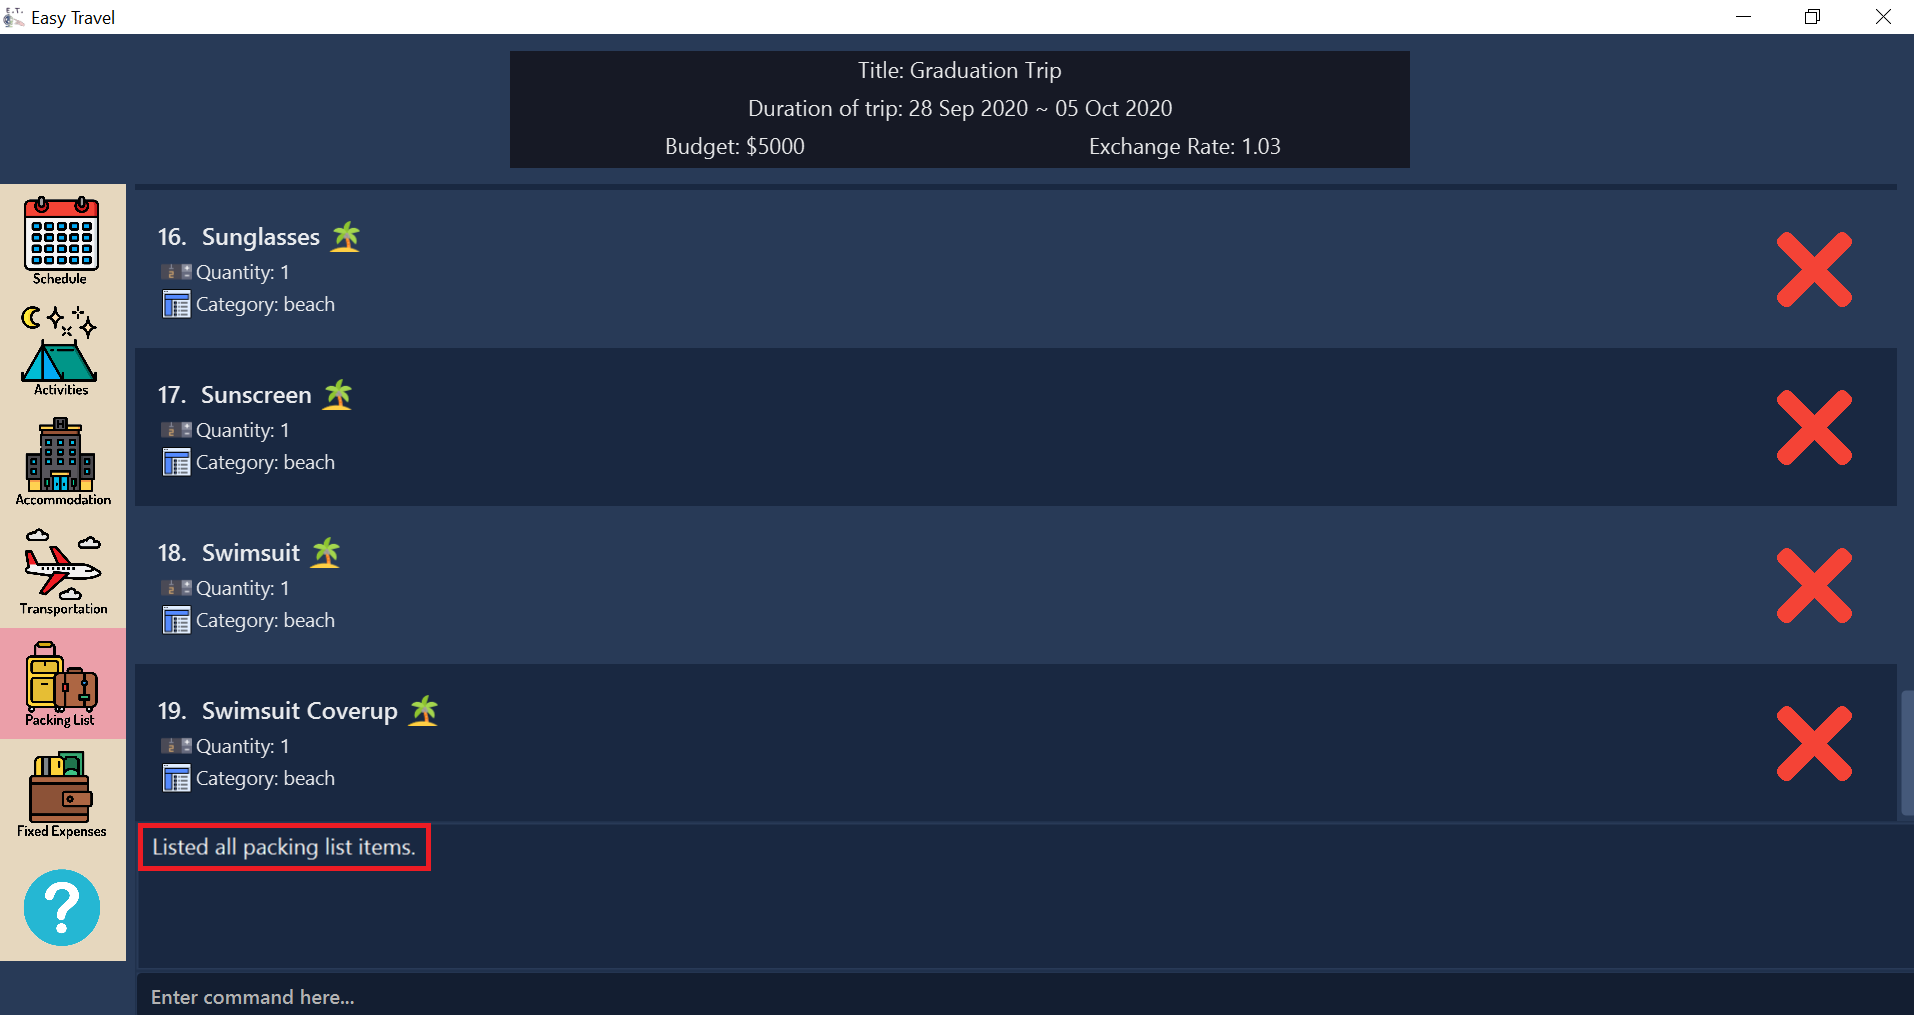
4.6.2. List all packing list items: listitem
You can use this command to navigate to the Packing List Tab and display your packing list in E.T..
Format:
listitem
Examples:
If you are in another tab and wish to look at your packing list, you can follow these instructions.
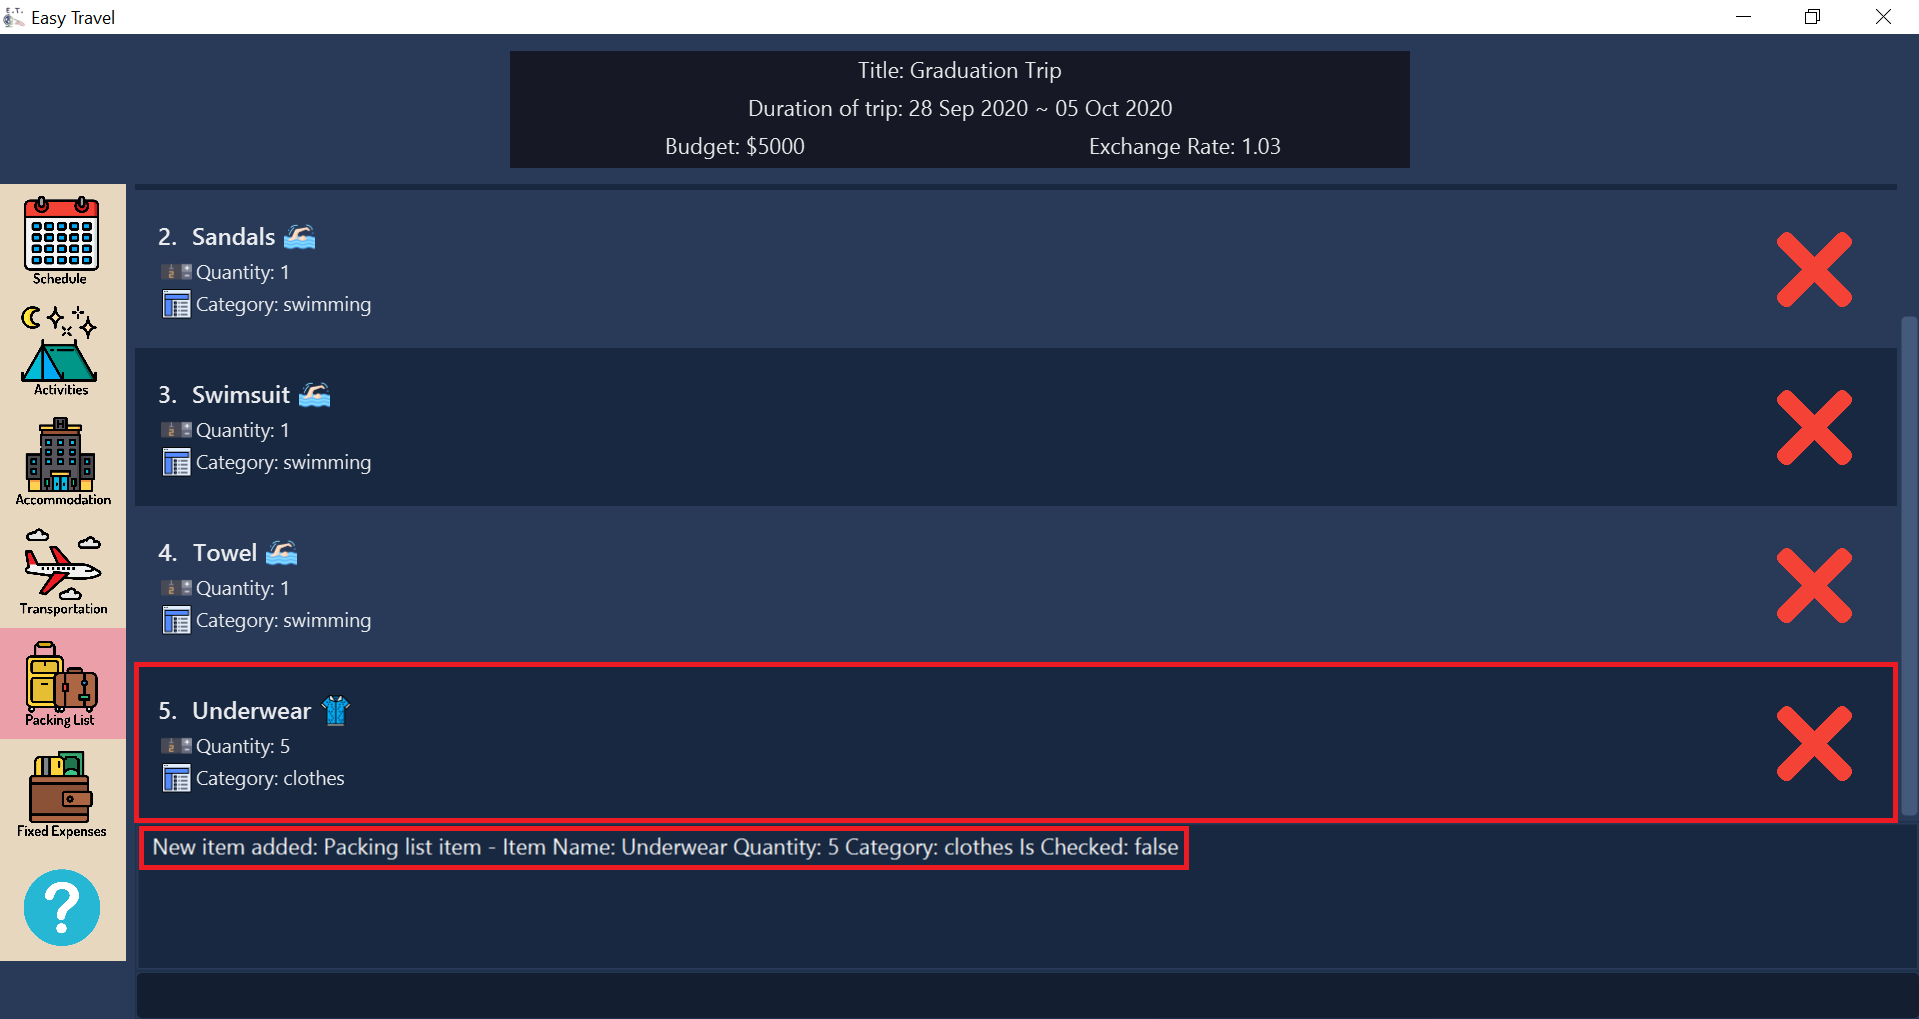
listitem command4.6.3. Add a new packing list item: additem
This command allows you to add a new item into your packing list.
Format:
additem name/NAME quantity/QUANTITY category/CATEGORY
|
Example:
additem name/underwear quantity/5 category/clothes
Suppose you want to add a new item with the following information and wish to record it in E.T..
|
underwear |
|
5 |
|
clothes |
You can follow these instructions:
additem command4.6.4. Edit an existing packing list item: edititem
This command allows you to edit any mistake made in the details of an existing item.
Format: edititem INDEX [name/NAME] [quantity/QUANTITY] [category/CATEGORY]
|
Examples:
edititem 5 name/boxer quantity/3 category/essentials
Let’s say you want to edit the item at index 5 to the following information:
| Current | Edited | |
|---|---|---|
|
Underwear |
Boxer |
|
5 |
3 |
|
clothes |
essentials |
You can follow these instructions:
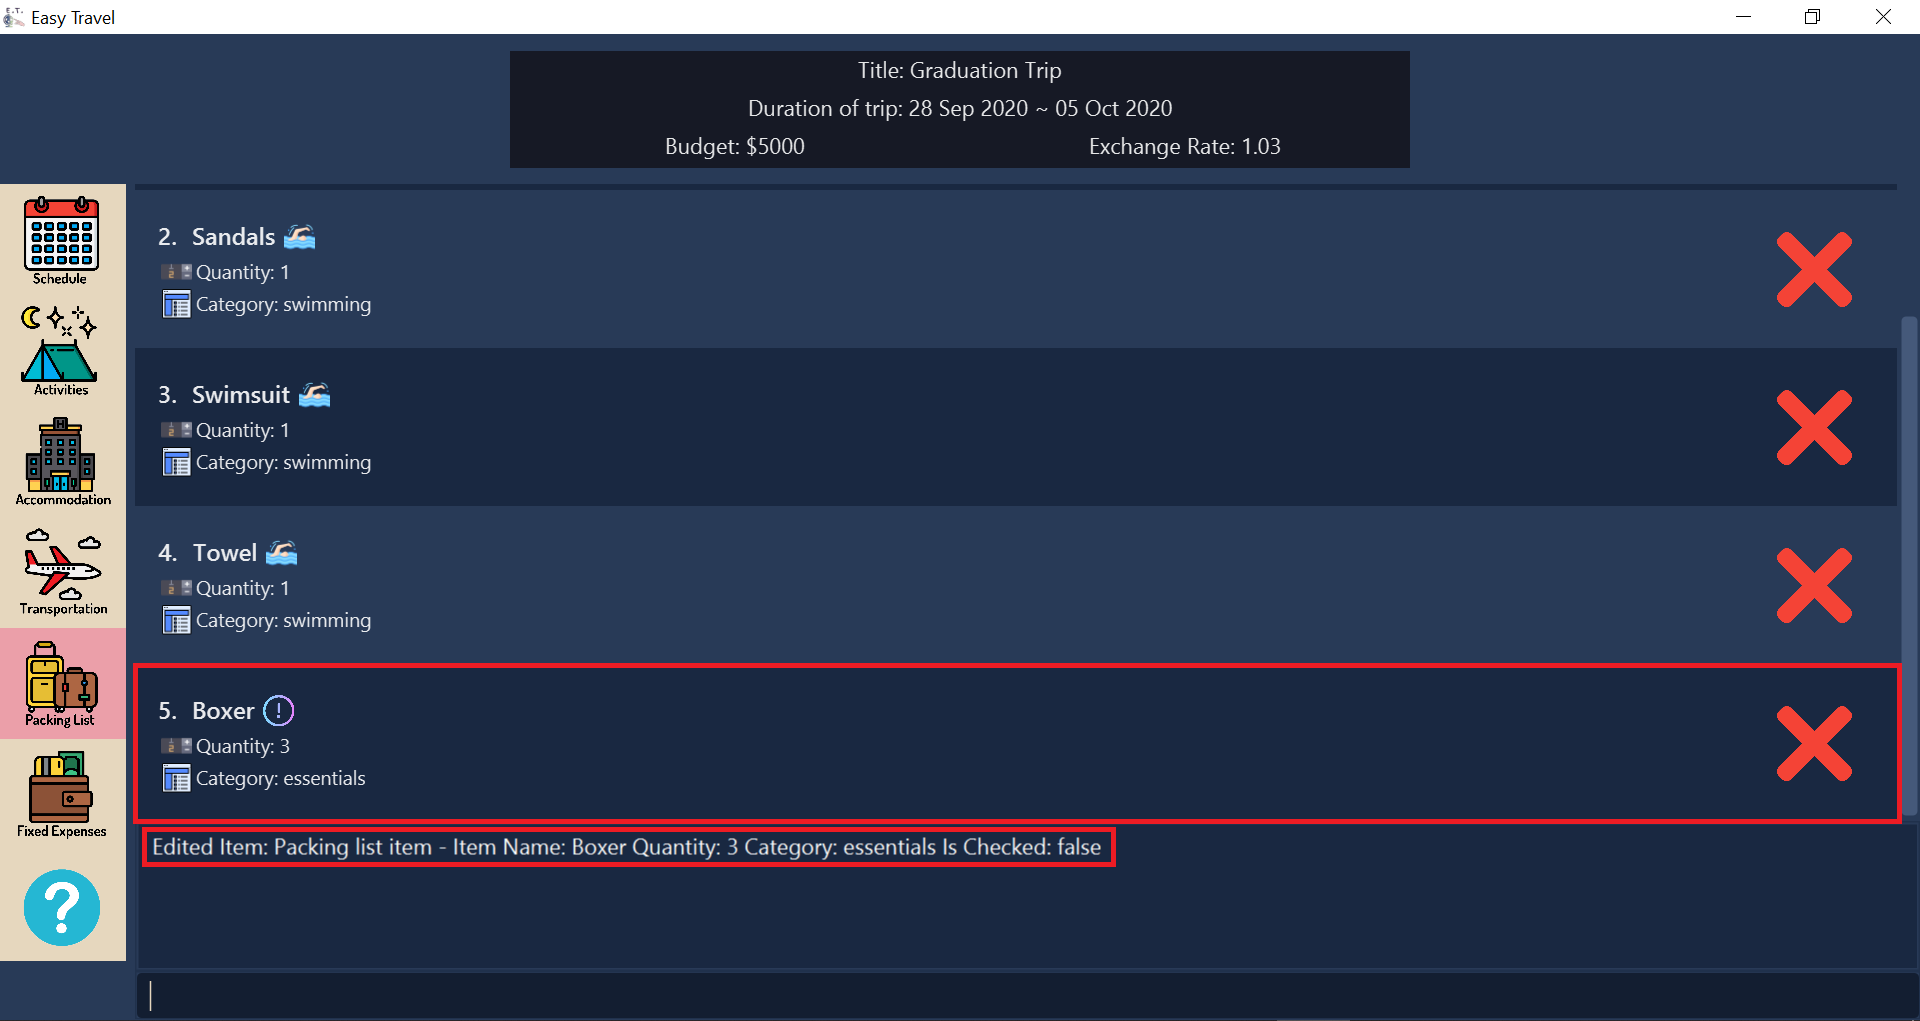
edititem command4.6.5. Delete an existing packing list item: deleteitem
This command would delete the packing list item at the INDEX that you specified. The INDEX should be corresponding to the index shown in the packing list.
Format:
deleteitem INDEX
|
Examples:
Let’s say you want to delete the first item in the packing list. You can follow these instructions:

deleteitem command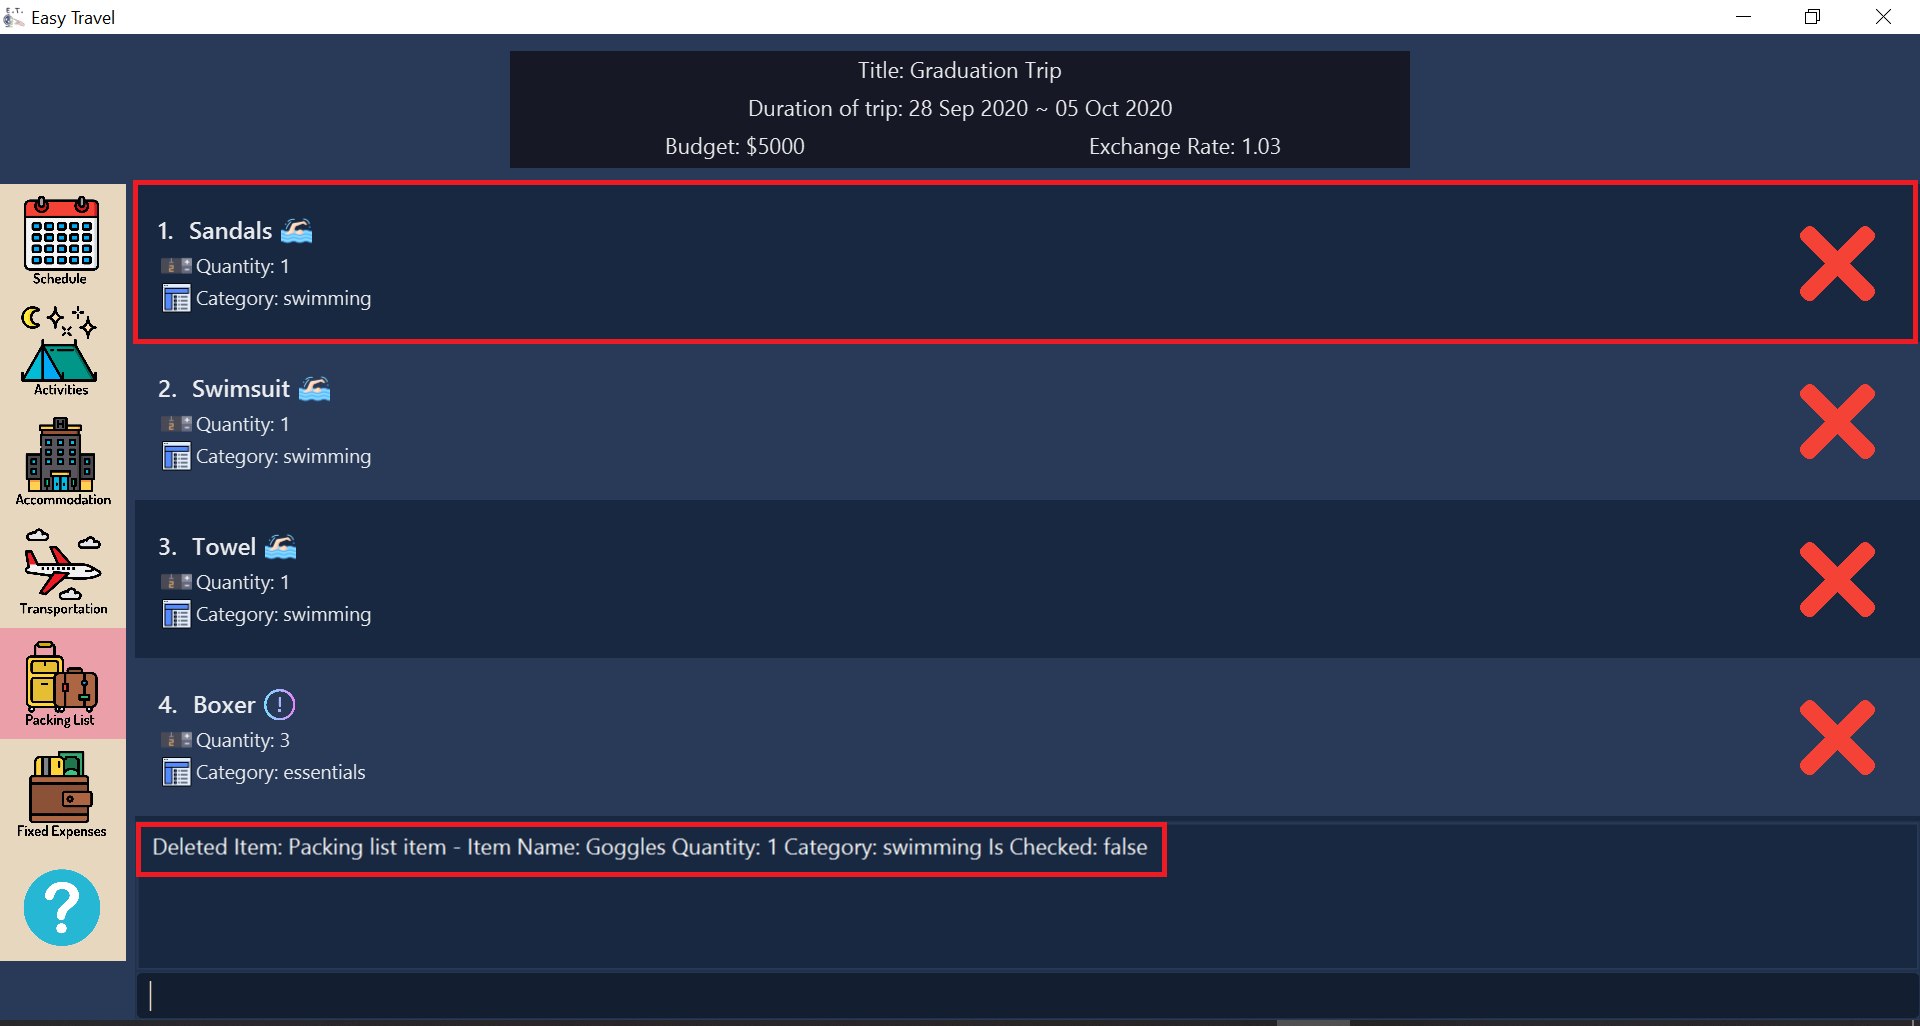
deleteitem command4.6.6. Mark an existing packing list item as packed: checkitem
This command marks an item as packed in your packing list.
Format:
checkitem INDEX [MORE_INDEXES]…
|
Examples:
checkitem 1 3 14 17
Let’s assume you want to mark the first, third, fifth and sixth items in the packing list as packed. You can follow these instructions.
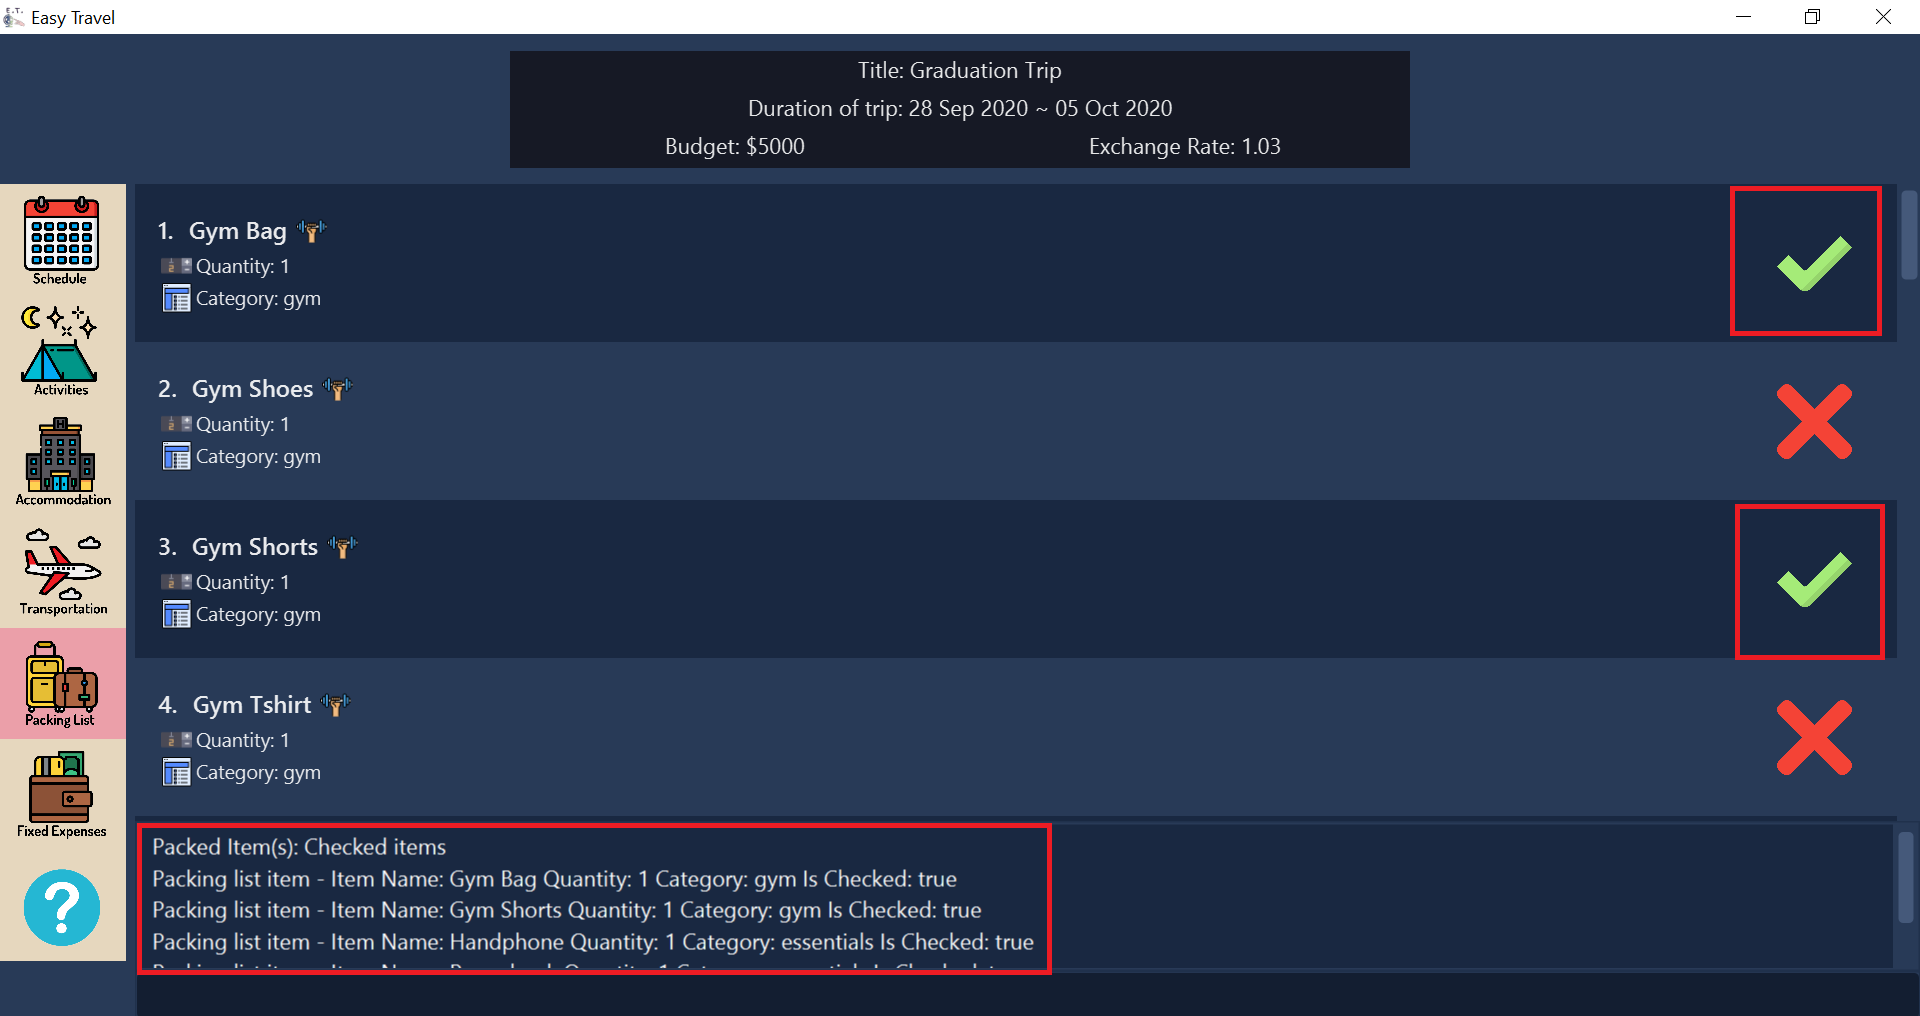
checkitem command part 1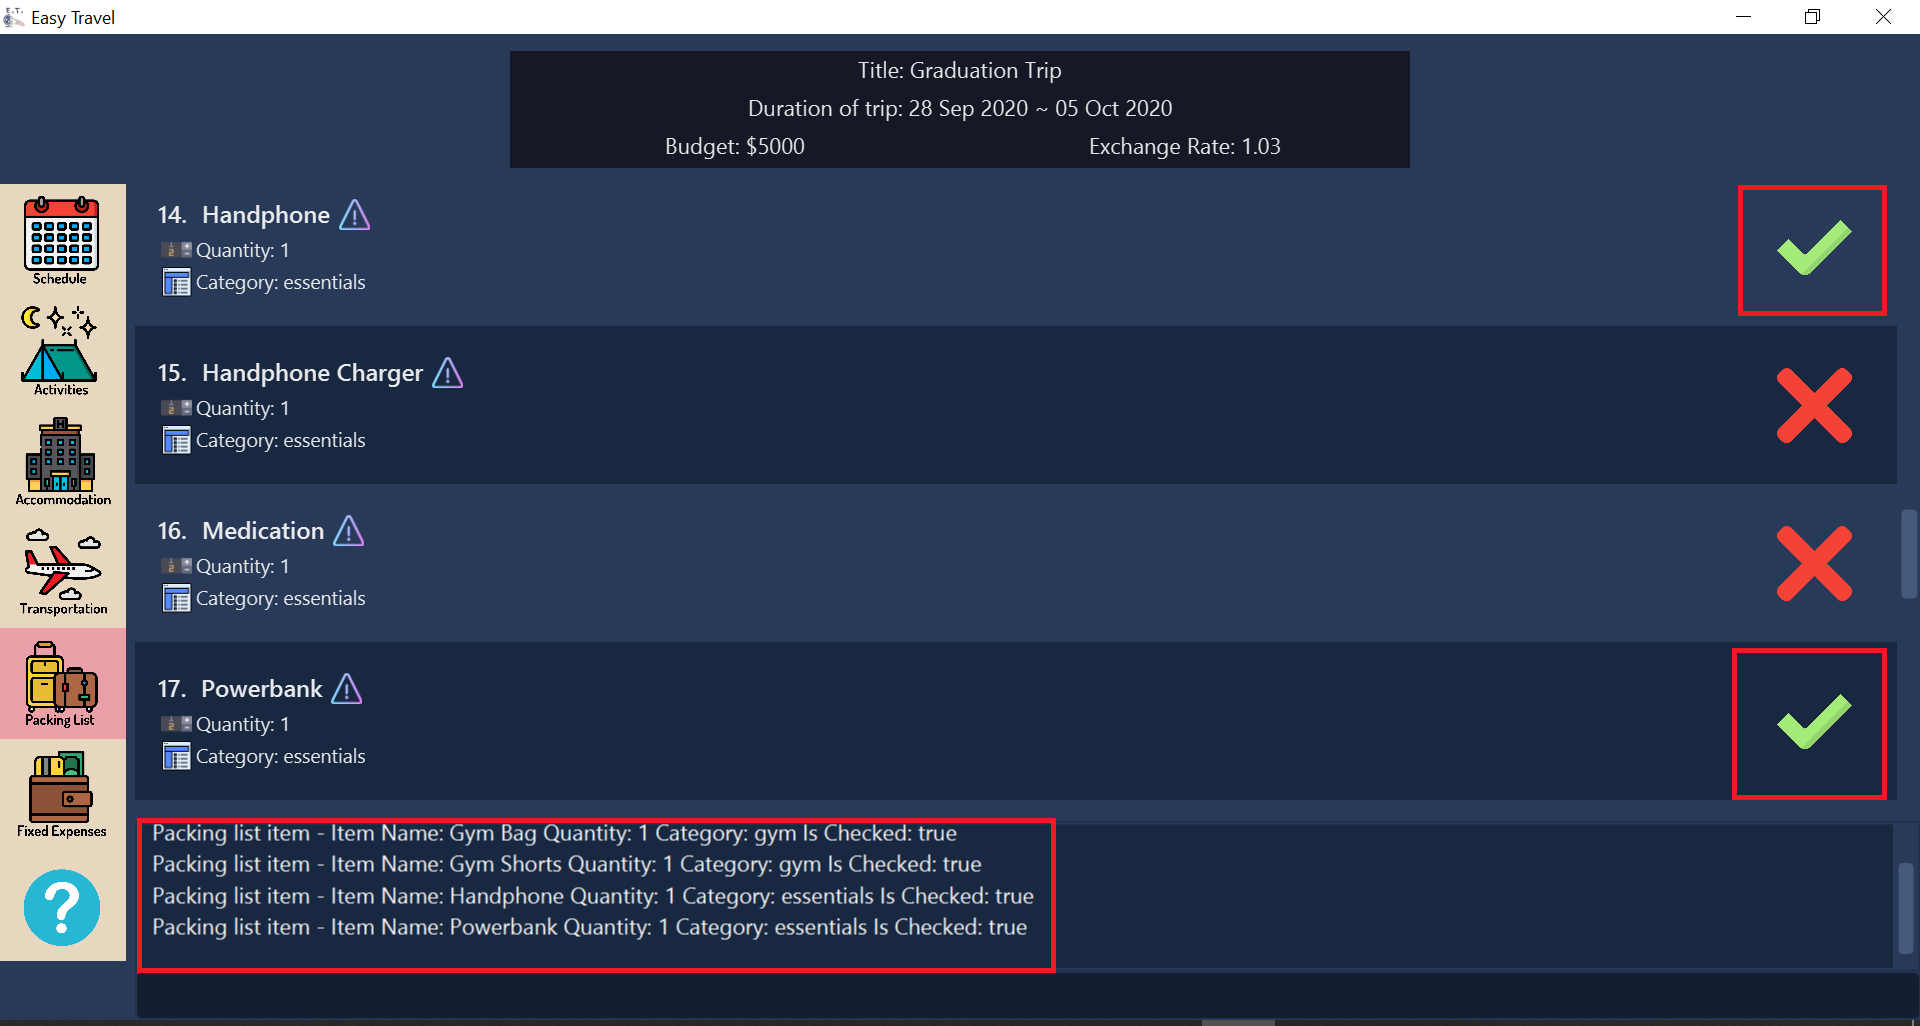
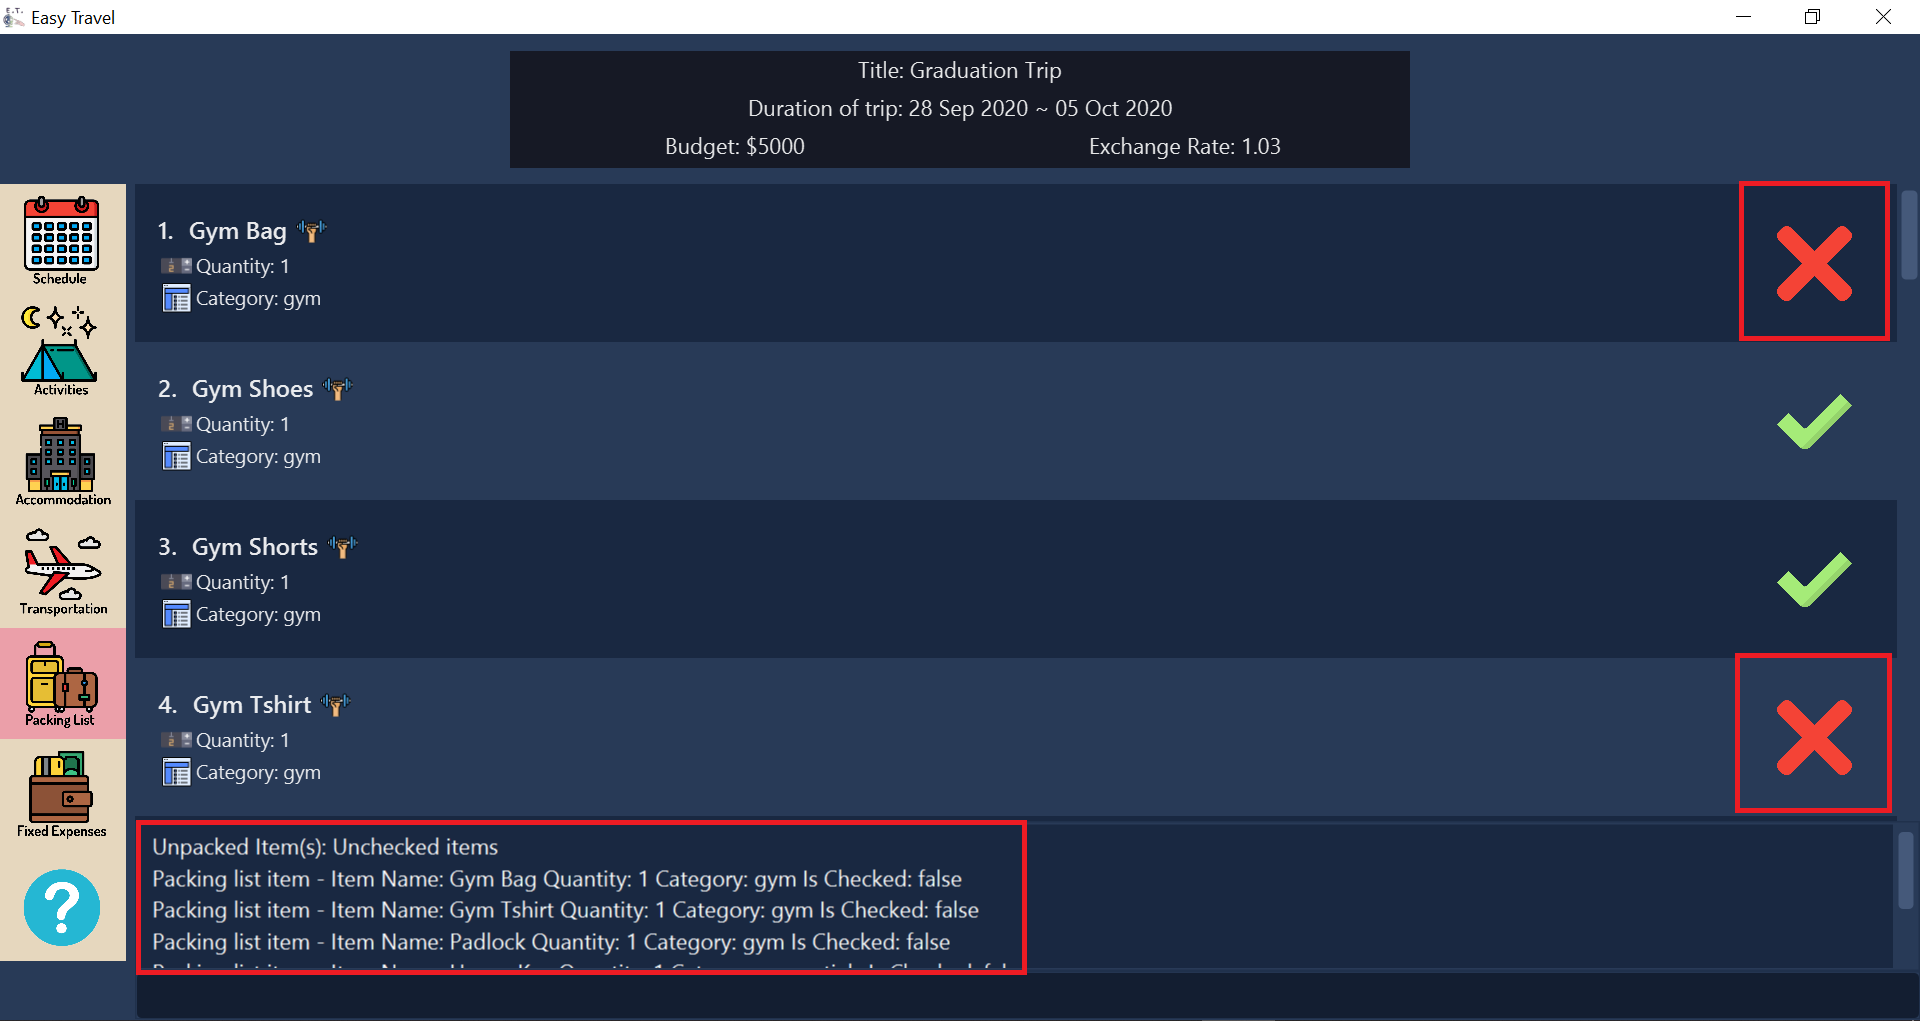
checkitem command part 24.6.7. Mark an existing packing list item as not packed: uncheckitem
This command marks an item as not packed in your packing list.
Format:
uncheckitem INDEX [MORE_INDEXES]…
|
Examples:
uncheckitem 1 4 7 13 16
Imagine you want to mark the first, fourth, seventh, thirteenth and sixteenth items in the packing list as not packed. You can follow these instructions.
uncheckitem command part 1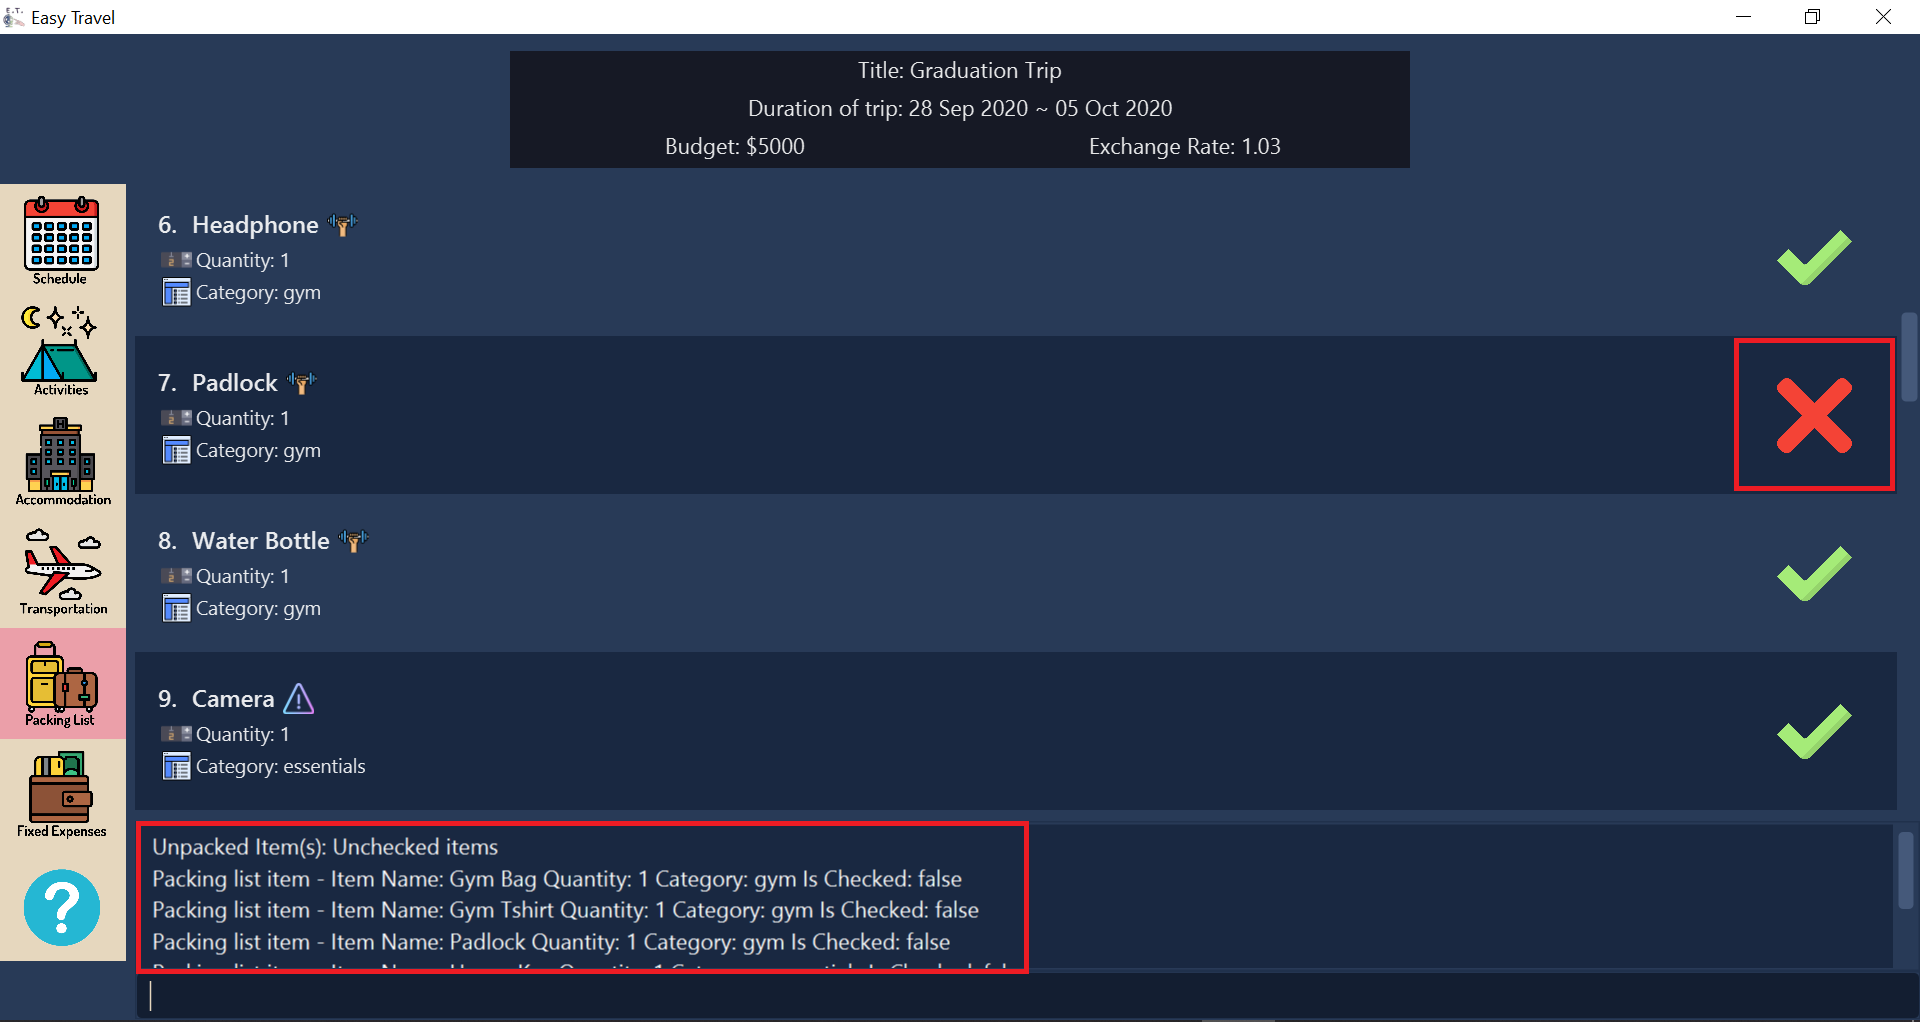
uncheckitem command part 2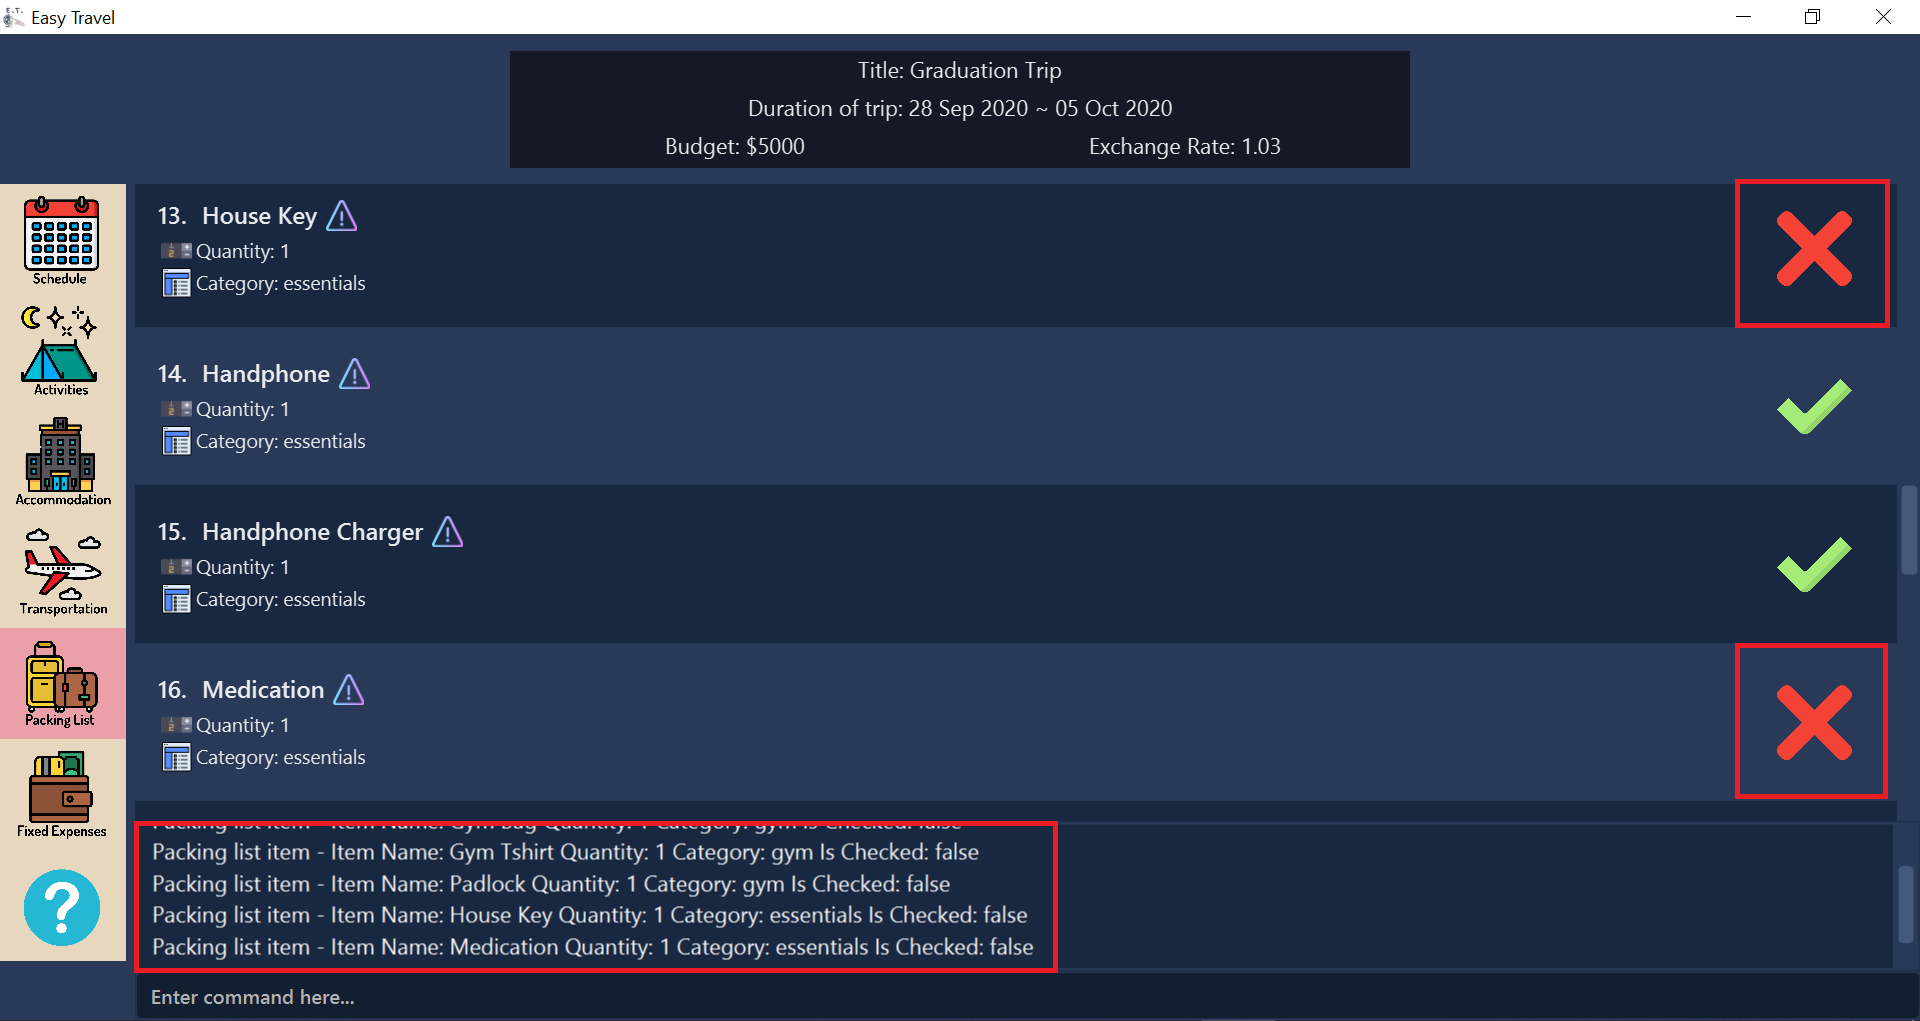
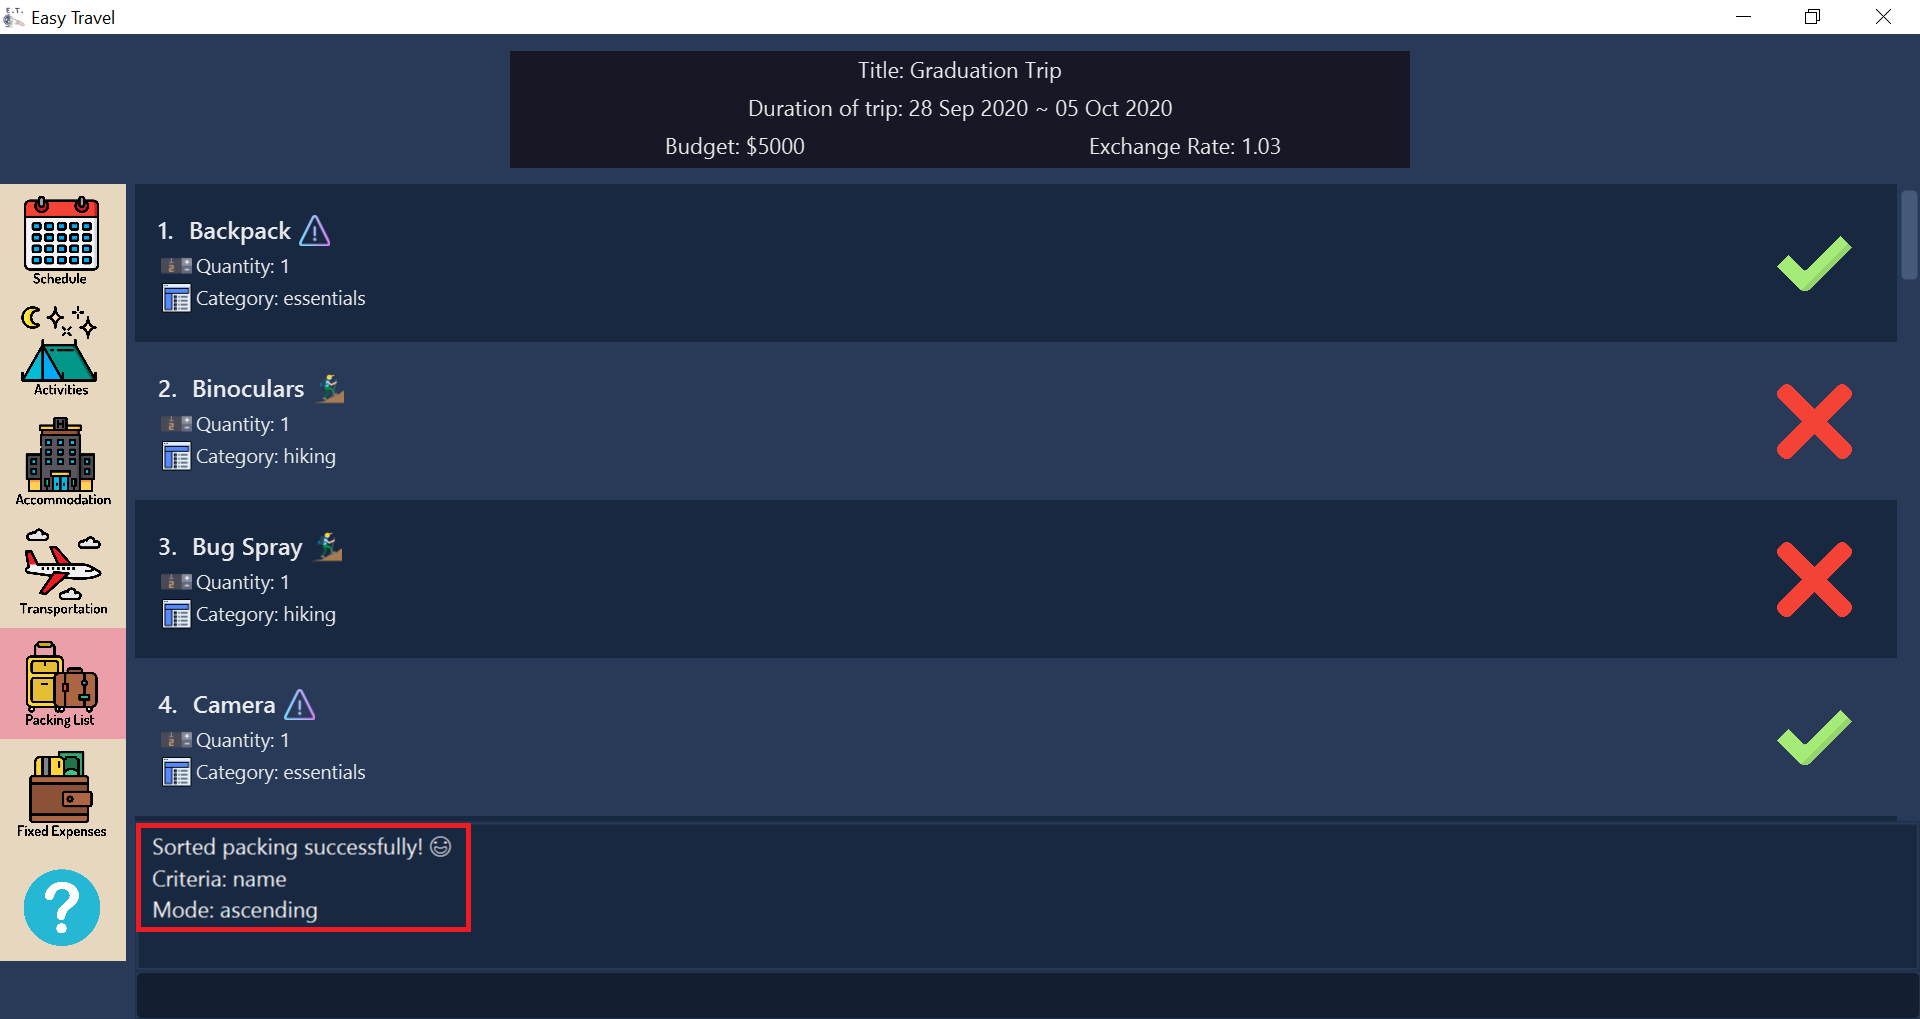
uncheckitem command part 34.6.8. Sort the packing list: sortitem
You can sort your packing list using this command.
Format:
sortitem CRTIERIA ORDER
|
Examples:
sortitem name asc
In the case where you want to sort the packing list by alphabetical order, and in ascending order. You can follow these instructions.
sortitem command part 1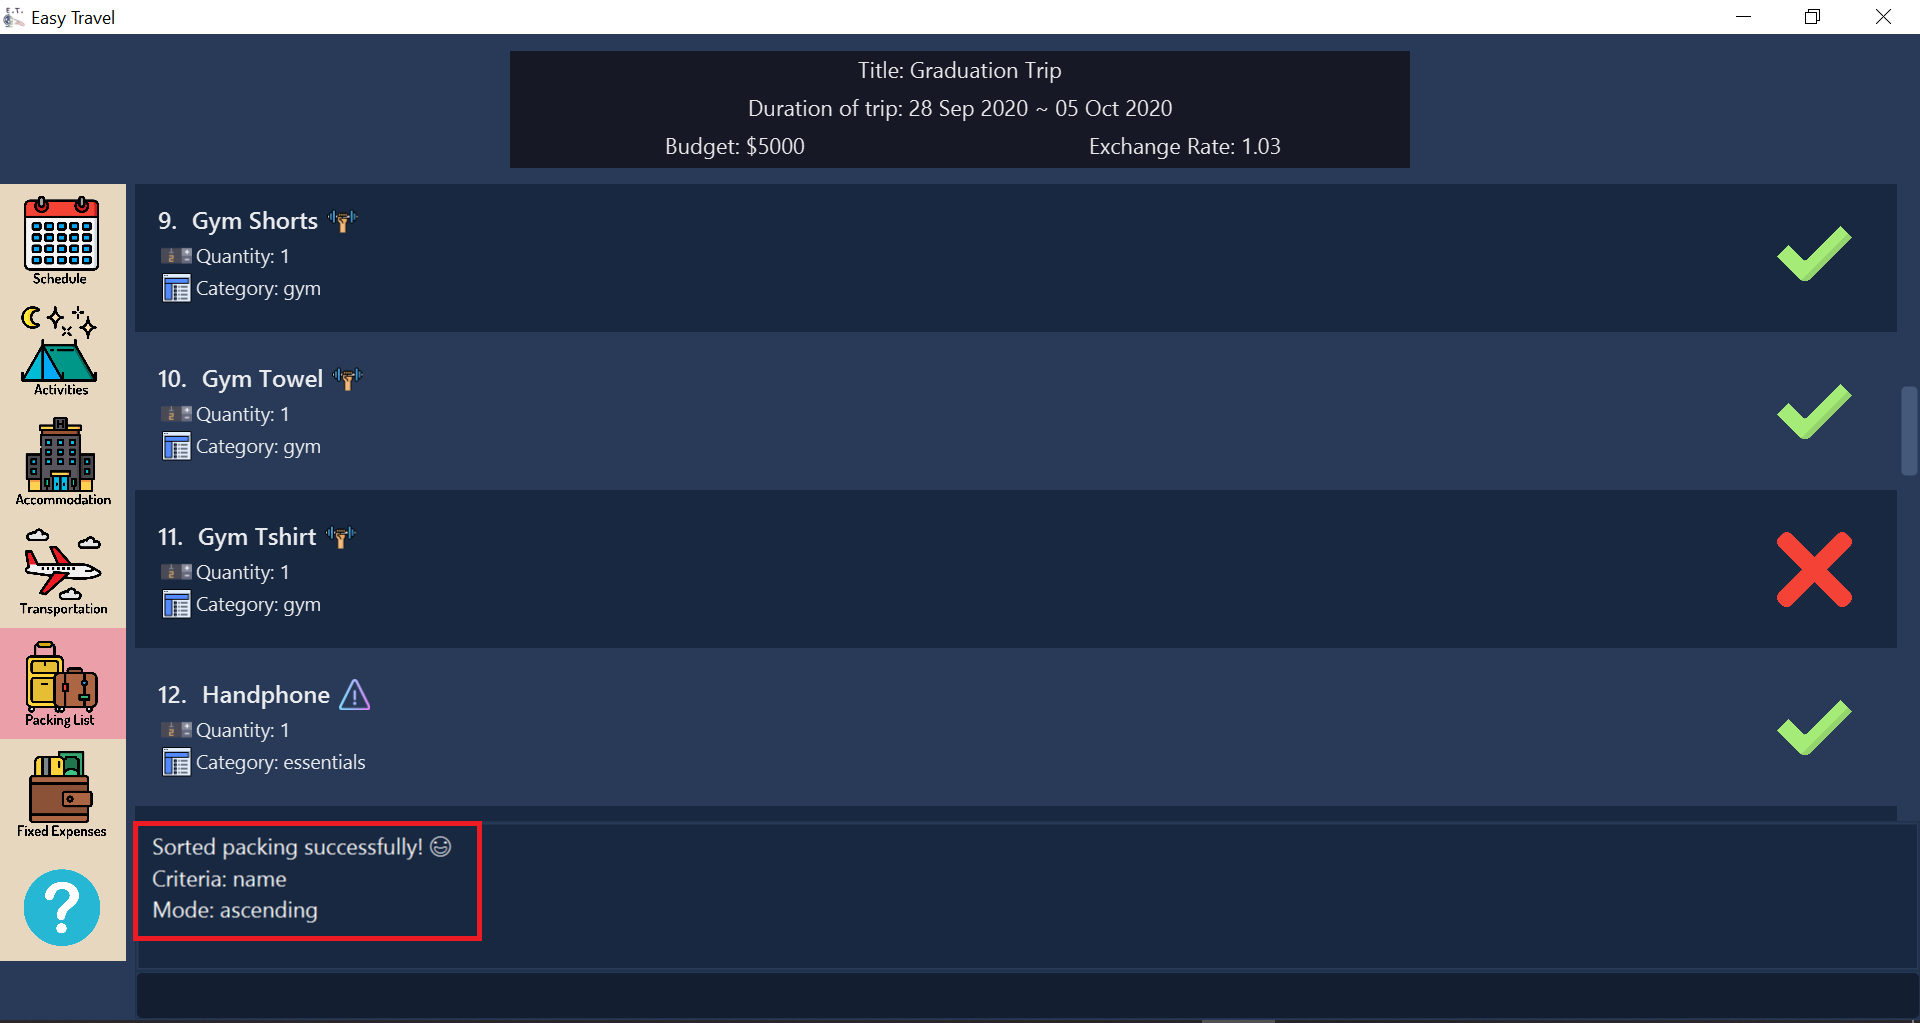
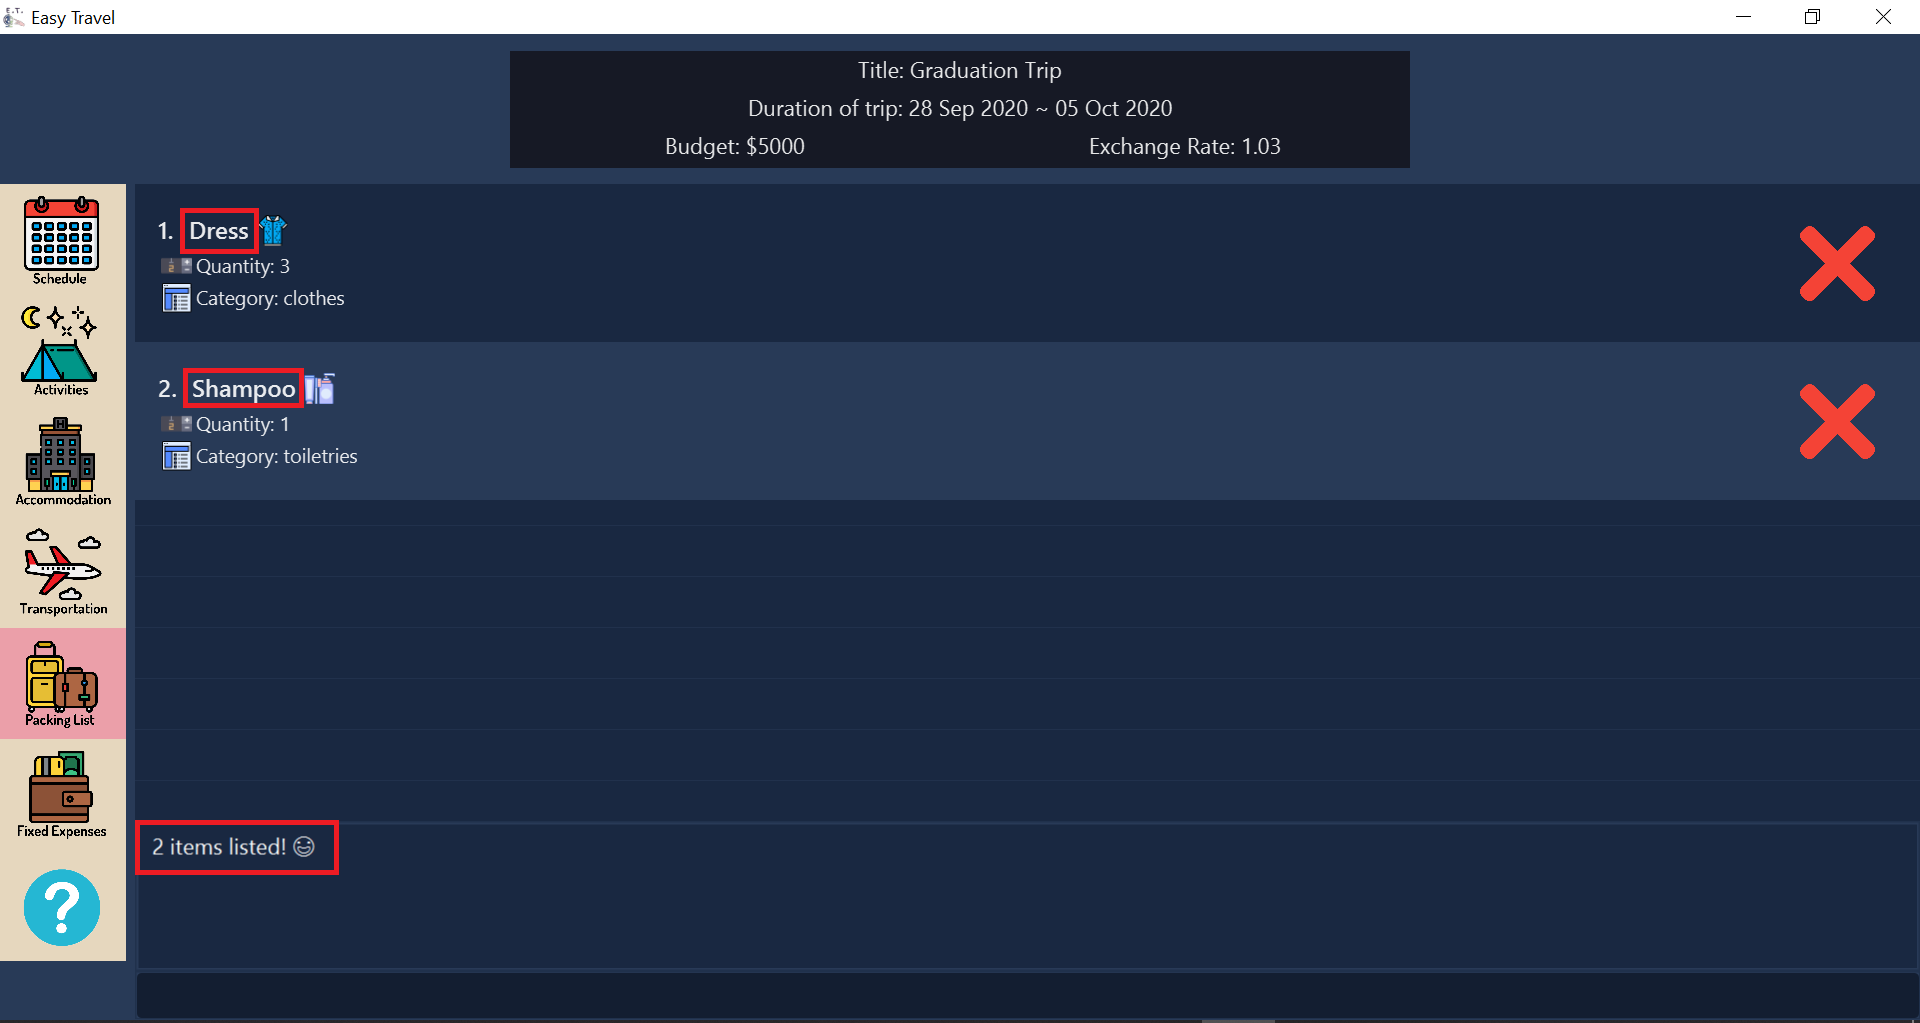
sortitem command part 24.6.9. Find packing list items by name: finditem
This command finds items in your packing list according to the names specified by you.
Format: finditem KEYWORD [MORE_KEYWORDS]…
|
Examples:
finditem shampoo dress
Suppose you want to find items that contain either shampoo or dress in its name in the packing list. You can follow these instructions.
4.6.10. Find packing list items by category: finditemcategory
This command finds items in your packing list according to the categories specified by you.
Format: finditemcategory CATEGORY [MORE_CATEGORIES]…
|
Examples:
finditemcategory international clothes
Presuming you want to find items that are either in the international or clothes category. You can follow these instructions.

finditemcategory command4.6.11. Clear all packing list items: clearitem
This command clears all items in your packing list.
Format:
clearitem
Examples:
clearitem
In the circumstance that you want to delete all the items in your packing list, to start from an empty packing list. You can follow these instructions.

clearitem command4.6.12. Add a new preset (built-in list): addpreset
E.T. contains some basic built-in list of items, grouped by categories. This is to enhance your planning experience as you can add many common items just by one command. The term preset will be used to describe these lists of items. You can use this command to add presets by their category name. Refer to Section 4.6.13, “List all presets: listpreset” to find out what are some presets you can use.
Format:
addpreset CATEGORY
|
Examples:
Assuming you will be going to the beach during your trip, but you are too lazy to add a packing list item one-by-one. You will like to add all the items in the beach category into your packing list. You can follow these instructions.
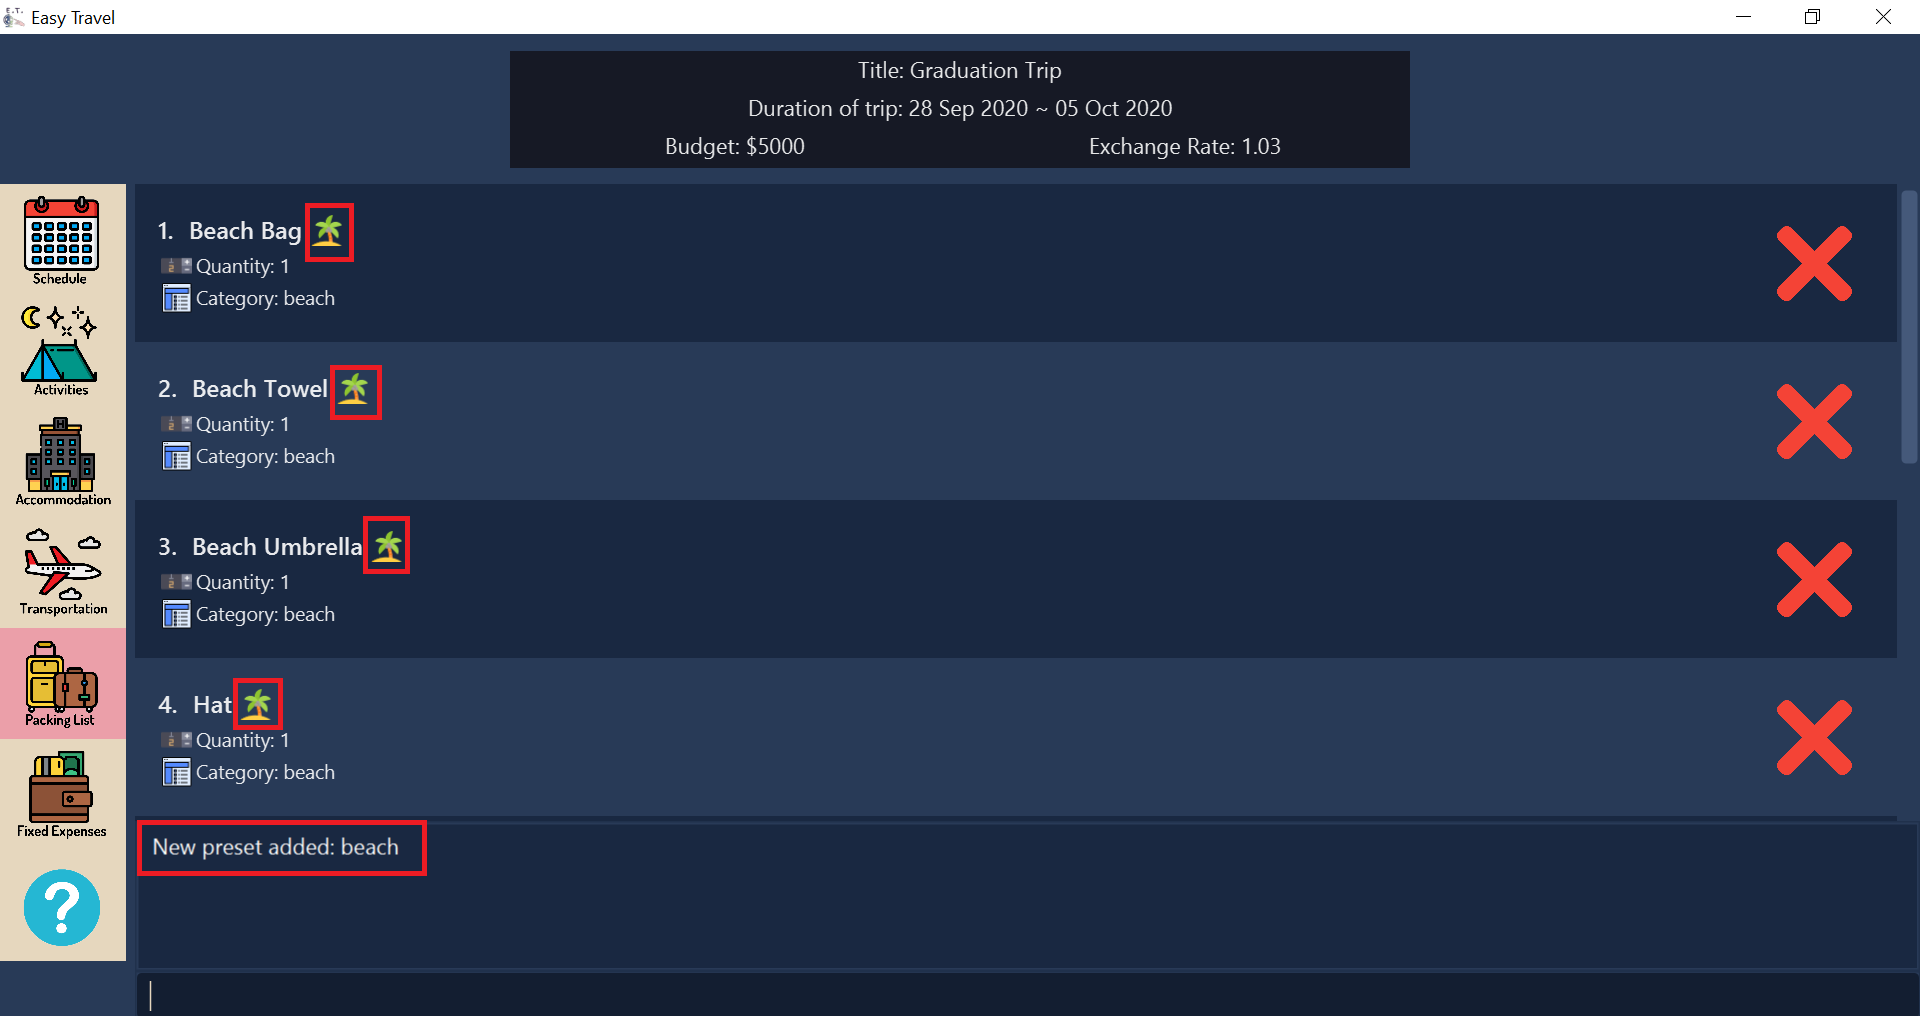
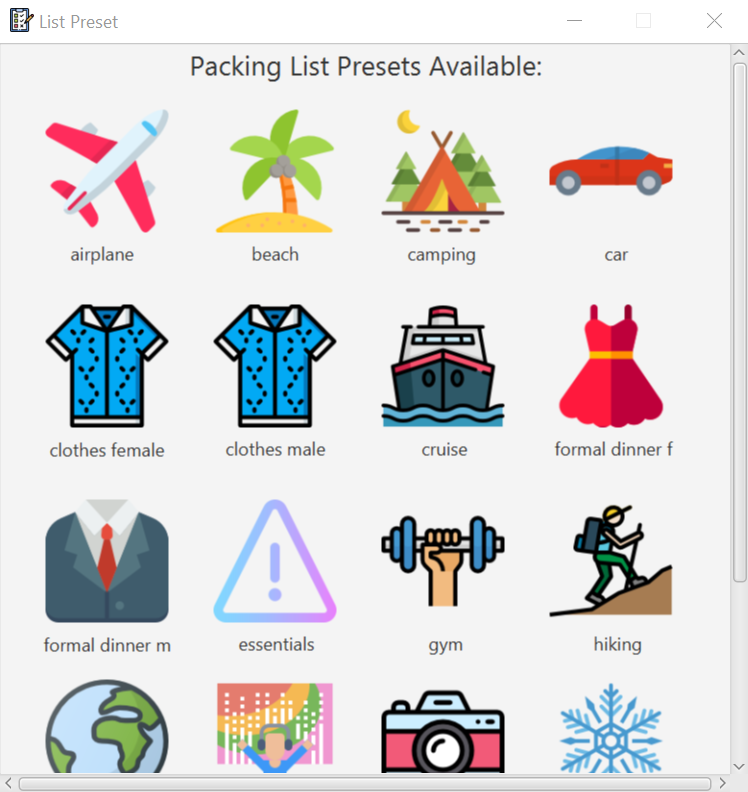
addpreset command4.6.13. List all presets: listpreset
This command lists all the default presets available for you to use. (See Section 4.6.12, “Add a new preset (built-in list): addpreset” for more information about presets.)
Format:
listpreset
|
Examples:
In the case that you want to add a list of items under a pre-existing category, but you are not sure of the available presets you can use. You can follow these instructions.
listpreset command4.7. Fixed Expense Management
(Contributed by Joshua Lay)
The Fixed Expense Manager comprises a list which allows you to set your fixed expenses before your trip. This would help you plan a suitable budget for your upcoming trip.
Examples of Fixed Expenses that you can include are as follows,
4.7.1. Fixed Expense Management Command Parameters
Before jumping into the various features the Fixed Expense Manager offers, it might be beneficial to take some time looking at the common command parameters that are used in this feature. This is shown in the table below.
| Parameter Name | Description |
|---|---|
|
The amount of money for your fixed expense. It must be a positive number with at most 2 decimal places. It must also be less than 1,000,000,000. Example: |
|
Currency the fixed expense is in. It can only take the value of |
|
The description of the fixed expense. It must be words made up of alphanumeric characters not more than 50 characters long. Example: Plane Tickets |
|
The category of the fixed expense. It can take the value of |
|
The index number of the fixed expense entry in the displayed list.
The first entry of the list has an index of It must be a valid index. |
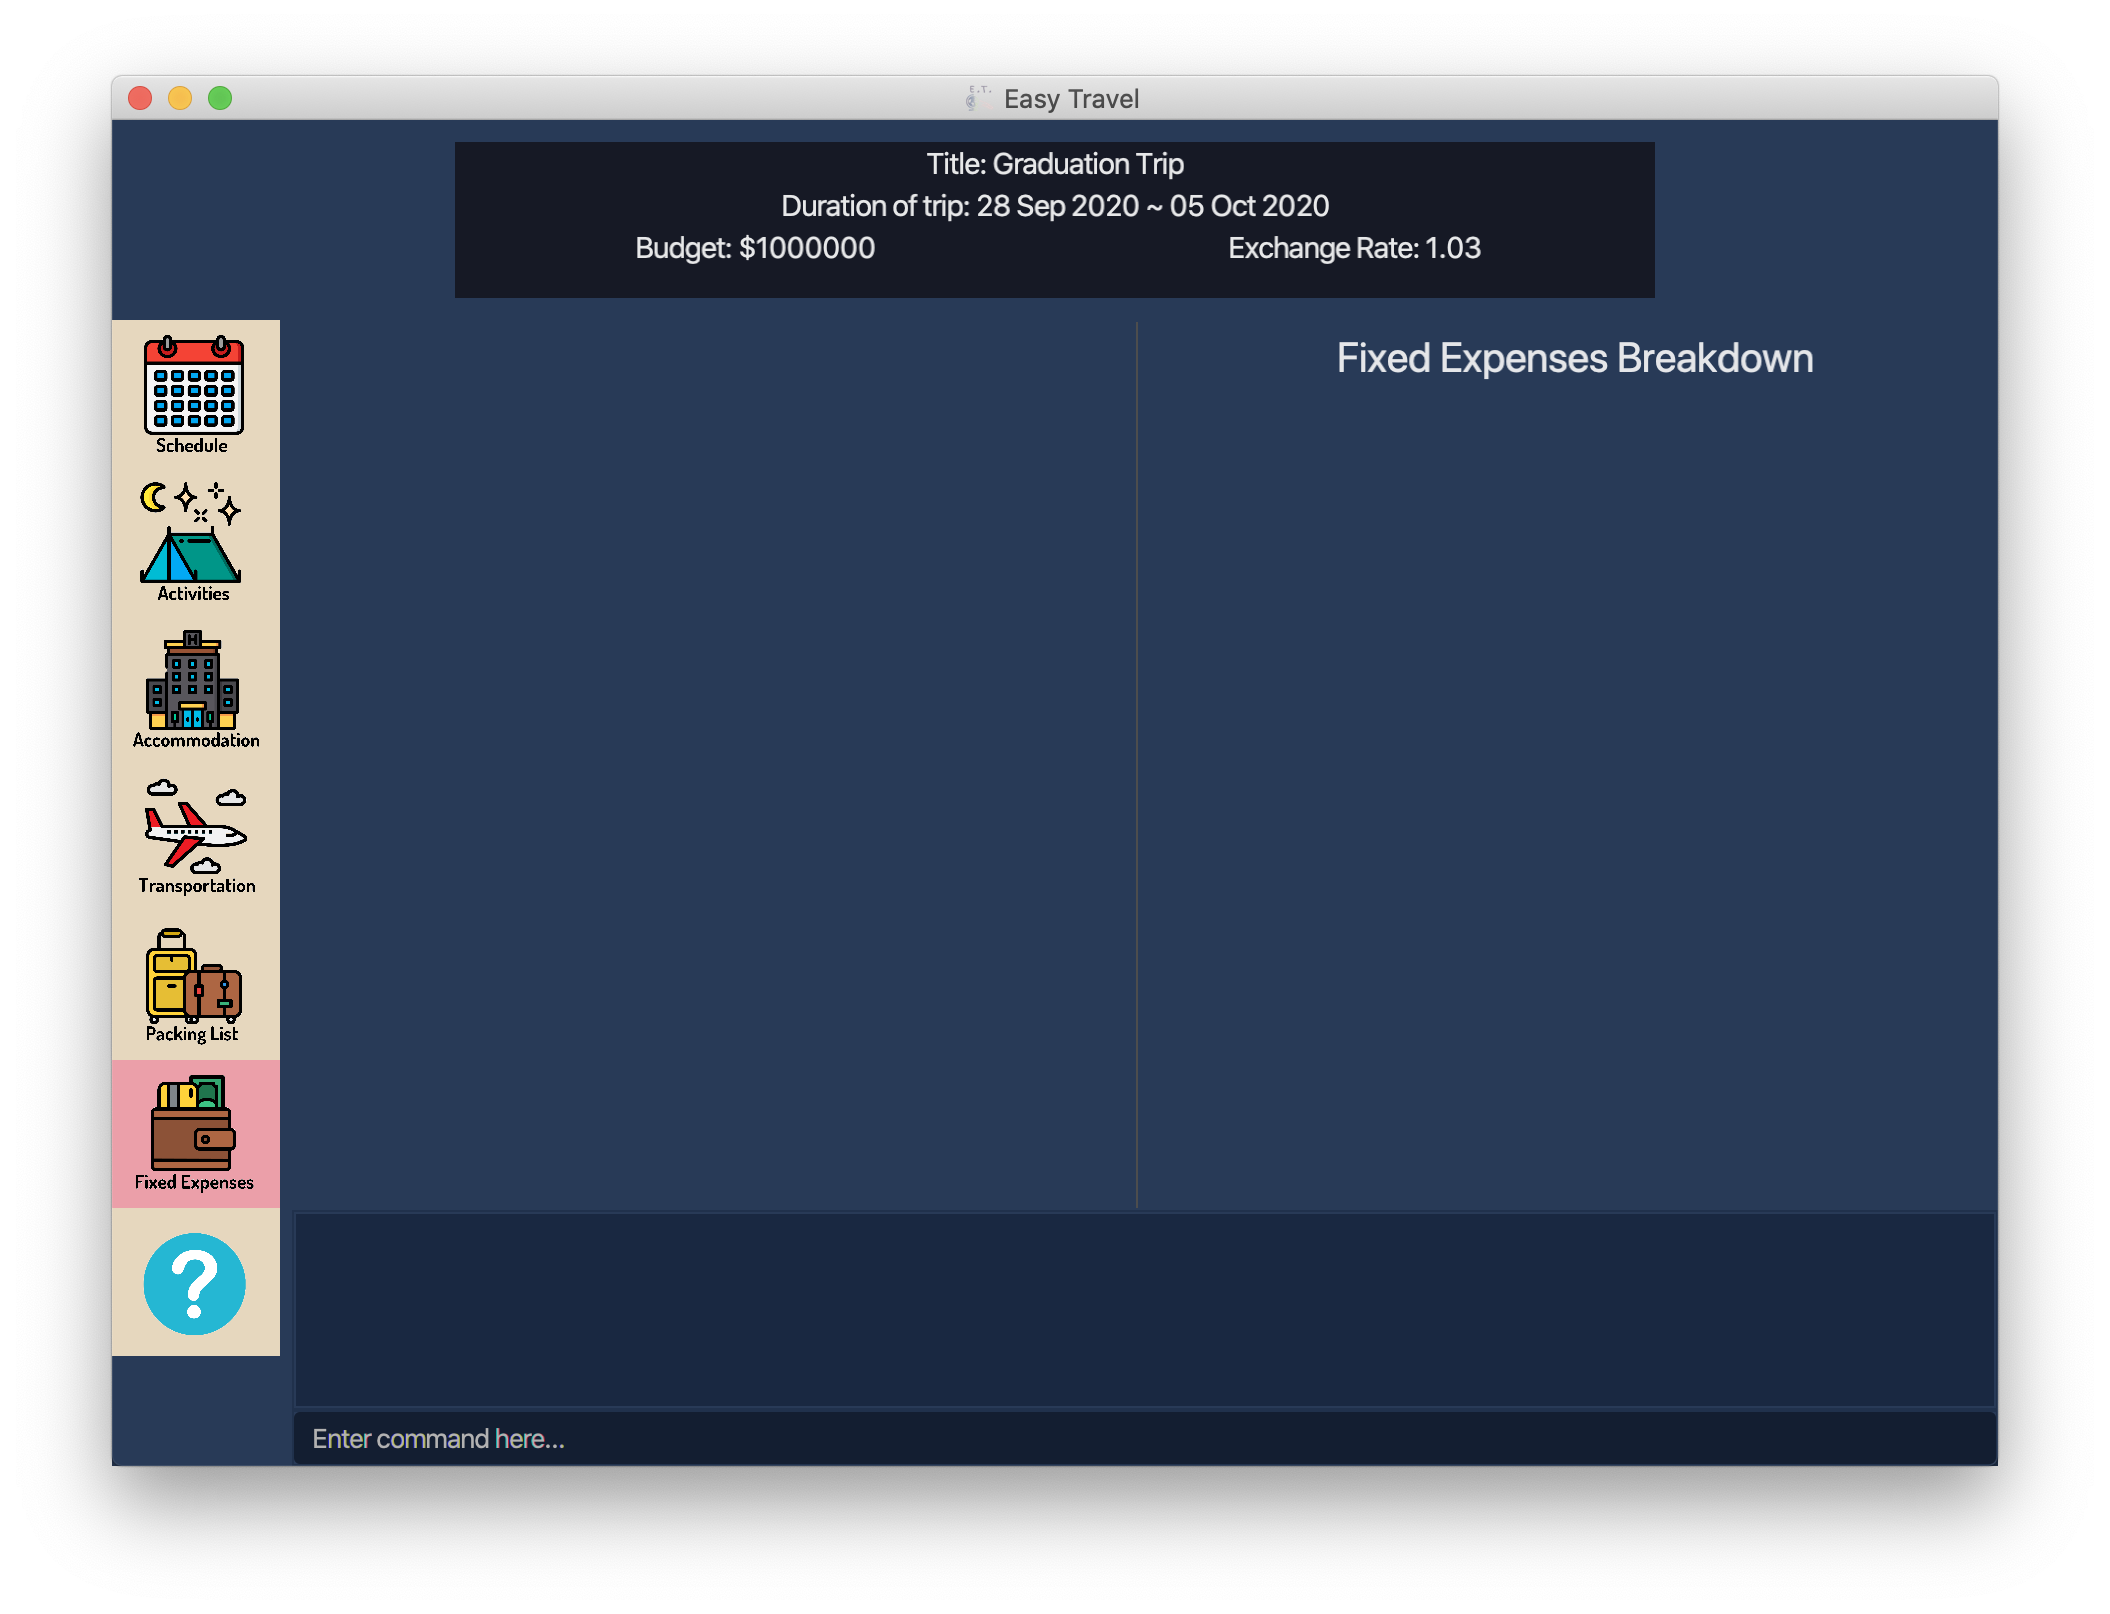
4.7.2. List your fixed expenses: listexpense
You can use the listexpense command to navigate to the Fixed Expenses Tab and list all fixed expenses entries.
Format:
listexpense
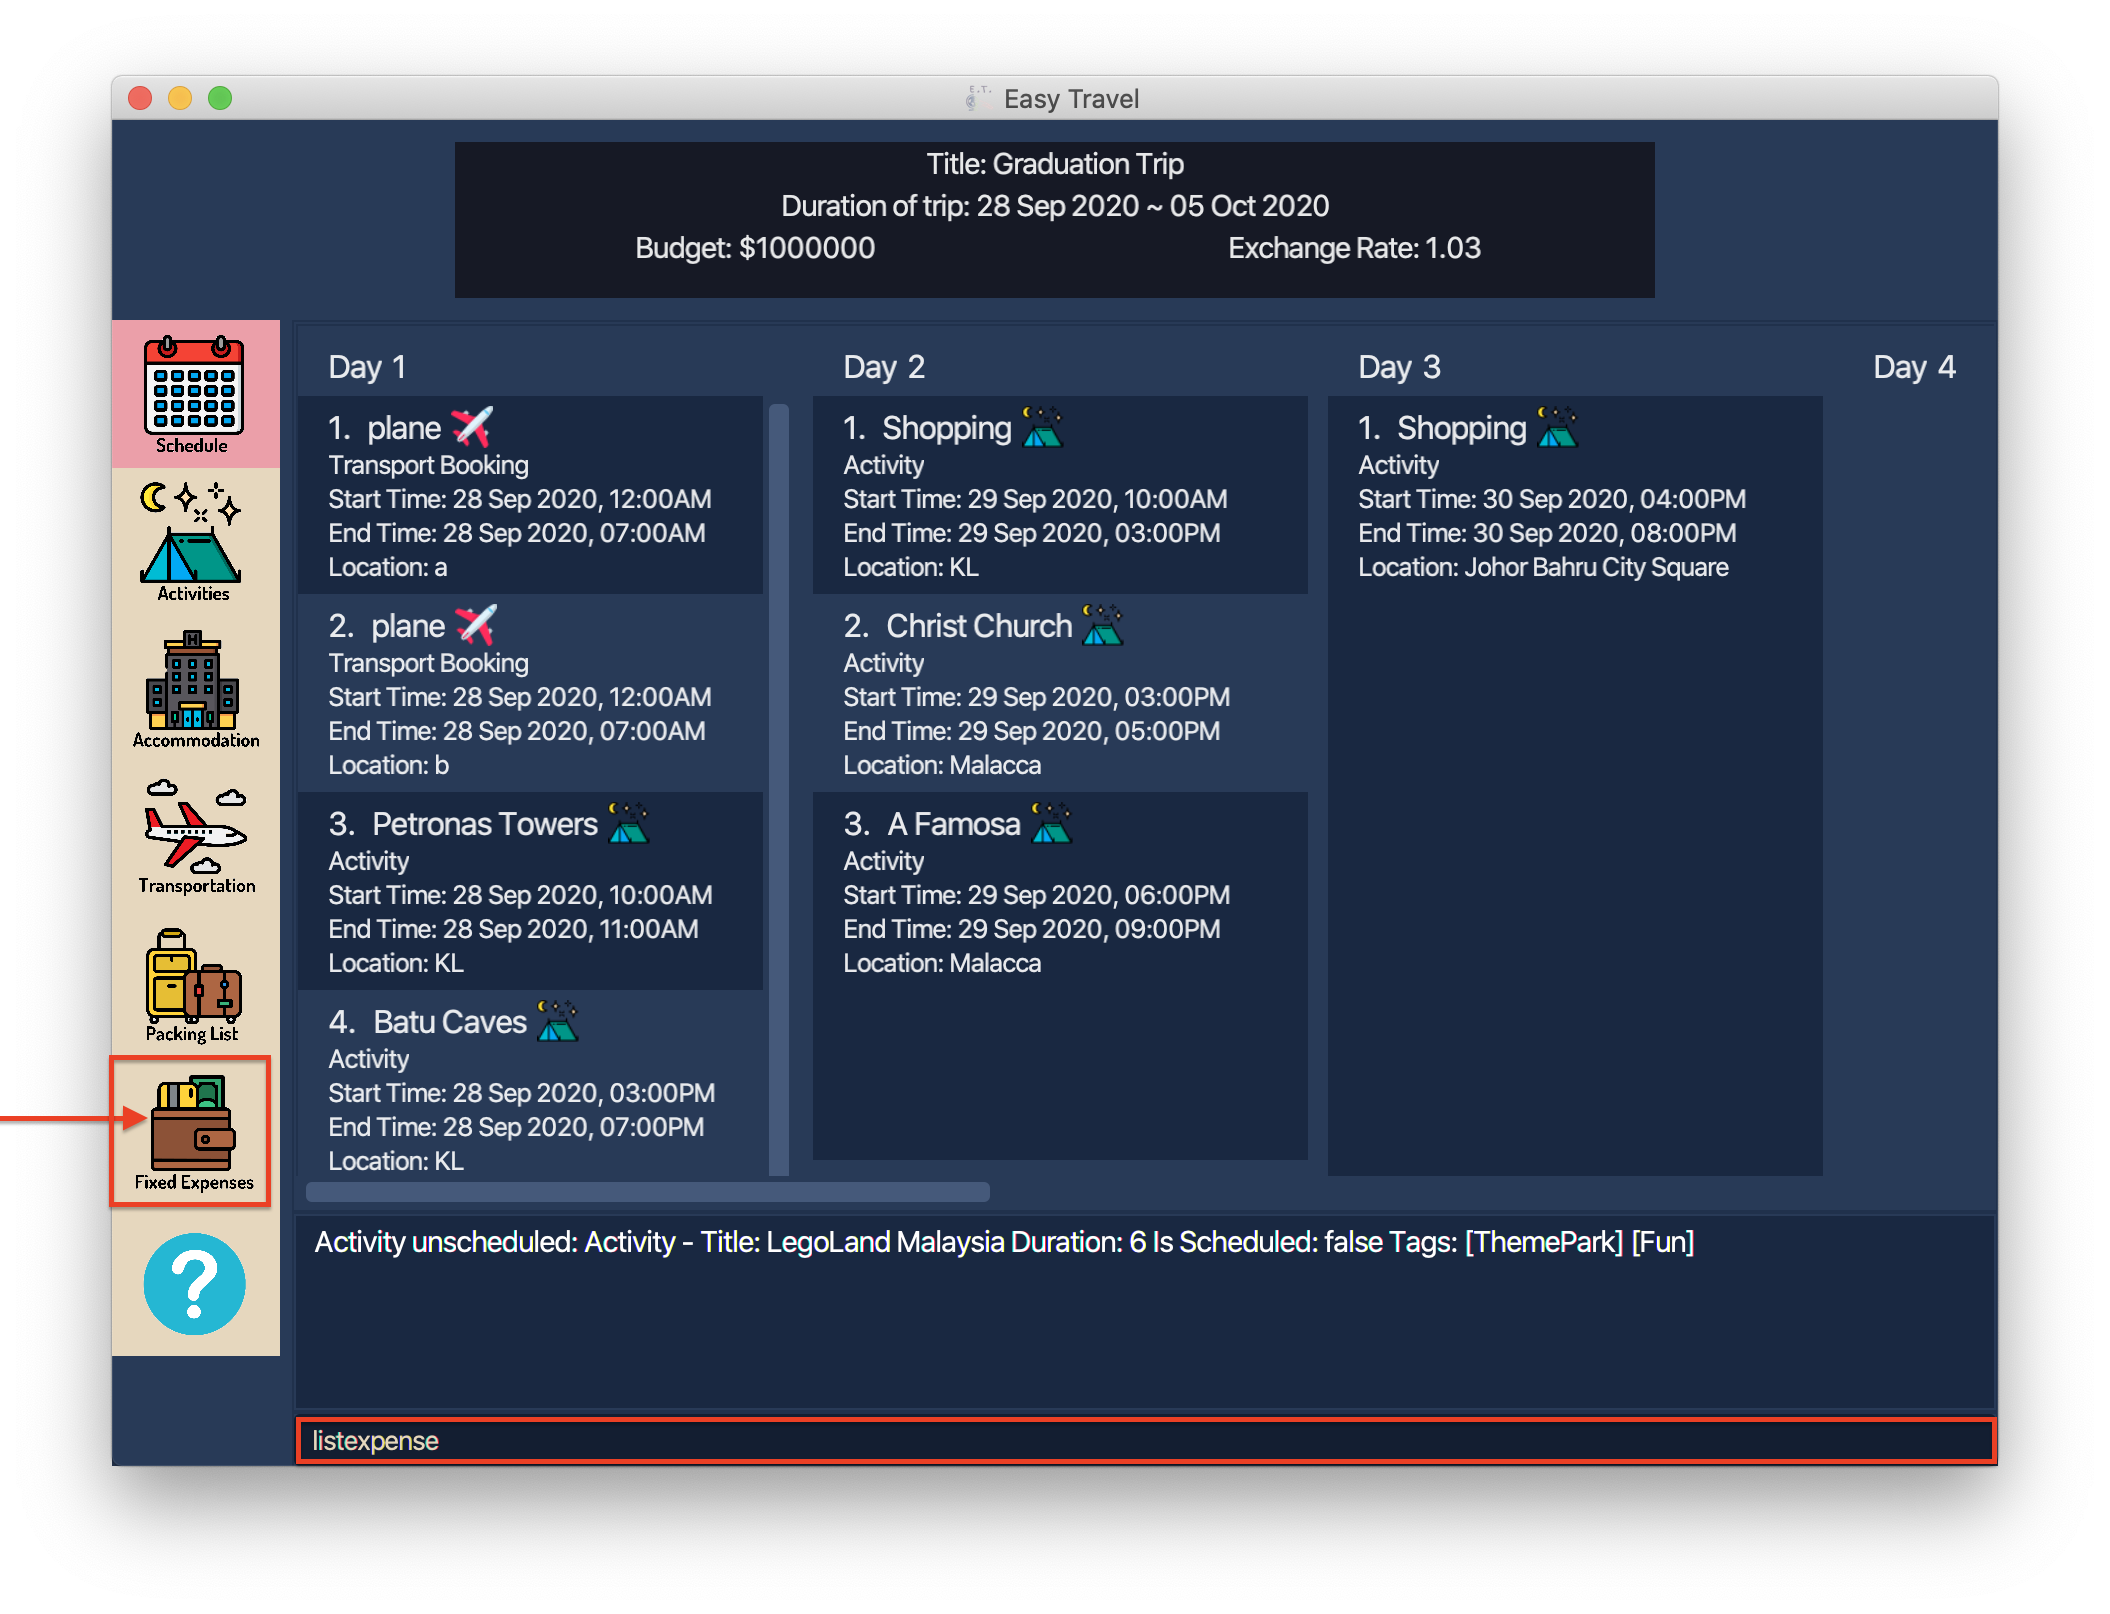
Example:
If you are in another tab and wish to navigate to the Fixed Expenses Tab to view all your fixed expense entries, you can follow these steps.
Listing all fixed expense entries:
-
Type
listexpneseinto the Command Box. -
Press
Enterto execute.
Outcome:
-
The Result Display will show a success message.
-
E.T. will switch to the Fixed Expenses Tab.
-
You can now see all your fixed expense entries.
listexpense commandThereafter, you will be able to add and subsequently modify your fixed expenses.
This would be further elaborated in Section 4.7.3, “Adding a new fixed expense entry: addexpense” onwards.
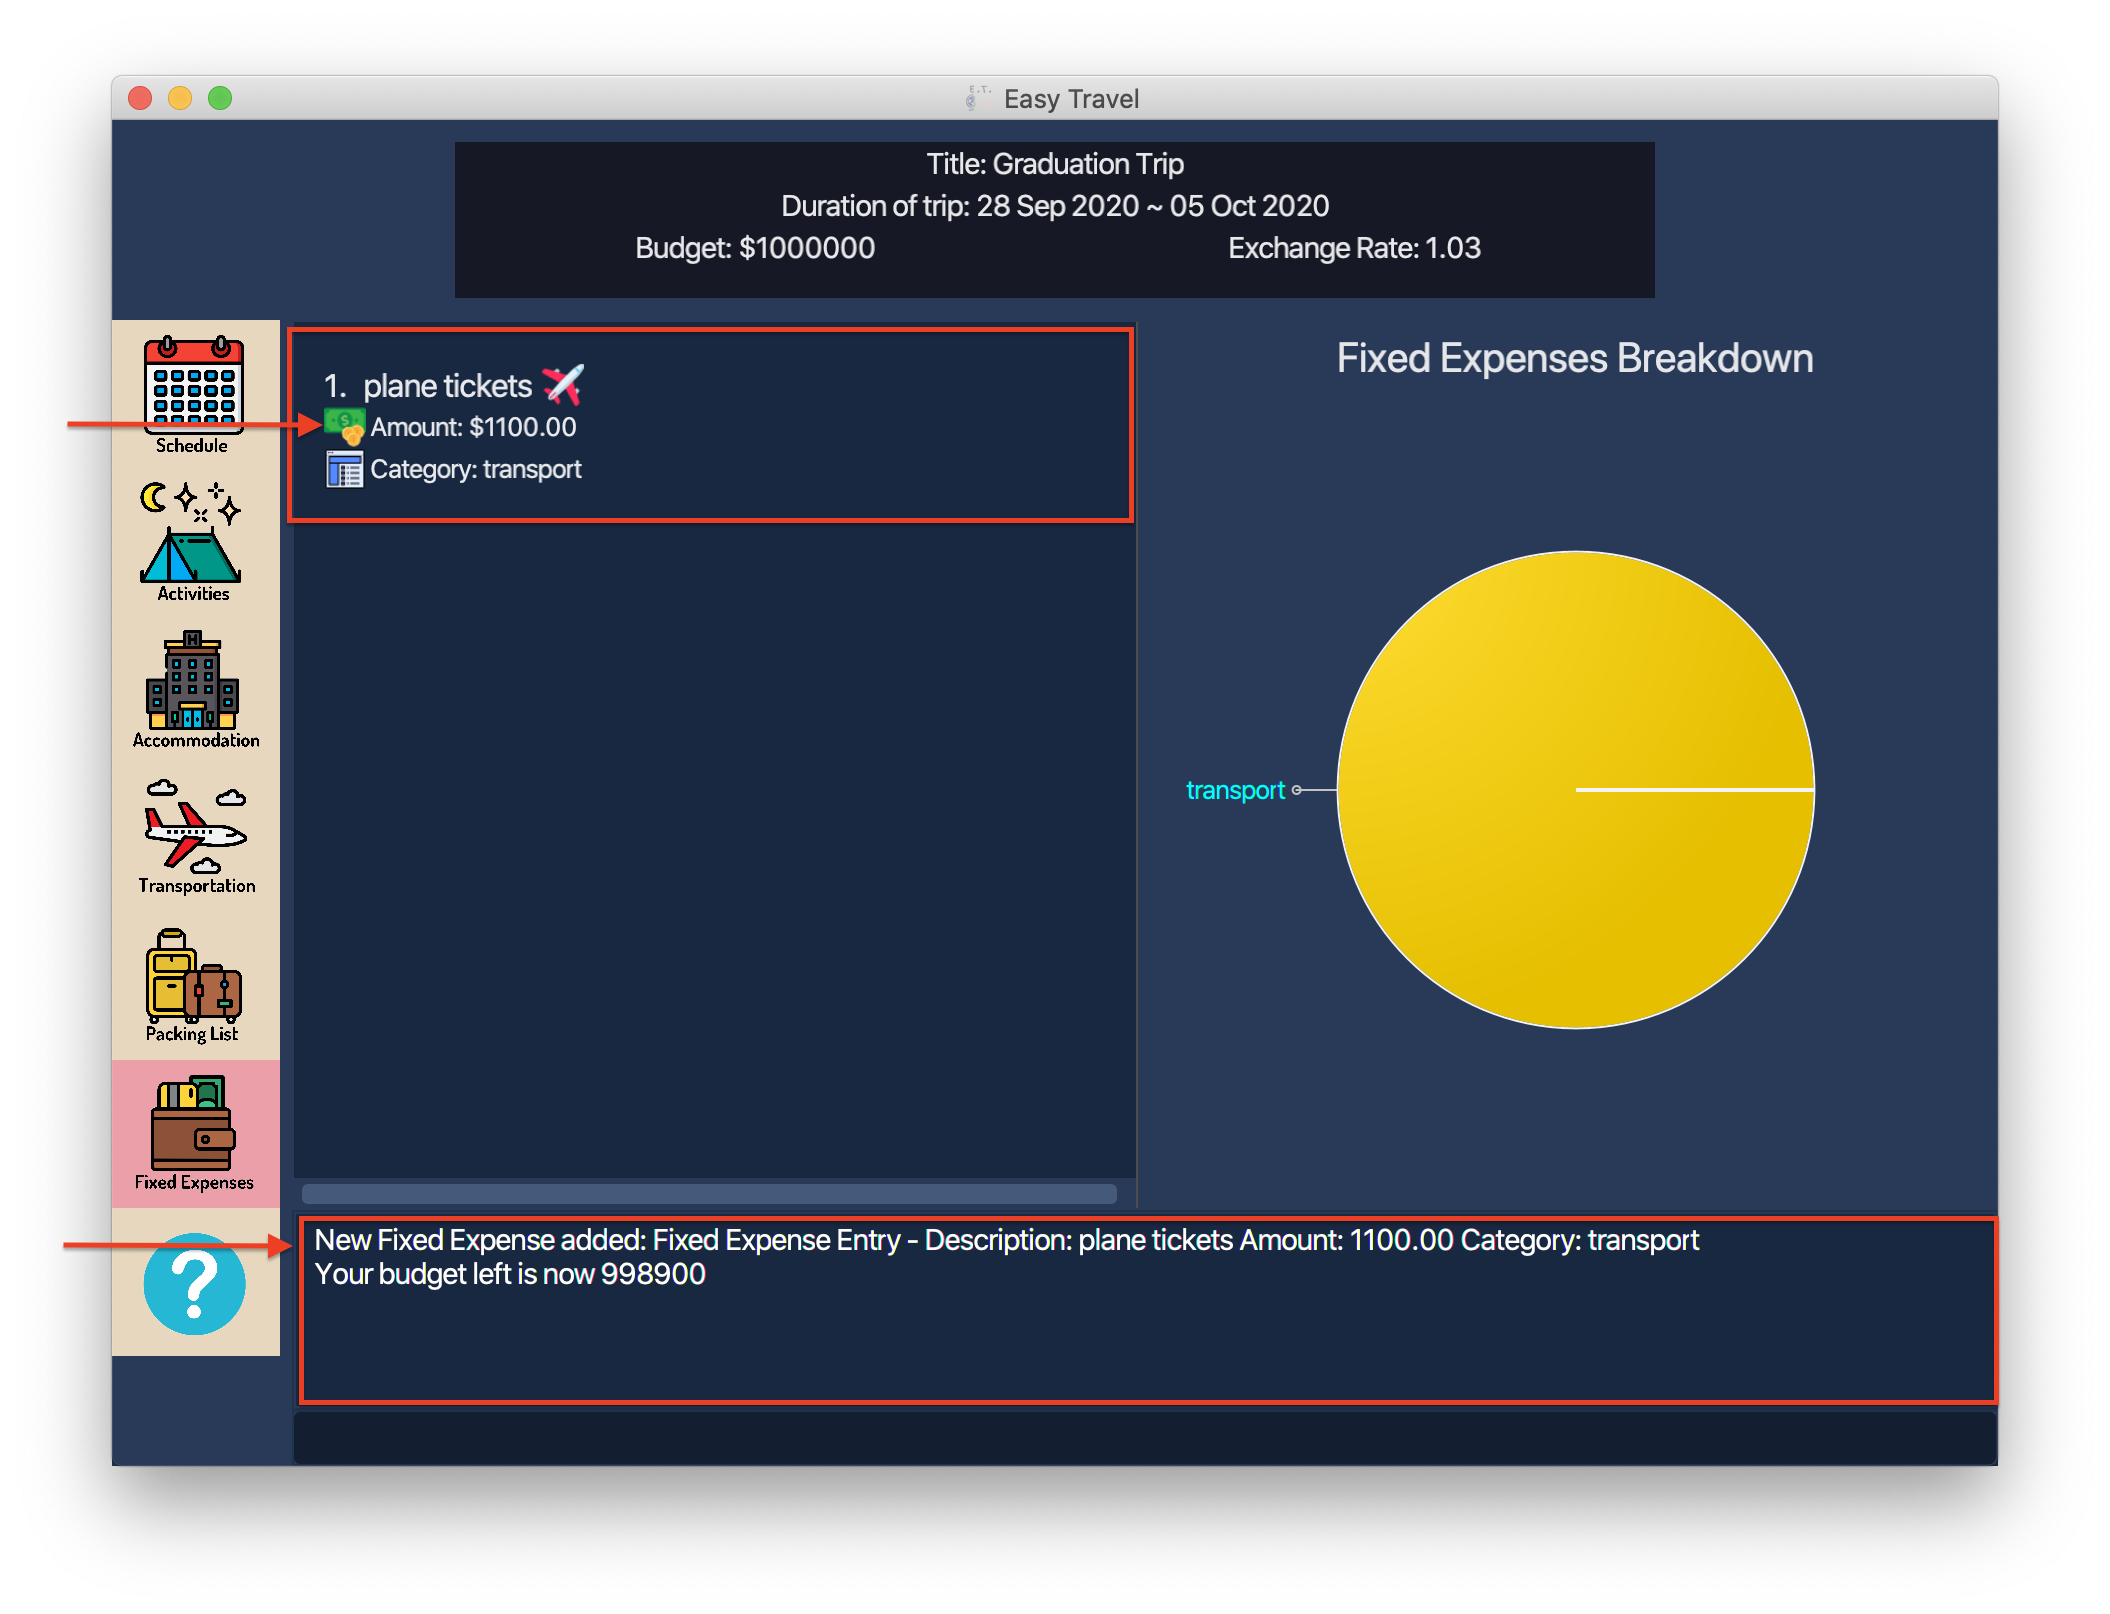
4.7.3. Adding a new fixed expense entry: addexpense
You can use this command to add a new fixed expense into the Fixed Expense Manager.
Format:
addexpense amount/AMOUNT currency/CURRENCY description/DESCRIPTION category/CATEGORY
|
Example:
Let’s say you wish to include a fixed expense entry with the following information and wish to add it in the Fixed Expense Manager.
|
1100 |
|
SGD |
|
Plane Tickets |
|
Transport |
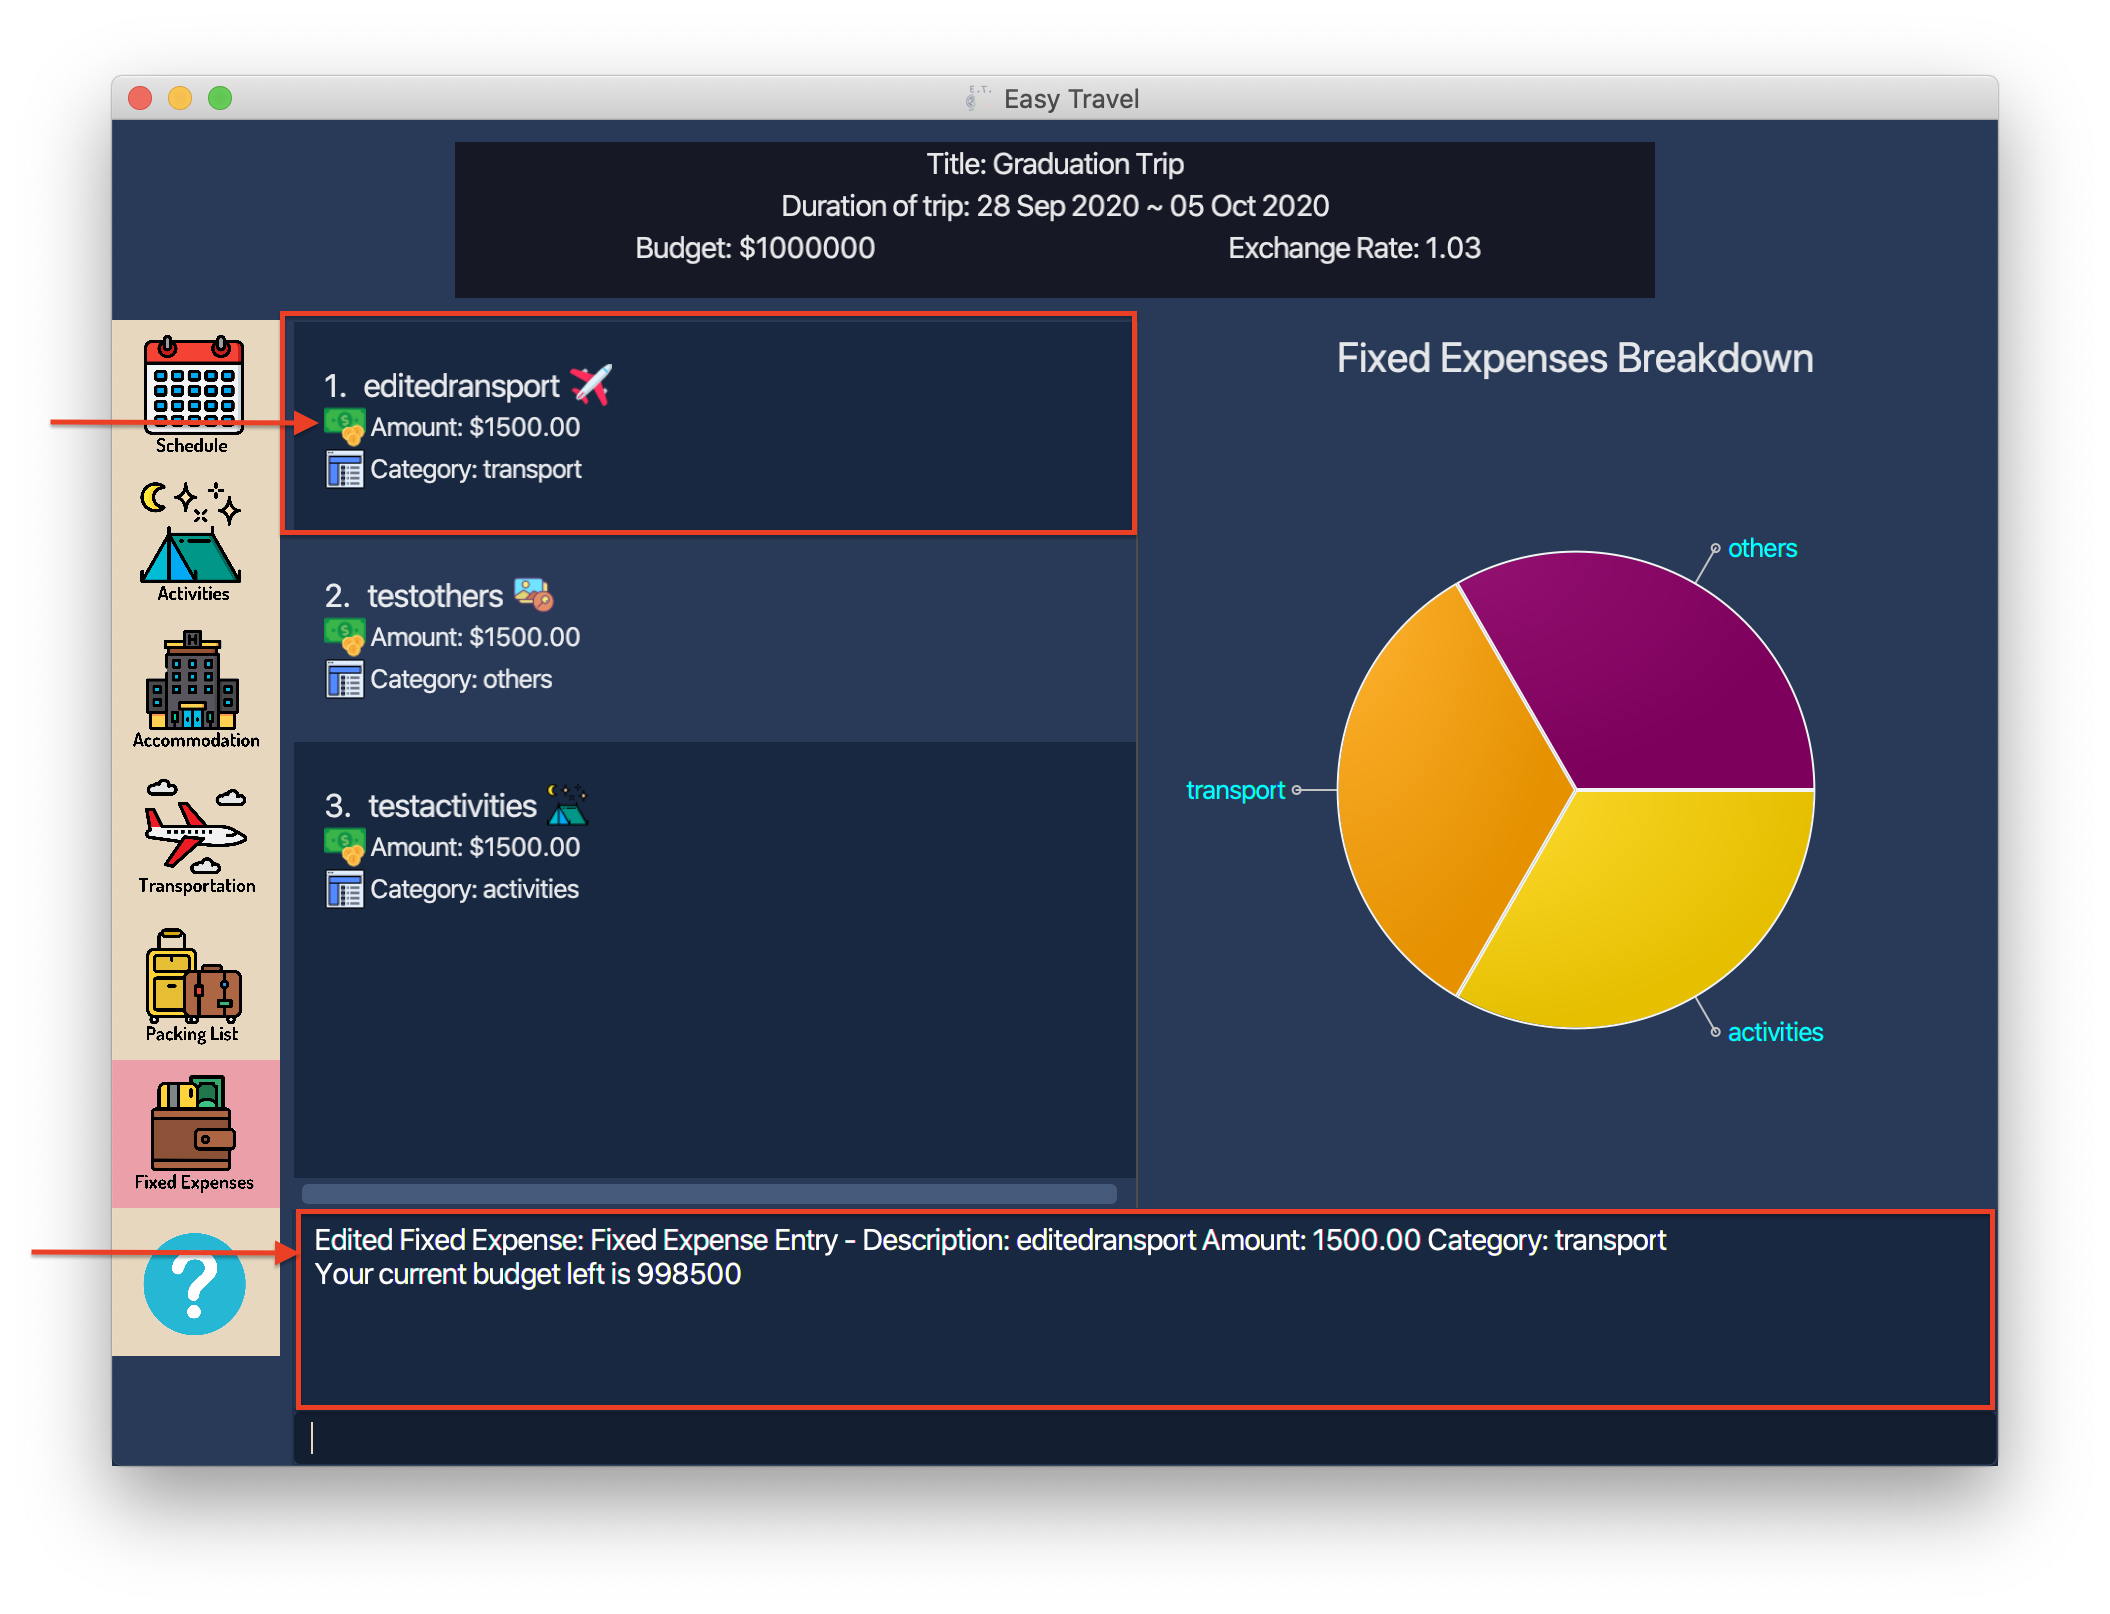
4.7.4. Edit a fixed expense entry: editexpense
This command allows you to edit any mistakes that you might have accidentally included into the fixed expense manager. You can edit the details of an existing fixed expense entry based on the INDEX you have specified.
Format:
editexpense INDEX [amount/AMOUNT] [currency/CURRENCY] [description/DESCRIPTION] [category/CATEGORY]
|
Example:
Let’s say you wish to edit the fixed expense entry at index 1 to have a description of “editedtransport" and SGD 1500 respectively.
| Current | Edited | |
|---|---|---|
|
1000 |
1500* |
|
other |
SGD |
|
WrongTransport |
editedtransport |
|
activity |
transport |
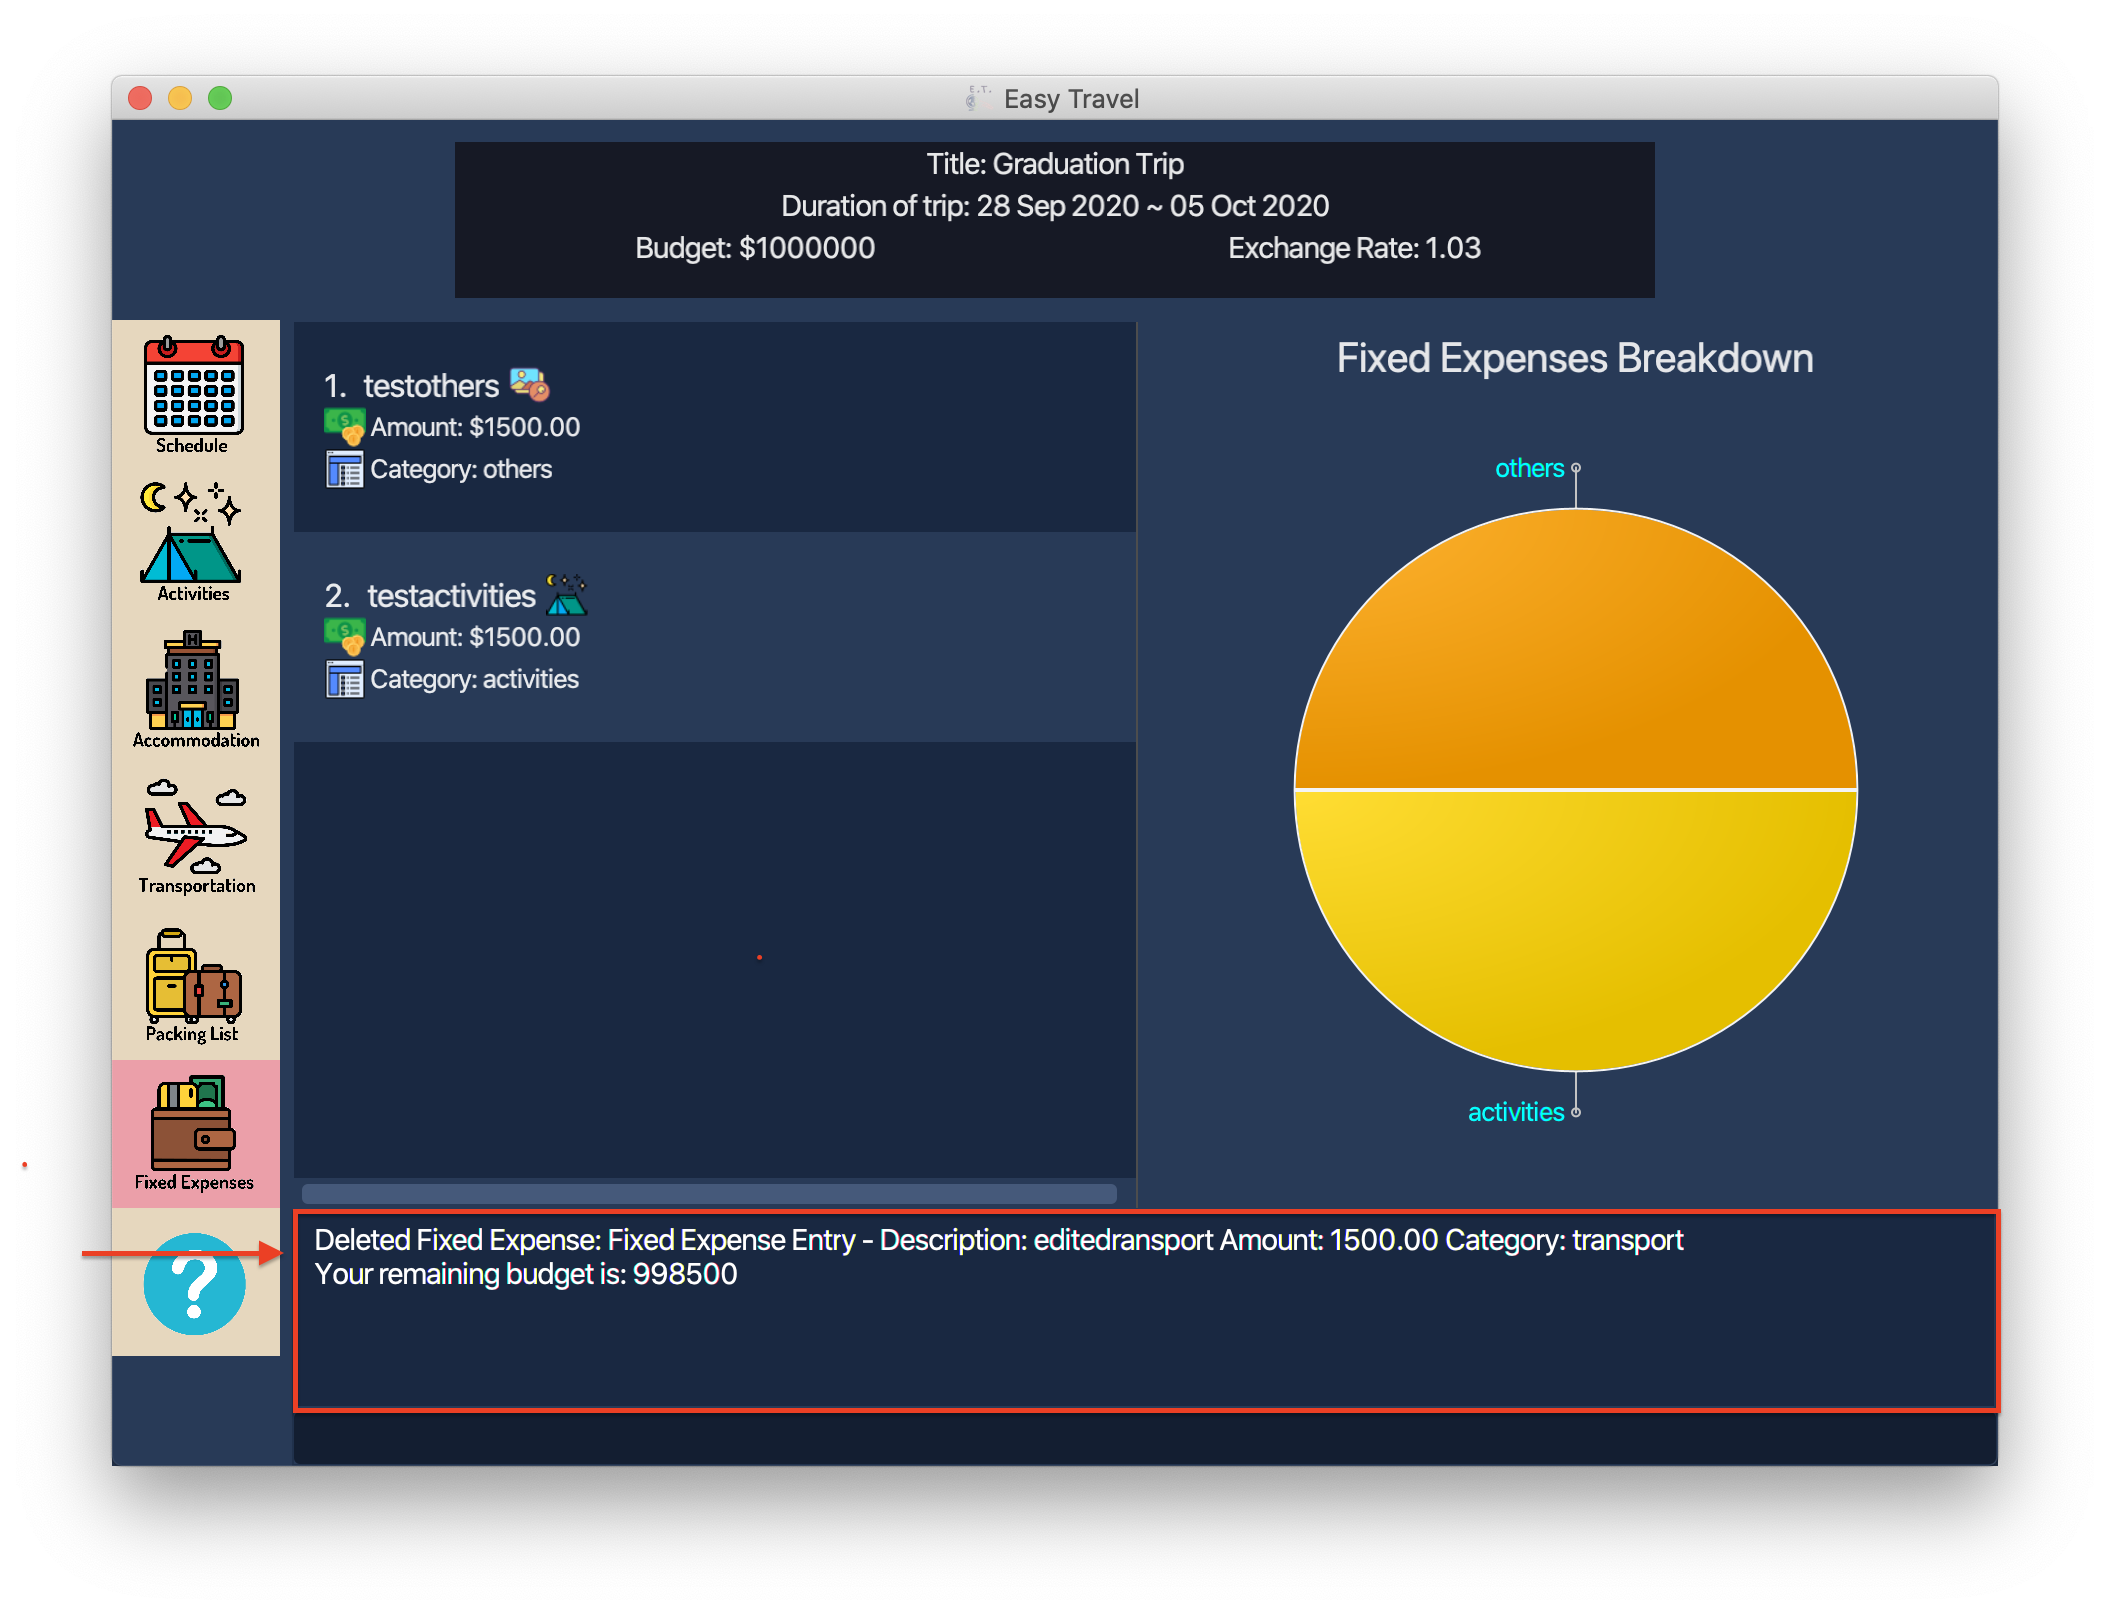
4.7.5. Deleting a fixed expense entry: deleteexpense
This command allows you to delete an existing fixed expense entry.
Format:
deleteexpense INDEX
|
Refer to Section 4.7.1, “Fixed Expense Management Command Parameters” for more detail about the parameter. |
Example:
Assuming you wish to delete the first fixed expense.
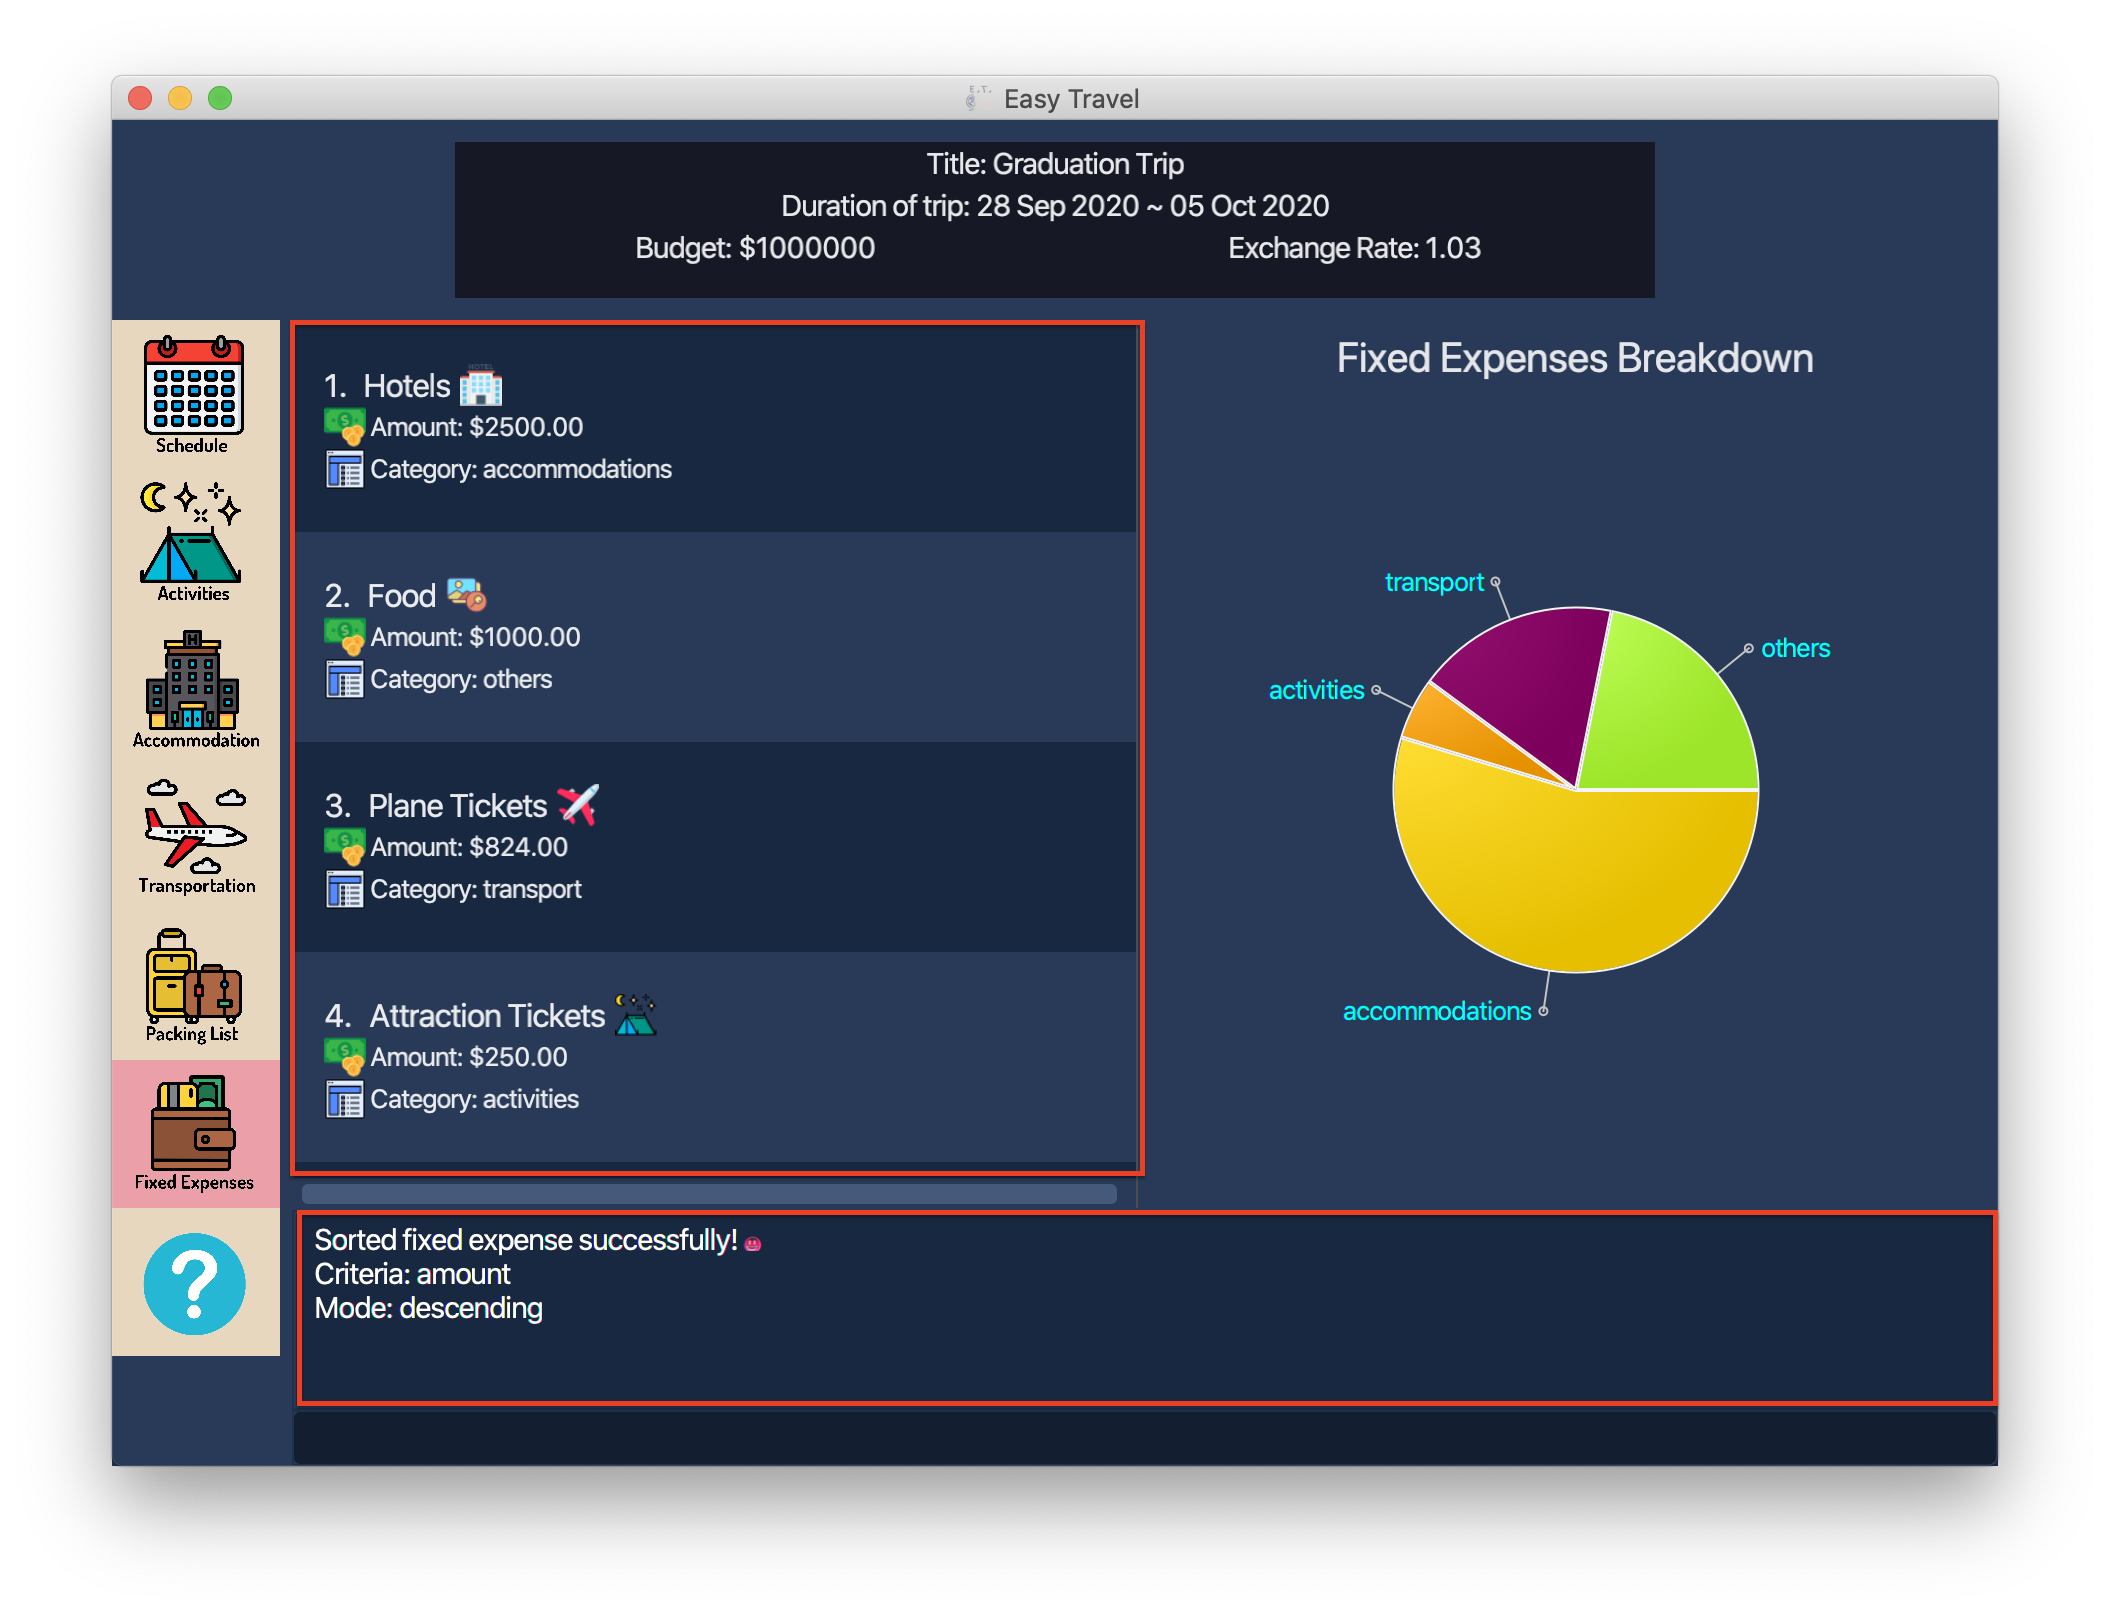
4.7.6. Sort fixed expenses: sortexpense
This command allows you to sort all your fixed expenses in the list.
Format: sortexpense CRITERIA ORDER
|
Example:
Assuming you have a lot of fixed expenses and wish to group them by category. In this example, we would be sorting the fixed expense according to the amount in descending order.
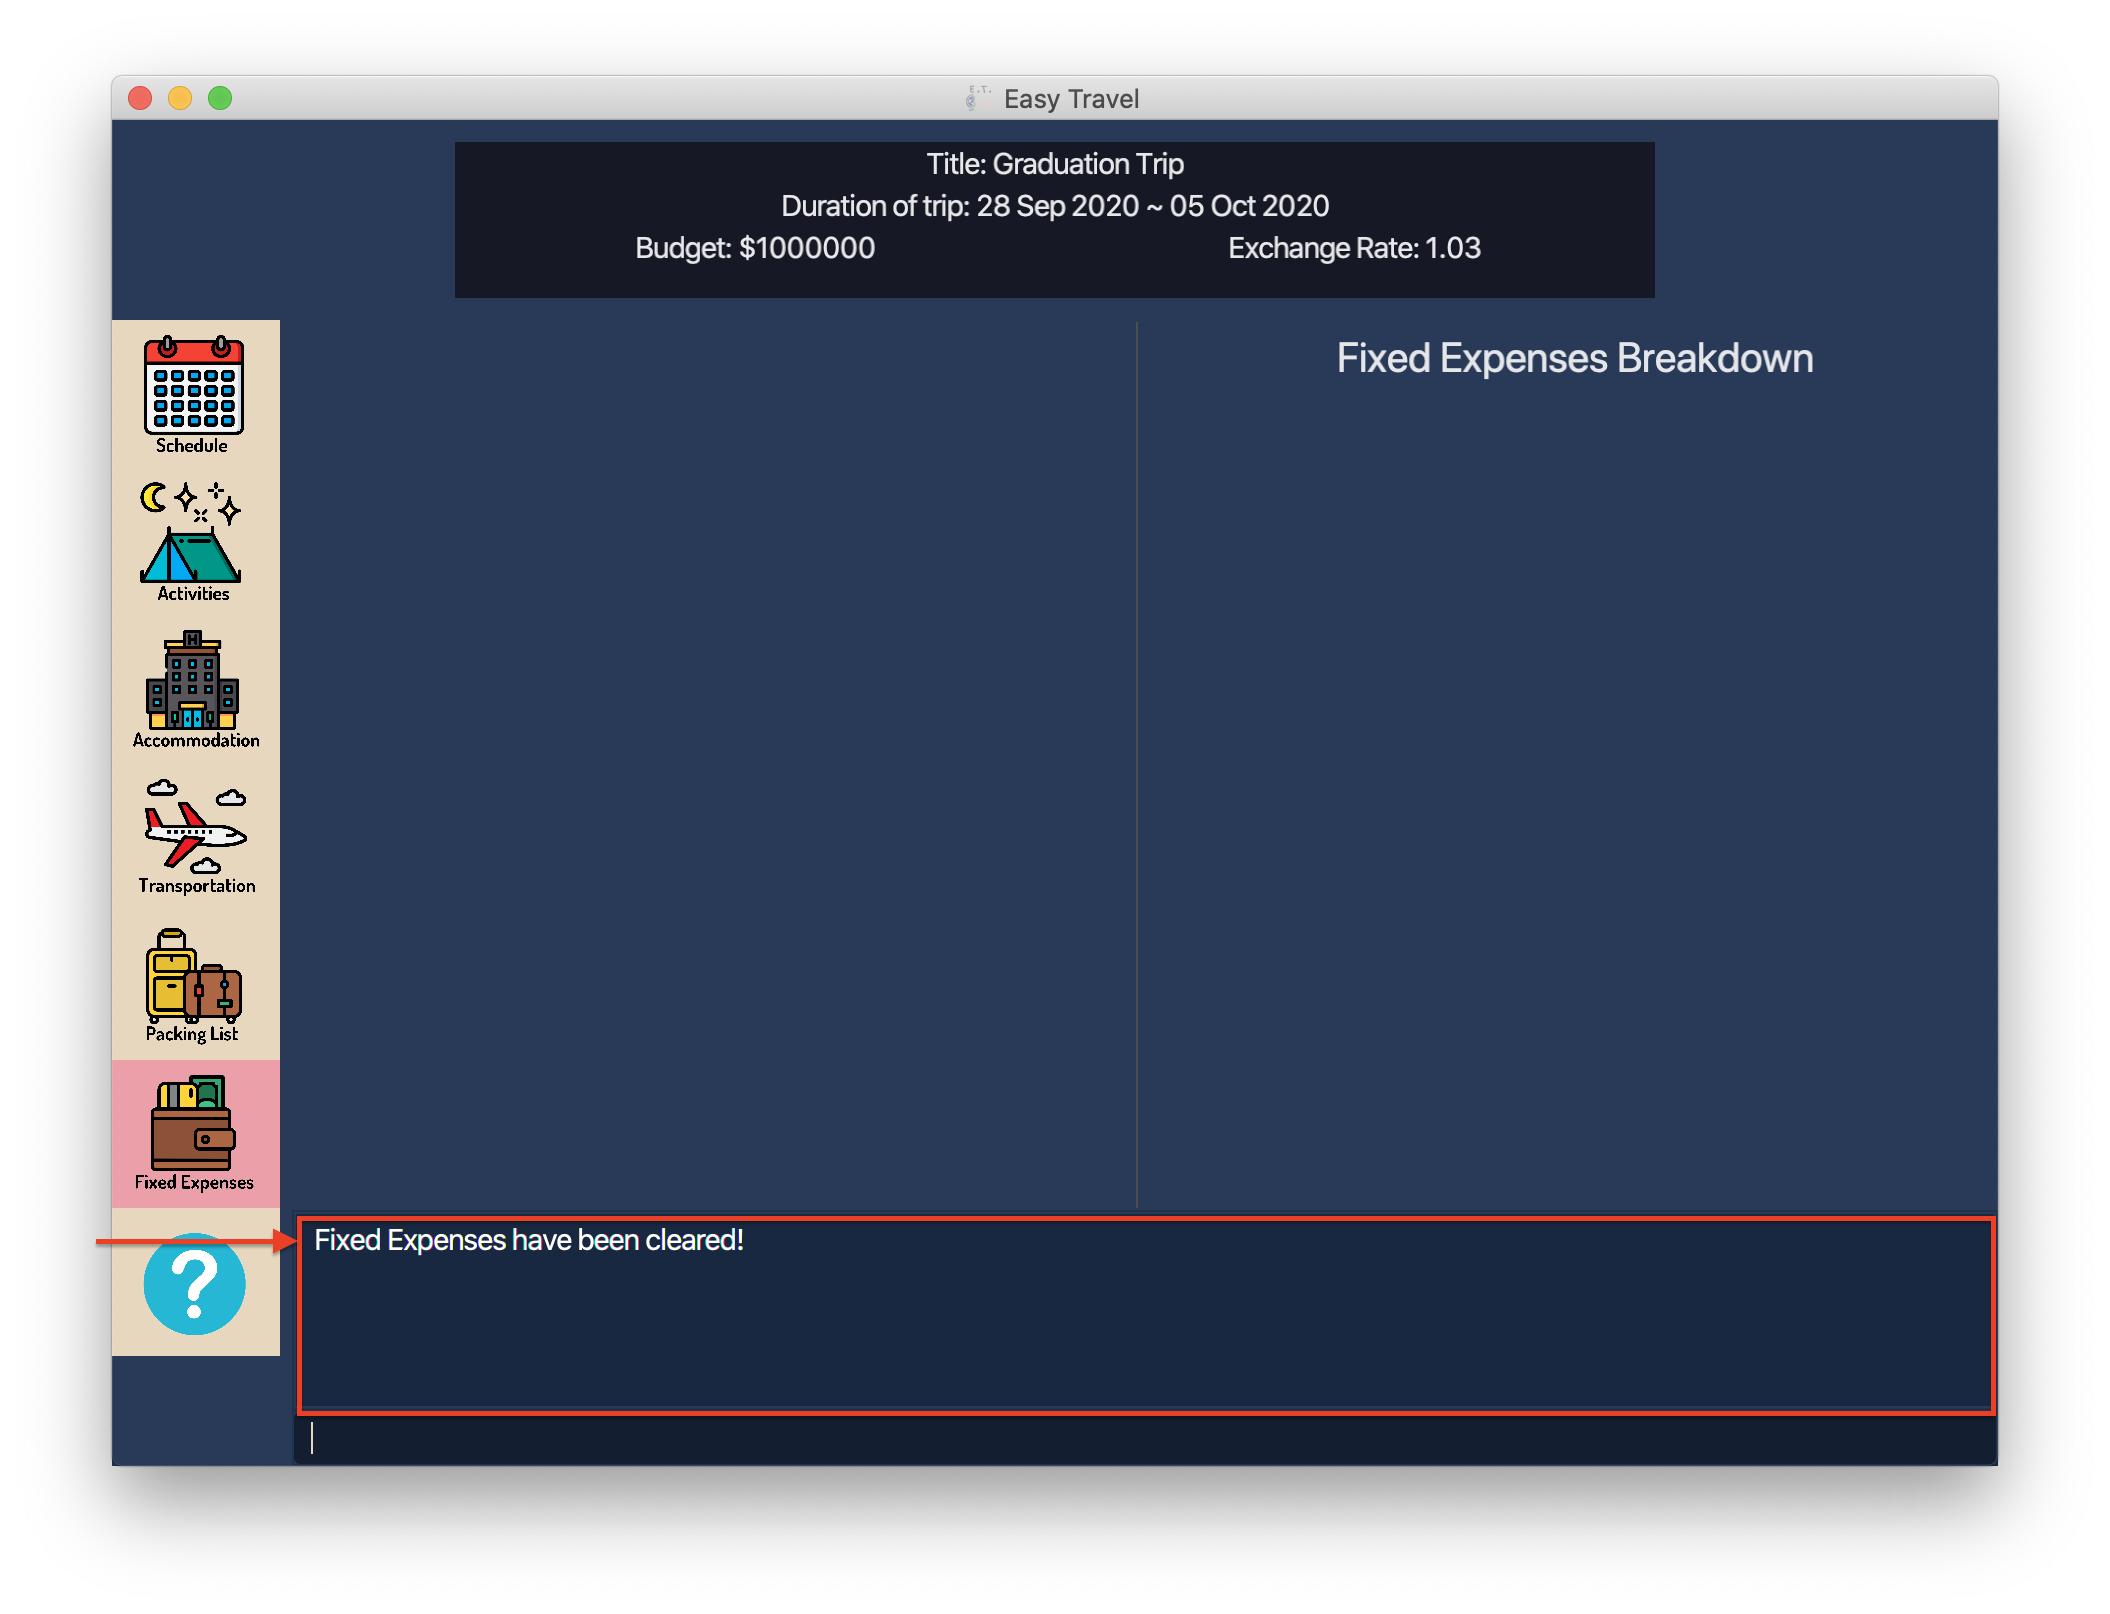
4.7.7. Clearing a fixed expense: clearexpense
This command allows you to clear all Fixed Expenses in the list.
Format: clearexpense
|
Example:
Assuming that you wish to clear all your fixed expenses entries, you can clear the whole list by following these steps.
4.8. Features coming in Version 2.0
(Contributed by Catherine)
This section will describe the various features that are planned for Version 2.0 of E.T.
4.8.1. Packing List Management
The Packing List Management feature has some exciting updates that will help you better manage your packing list.
4.8.1.1. Create a smart packing list: createlist v2.0
This feature will allow you to create a smart packing list. The packing list will recommend you the quantity to pack for your trip based on the information provided.
For example, if you are planning a trip is 7 days, with 1 male and 1 female, you can use a single command to help you create a packing list that contains 7 sets of adult and child summer clothing will be added into the packing list, along with toys for the children.
An example of the command would be:
createlist d/7, m/1, f/1, c/2, s/Summer
4.8.1.2. Export the packing list as a text file: export v2.0
This feature allows you to export your existing packing list into a formatted text file. The motivation behind it is to allow you to share your packing lists with your friends easily.
4.8.2. Fixed Expense Management
(Contributed by Joshua Lay)
The Fixed Expense Management will also be getting brand new functionalities that will take your financial management to the next level.
4.8.2.1. Recommend ways to save money based on prevailing usage v2.0
E.T. will be able to use complex algorithms to monitor and track your spending habits and recommend ways to save money on certain items.
4.8.3. Enhancing your experience with E.T.
After gathering all your feedback, we have plans to upgrade E.T.'s to provide you with better user experience.
4.8.3.1. Auto-Complete v2.0
This feature will allow you to press Tab to complete the command.
4.8.3.2. Undo/Redo v2.0
This feature will allow you to undo or redo certain commands.
4.8.3.3. Import and export of data v2.0
This feature will allow you to import and export your trip data in different formats such as the .ics calendar format.
5. FAQ
(Contributed by Joshua Wee)
Q: How many trips am I able to set in E.T.?
A: You can only set 1 trip in E.T..
Q: Why aren’t I allowed to edit my date for the trip?
A: Editing the date would cause conflicts in your schedule if you try to change the date to one that is earlier. However, we are working on a feature that will allow you to resolve these conflicts in the upcoming version of E.T..
Q: What do I do if I want to change my trip’s date since I cannot edit the date?
A: Unfortunately, you have to delete the trip.
Q: What happens if 2 of my activities are scheduled on the same date and time? Will E.T. detect it?
A: E.T. will allow you to schedule activities that overlap in timing. However, when you check your progress using the status command, E.T. will notify you of this conflict in timing and the day index that you can find it.
Q: How do I transfer my data to another computer?
A: By default, E.T. saves all your data in a folder named data in the same directory as the application. You can copy and transfer the data folder into the same directory as E.T. on your other computer and E.T. will automatically load your data upon launching E.T..
6. Command Summary
(Contributed by Joshua Lay)
6.1. Trip Management Commands
| Command | Example |
|---|---|
Set Trip : |
|
Rename a Trip : |
|
Edit Budget for Trip : |
|
Delete Trip : |
|
Check Progress : |
|
6.2. Activity Commands
| Command | Example |
|---|---|
List Activities: |
|
Add Activity: |
|
Edit Activity: |
|
Delete Activity: |
|
Sort Activities: |
|
Find Activities by Keywords: |
|
Find Activities by Tag: |
|
Clear Activities: |
|
6.3. Activity Scheduling Commands
| Command | Example |
|---|---|
List Schedule: |
|
Schedule Activity: |
|
Unschedule Activity: |
|
6.4. Transportation Booking Management Commands
| Command | Example |
|---|---|
List Transport Bookings: |
|
Add Transport Booking: |
|
Edit Transport Booking: |
|
Delete Transport Booking: |
|
Sort Transport Bookings: |
|
Clear Transport Bookings: |
|
6.5. Accommodation Booking Management Commands
| Command | Example |
|---|---|
List Accommodation Bookings: |
|
Add Accommodation Booking: |
|
Edit Accommodation Booking: |
|
Delete Accommodation Booking: |
|
Sort Accommodation Bookings: |
|
Clear Accommodation Bookings: |
|
6.6. Packing List Management Commands
| Command | Example |
|---|---|
List Packing List Items: |
|
Add Packing List Item: |
|
Edit Packing List Item: |
|
Delete Packing List Item: |
|
Mark Packing List Item as Packed: |
|
Mark Packing List Item as Not Packed: |
|
Sort Items in Packing List: |
|
Find Packing List Items by Name: |
|
Find Packing List Items by Category: |
|
Clear Packing List: |
|
Add Preset: |
|
List all Presets in Packing List: |
|
6.7. Fixed Expense Commands
| Command | Example |
|---|---|
*List Fixed Expenses: |
|
Add Fixed Expense: |
|
Edit Fixed Expense: |
|
Delete Fixed Expense: |
|
Sort Fixed Expenses: |
|
Clear Fixed Expenses: |
|