PROJECT: Easy Travel
This portfolio aims to document the contributions that I have made to the E.T. project. The Github Link to E.T. can be found here : https://github.com/AY1920S2-CS2103T-W17-3/main
Overview
E.T. is a desktop travel planning application to provide a simple an easy way for users to prepare for their trip. The user interacts with it using a CLI, and it has a GUI created with JavaFX. It is written in Java, and has about 10 kLoC.
Summary of contributions
-
Major enhancement: Implemented Activity Tab along with its User Interface and commands (CRUD/Sort)
-
What it does: The activity manager feature allows the user to keep track of all the activities planned for their trip. It takes care of the title, duration and location of the activity. Users are also allowed to tag their activities with tags associated with them, such as expensive or sightseeing.
-
Justification: This feature is essential when planning for a trip, as it allows the user to remember all of the activities planned so far.
-
Highlights: The implementation too was challenging and time consuming as it required understanding existing commands within Address Book 3.
-
Credits: {Authors or Address Book 3 and Jeffry Lum for his guidance, time and support. }
-
-
Major enhancement: Implemented Trip commands (CRUD/Sort)
-
What it does: It allows the user to set a trip, edit a trip, as well as delete a trip.
-
Justification: The trip manager feature is the core feature of Easy Travel. Without a trip, all the other features in Easy Travel will not be able to function.
-
Highlights: The implementation was challenging and time consuming as features such as the Accommodation Bookings, the Schedule, the Transportation Bookings, and the Budget all depends on the Trip feature. Hence, I had to understand all the features to implement the Trip feature.
-
-
Minor enhancement: I did the base code for the progress check feature, so that my team members could work from there.
-
Minor enhancement: I implemented the dashboard UI for Easy Travel. It consists of the information of the trip set by the user, so that the user will have a visual of all the information of the trip at all times. The information consists of the trip’s title, the start and end date of the trip, the budget set for the trip, as well as the exchange rate of the trip.
-
Code contributed: [All commits] [RepoSense Dashboard]
-
Other contributions:
-
Project management:
-
There were a total of 4 releases, from version 1.1 to 1.4. I contributed to all the versions on GitHub.
-
-
Enhancements to existing features:
-
Documentation:
-
Used more 'you' language in the UserGuide so that it will be more reader-friendly. In addition, I added in pictures so that the reader can have visual cues on how the output should look like for each command.
-
-
Team:
-
Community:
-
PRs reviewed (with non-trivial review comments): PRs
-
Reported bugs and suggestions for other teams in the class: Bugs for Cooking Papa
-
-
Contributions to the User Guide
Given below are sections I contributed to the User Guide. They showcase my ability to write documentation targeting end-users. |
Activity Management
(Contributed by Charlotte)
If you are planning what to do for your trip, you will find this feature useful. This feature allows you to manage your activities for the trip. You can record the following information about your activities:
-
Title
-
Location
-
Duration
Activity Management Command Parameters
Before you jump right into using this feature, you may want to learn about all the common command parameters used in this feature. The table below shows the list of common command parameters that will be used for this feature.
| Parameter Name | Description |
|---|---|
|
The title of the activity. It must be alphanumeric words not more than 50 characters long. E.g. |
|
The location of the activity. It must be alphanumeric words not more than 50 characters long. E.g. |
|
The duration of the activity in hours. It must be an integer from 1 to 24 (both inclusive). E.g. |
|
The tag you want to attach to an activity. It must be a single alphanumeric word not more than 30 characters long. E.g. |
|
The index number of the activity in the displayed list. The first entry of the list has an index number of It must be a valid index number. |
List all activities: listactivity
You can use this command to navigate to the Activities Tab and display all your activities in E.T..
Format:
listactivity
Example:
If you are in another tab and wish to look at your list of activities, you can follow these instructions.
Add a new activity: addactivity
You can use this command to add a new activity to E.T..
Format:
addactivity title/TITLE duration/DURATION location/LOCATION [tag/TAG]…
|
Refer to Activity Management Command Parameters for more detail about each parameter. |
Example:
Let’s say you have an activity with the following information and wish to record it in E.T..
| Activity | |
|---|---|
Title |
plane |
Location |
Singapore |
Duration |
1 |
Tag |
sea, outdoor |
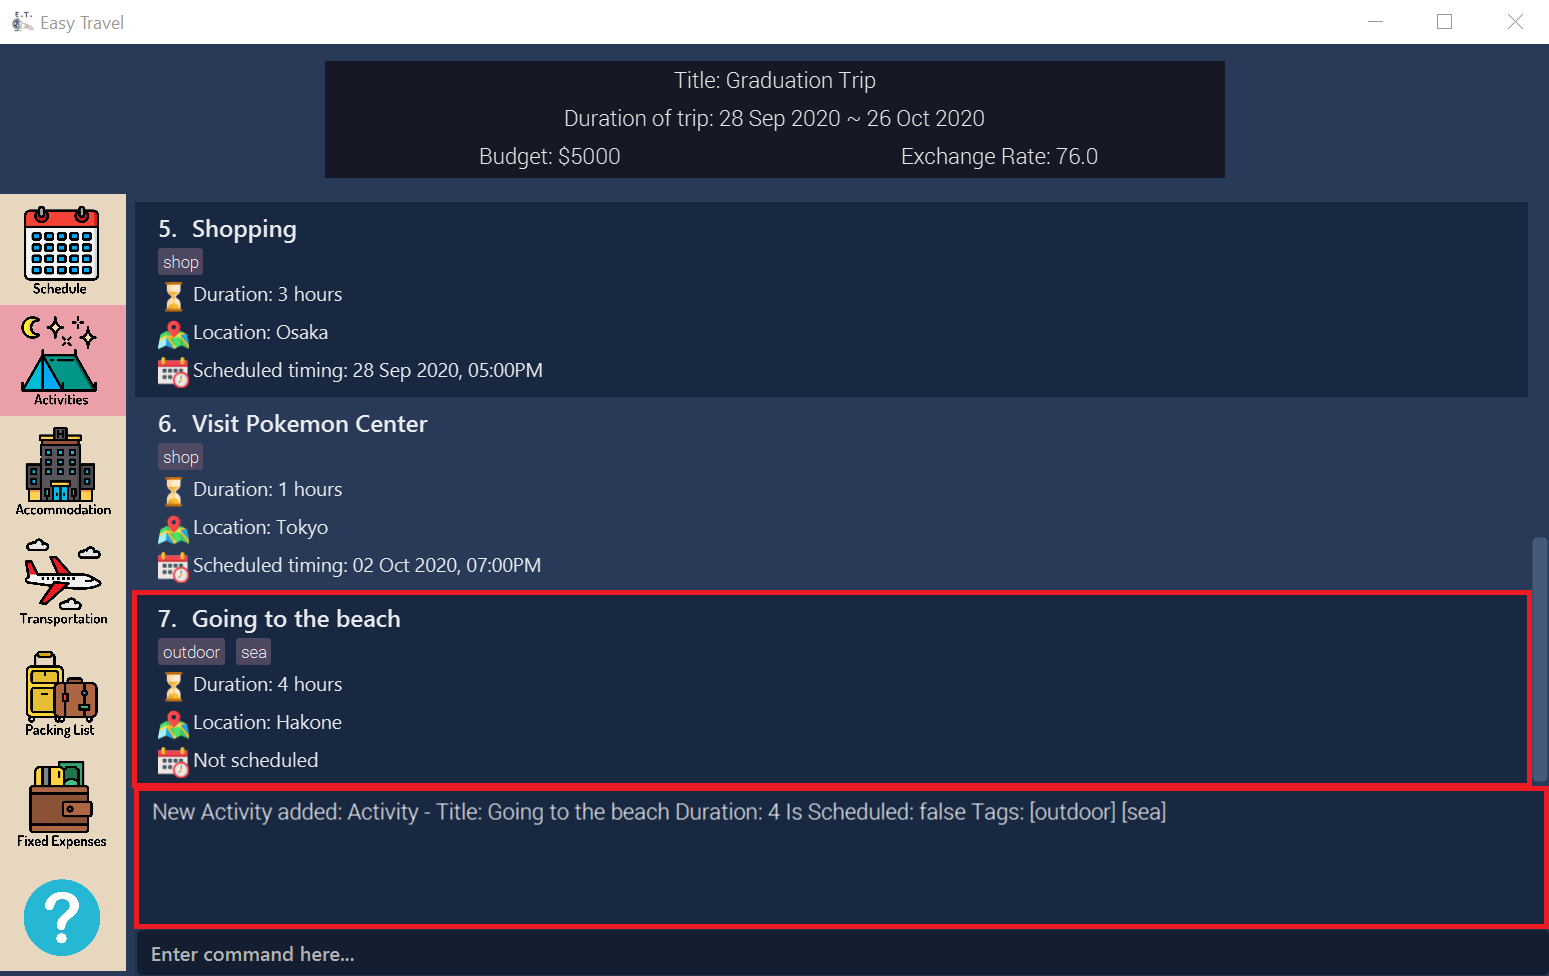
addactivity commandEdit an existing activity: editactivity
You can use this command to edit an existing activity in E.T..
Format:
editactivity INDEX [title/TITLE] [duration/DURATION] [location/LOCATION] [tag/TAG]…
|
Editing the activity:
Example:
Assume you have accidentally made a mistake in the spelling of the title of the second activity in the displayed list and wish to change it to “Skiing”. You do perform the following steps.
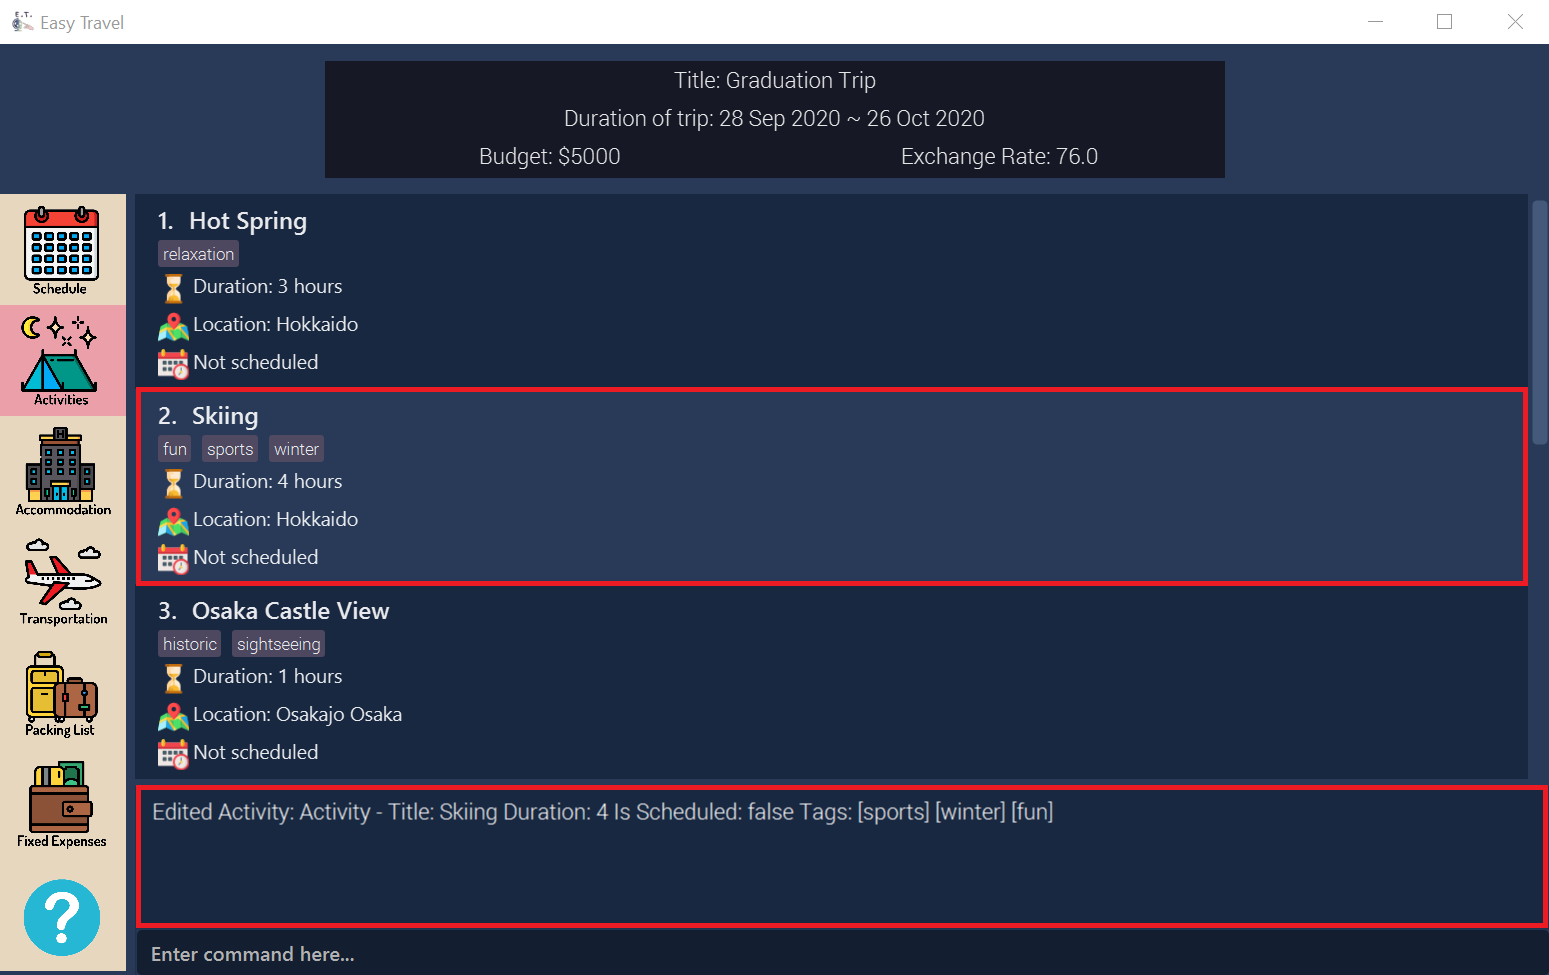
editactivity commandDelete an existing activity: deleteactivity
You can use this command to delete an existing activity in E.T..
Format:
deleteactivity INDEX
|
Example:
If you change your mind and decide to remove the first activity in the displayed list from your plan, you can perform the steps below.
Sort the activity list: sortactivity
Format:
sortactivity CRITERIA ORDER
|
Example:
If you want to sort your list of activities in descending order of duration, to help you in your planning, you can do the following.
Find activities by name: findactivity
You can use this command to find activities by keywords. E.T. will help you search for your activities using the activity title, duration and location.
Format:
findactivity KEYWORD [MORE_KEYWORD]…
|
Example:
Let say your list has a bunch of activities and you want to search for a specific one about shopping. You can do so as follows.
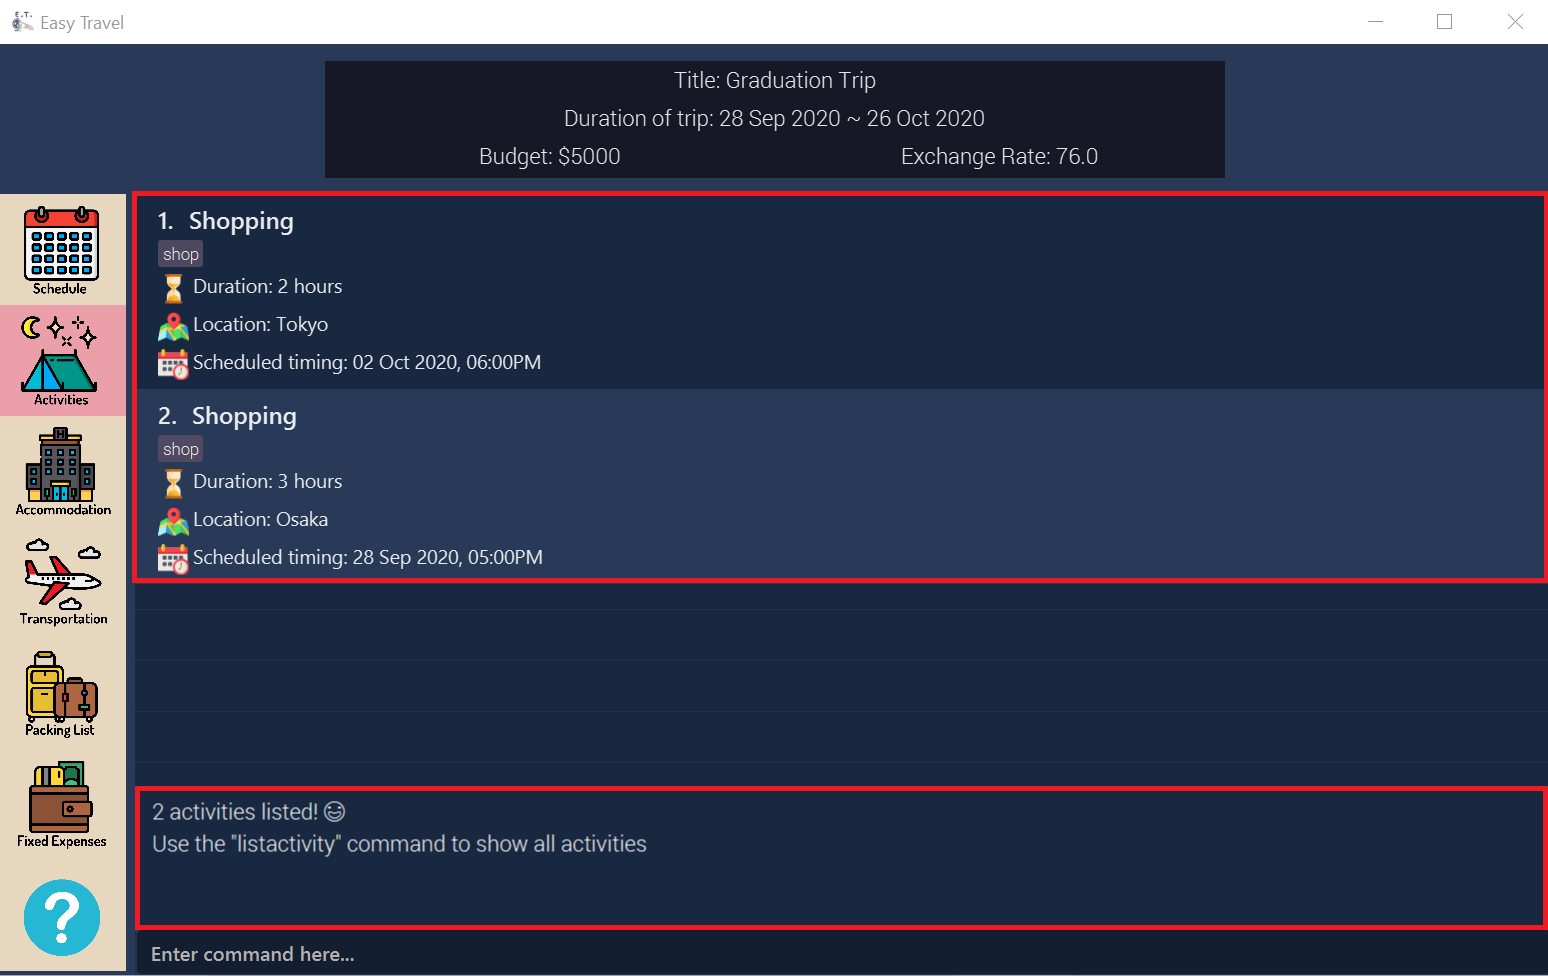
findactivity commandFind activities by tag: findactivitytag
You can use this command to find activities by tags.
Format:
findactivitytag TAG_NAME [MORE_TAG_NAMES]…
|
Clear all activities: clearactivity
You can use this command to clear and delete the whole list of activities in E.T..
Format:
clearactivity
Example:
In the case that you want to restart your activity planning from scratch, you can do the following.
Trip Management
(Contributed by Charlotte)
This feature allows you to manage your trip. You can record the following information about your trip: * Title * Budget * Exchange rate * Start date * End date
Trip Management Command Parameters
Before you jump right into using this feature, you may want to learn about all the common command parameters used in this feature. The table below shows the list of common command parameters that will be used for this feature.
| Parameter Name | Description |
|---|---|
|
The title of your trip. It must be alphanumeric words not more than 50 characters long. E.g. |
|
The budget of your trip. It must be a whole number not more than 1 000 000 000. E.g. |
|
The exchange rate for your country of visit. It must be a number greater than 0 and not more than 100. E.g. |
|
The starting date of your trip. It must be in the format of E.g. |
|
The ending date of your trip. It must be in the format of E.g. |
Set a new trip: settrip
You can use this command to set a new trip that you want to plan for.
Format:
settrip title/TITLE budget/BUDGET exchangerate/EXCHANGE_RATE startdate/START_DATE enddate/END_DATE
|
Refer to Trip Management Command Parameters for more detail about each parameter. |
| Ensure that your date is correct as E.T. does not allow editing of dates once set. |
Example:
If you are all ready to start planning for your trip and you want to set a trip to get started, follow these steps below. You will learn how to set a graduation trip that starts on 28 September 2020 and ends on 5 October 2020 with a budget of $5000 and an exchange rate of 76.6.
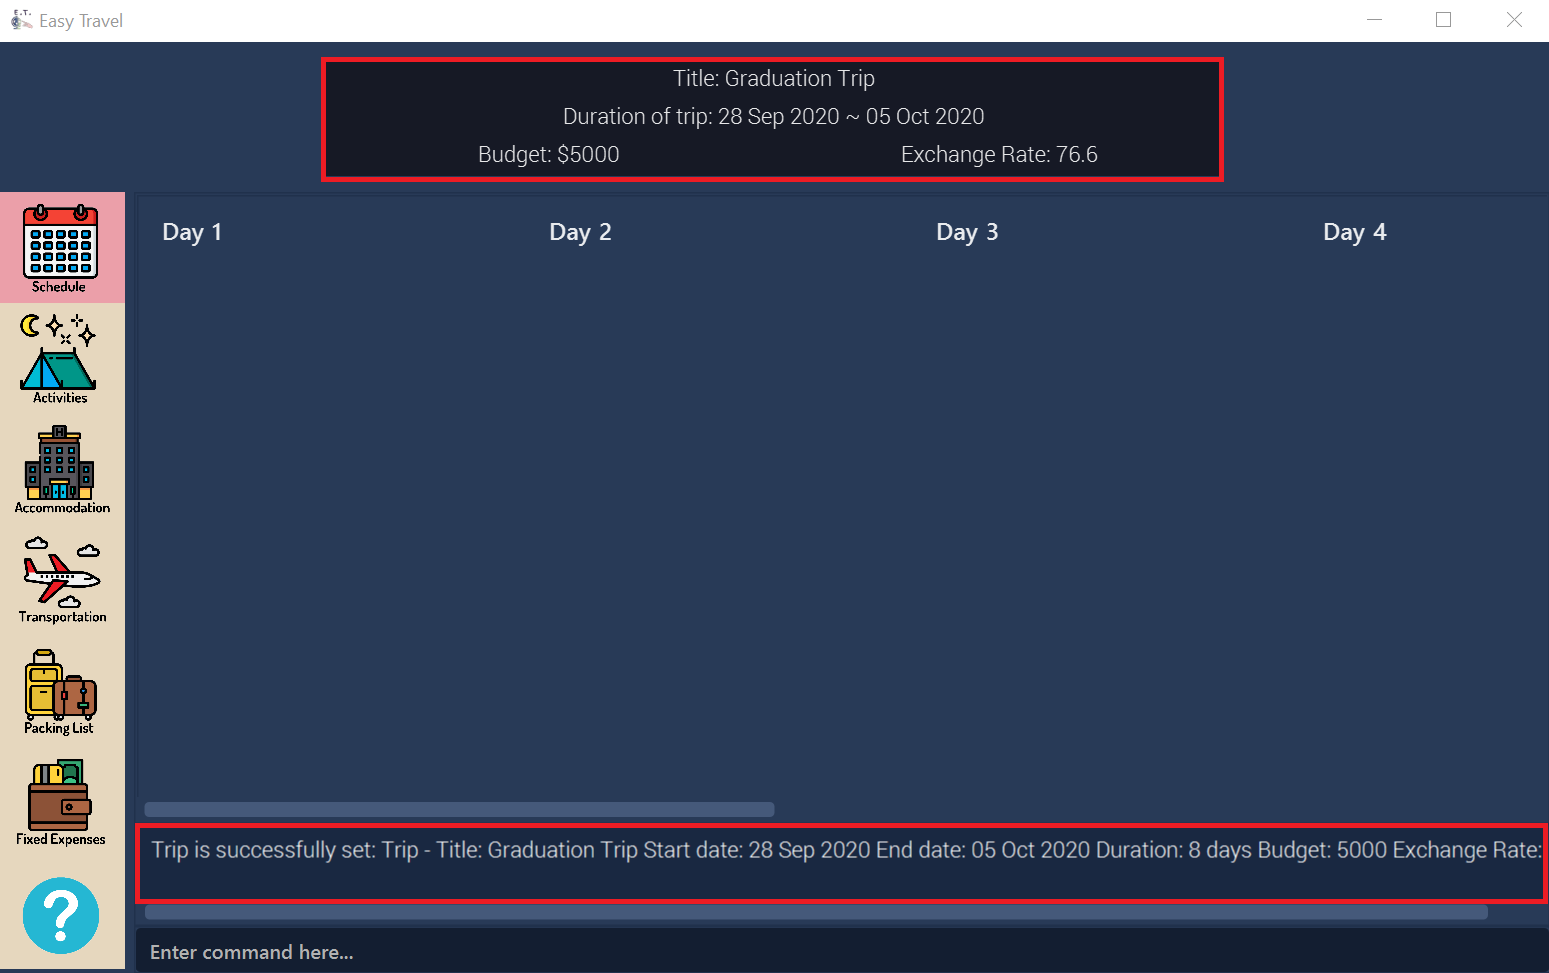
settrip commandRename the trip: rename
You can use this command to change the title of the trip.
Format:
rename TITLE
|
Refer to Trip Management Command Parameters for more detail about each parameter. |
Example:
Assume that you have accidentally titled the trip wrongly to Craduation Trip instead of Graduation Trip, you can do the following steps.
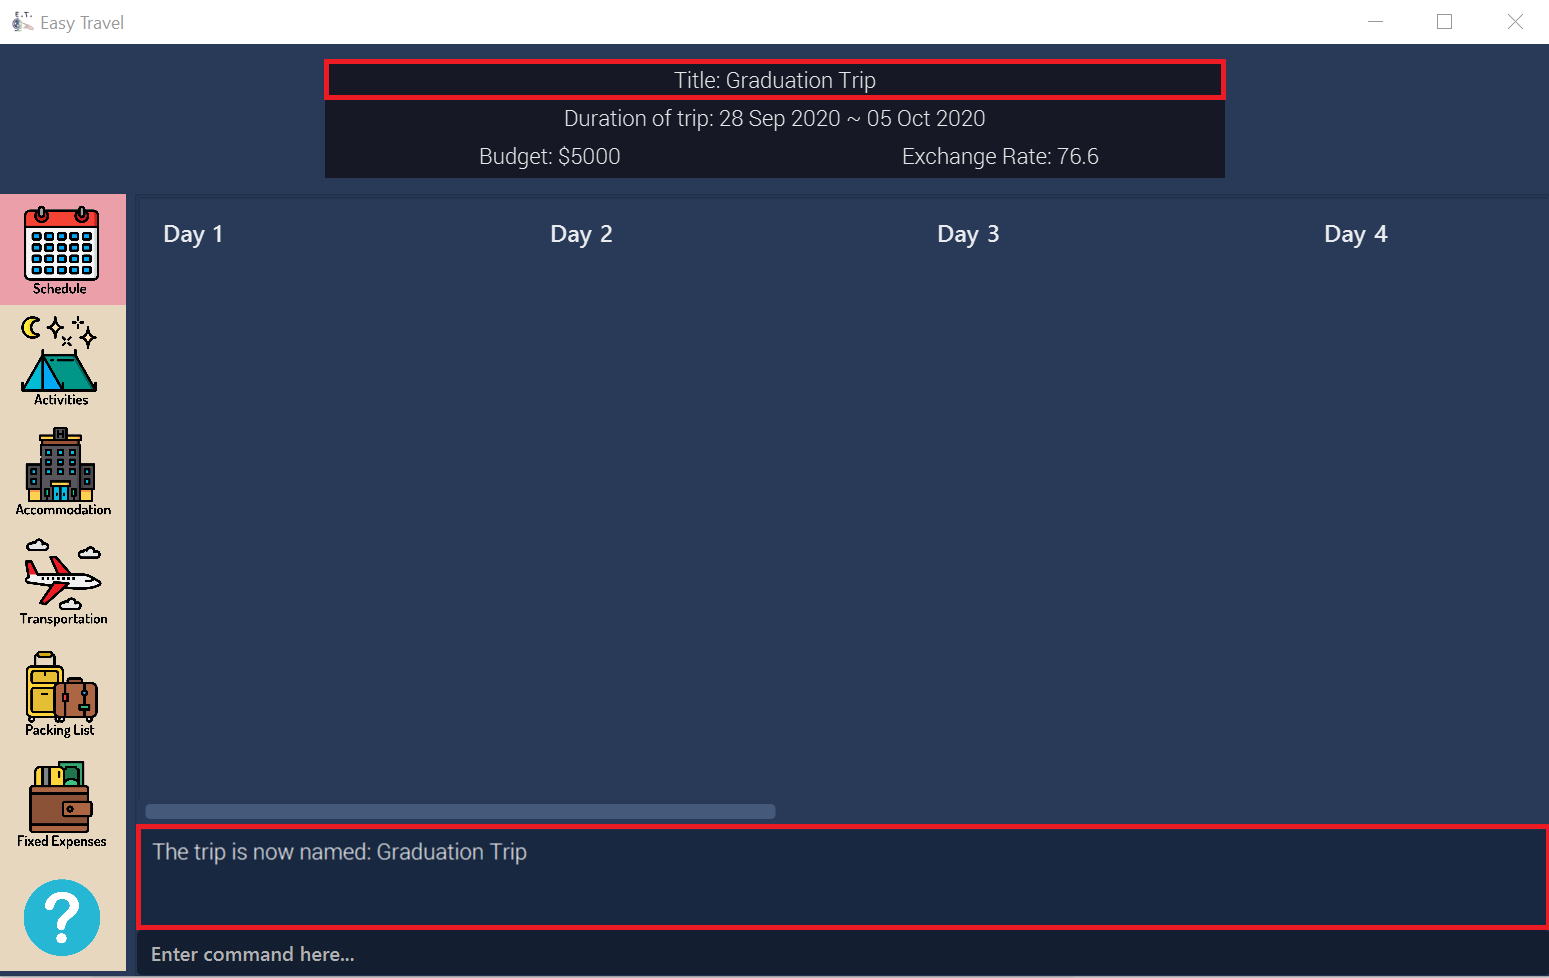
rename commandEdit the trip’s budget: editbudget
You can use this command to change the budget of the trip.
Format:
editbudget AMOUNT
|
Example:
Let’s say after planning your expenses, you realised that you would want to increase your budget to $6000. Follow the following steps to do that.
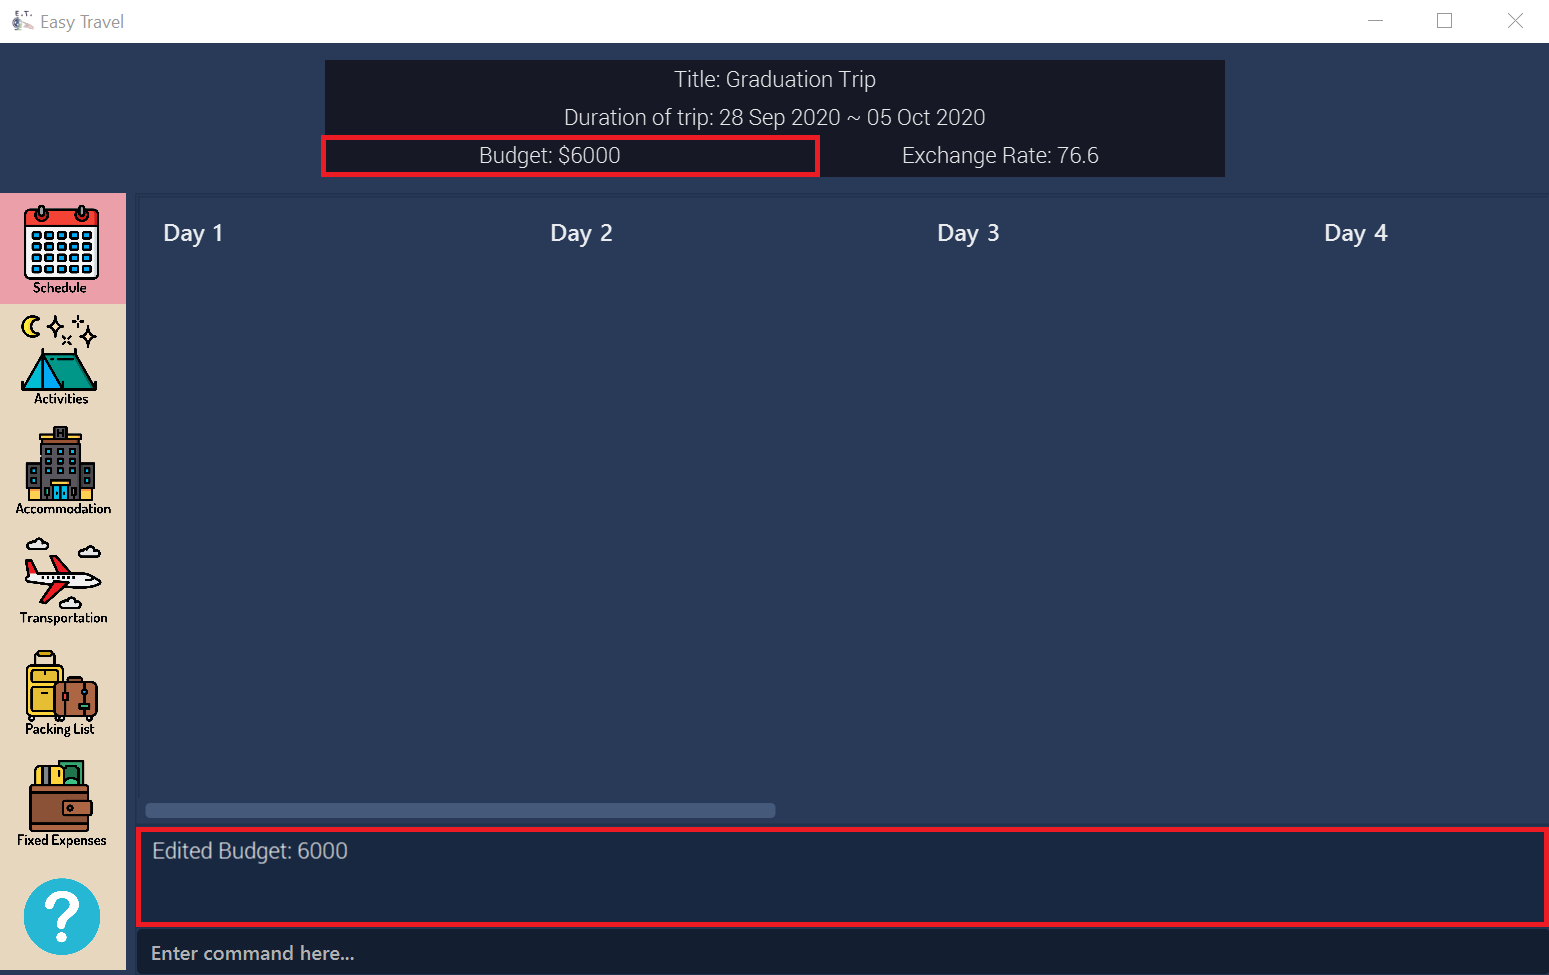
editbudget commandDelete the current trip: deletetrip
You can use this command to delete the current trip.
| Deleting the trip will clear all your data from the app! Think twice before you do so. |
Format:
deletetrip
Example:
Assuming that you have finished planning for your trip and would like to start planning for a new one, follow these steps.
Deleting the current trip:
-
Type
deletetripinto the Command Box. -
Press
Enterto execute.
Outcome:
-
The Result Display will show a success message.
-
You can now see that no trip is set on the Trip Information Panel.
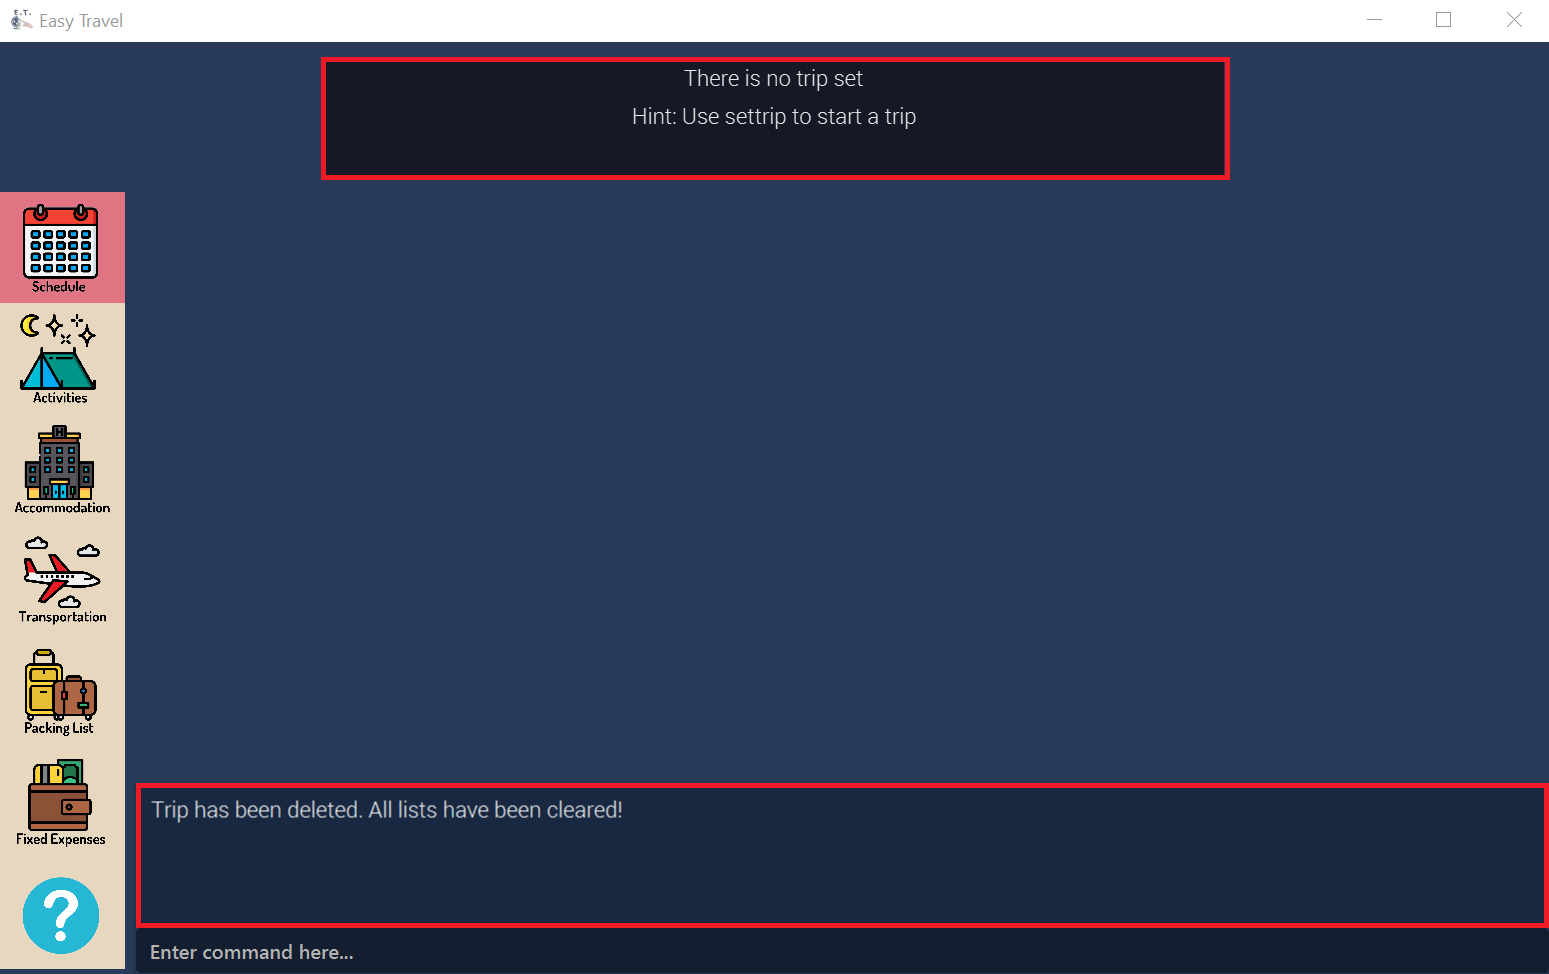
deletetrip commandCheck your progress: status
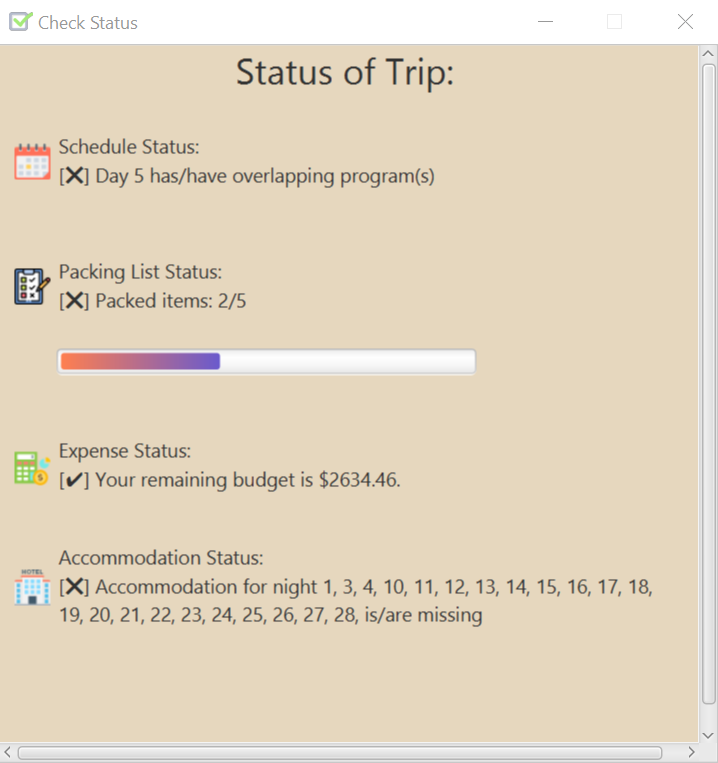
You can use this command to check the progress of your planning. This command will open a window which shows you the following information:
-
Schedule - If there are any overlapping programs.
-
Packing list - Number of items packed and left to pack.
-
Expense - Remaining budget.
-
Accommodation - The nights without accommodation bookings. Format:
status
Example: If you are planning for your trip halfway and feel lost, you can check your progress using the following steps. It can remind you of what you have to do next.
Contributions to the Developer Guide
Given below are sections I contributed to the Developer Guide. They showcase my ability to write technical documentation and the technical depth of my contributions to the project. |
Trip Manager
(Contributed by Charlotte)
E.T allows the user to plan for an overseas trip. E.T is implemented in a way that the user can only plan for one single trip at any time. i.e. Only a single trip’s data can be managed. In this Trip Manager feature, the user can set, edit and delete his/her trip details. The trip details includes:
-
title -
budget -
exchangeRate -
startDate -
endDate
Rationale
The Trip Manager feature is included in E.T. because it is the core feature of the application. If the user wants to plan for an overseas trip, he/she has to record details about the trip.
Current Implementation
The TripManager class in the Model component is responsible for all operations on the trip which is represented by the Trip class. The following Class Diagram describes the structure of the TripManager and its relevant classes.
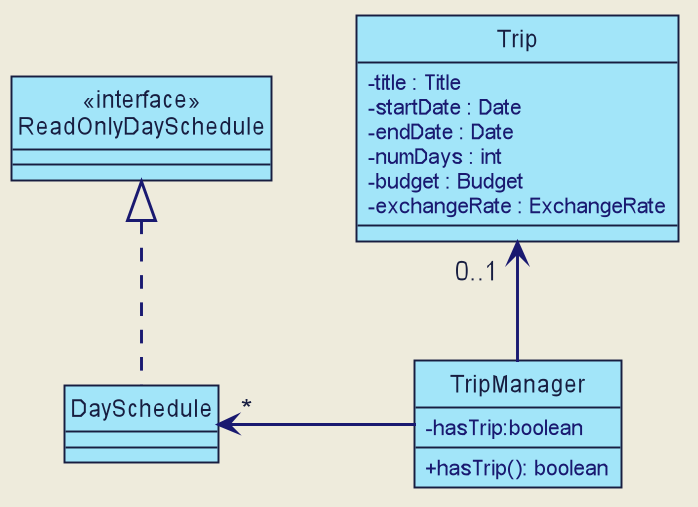
TripManager and its relevant classesAs seen from the diagram, the TripManager can only manage one trip at any point in time.
Next, the following table shows the commands related to managing the trip details.
| Command | Purpose |
|---|---|
|
Adds a trip and sets the trip details. |
|
Edits the trip title. |
|
Edits the budget of the trip. |
|
Deletes the trip and all the data in the App. |
This ability to change the start and end dates and the exchange rate of the trip is not available.
Design Consideration
Aspect: Number of trips allowed to be managed
| Pros | Cons | |
|---|---|---|
Option 1 (Current) |
Easy to implement. |
Less flexibility for the user. |
Option 2 |
More flexibility for the user. |
More overhead, especially in terms of space. |
Reasons for choosing the option 1:
-
A typical user would only plan one trip at a time. Thus, the overhead incurred by option 2 is not justified.
-
Limited time for implementing this feature. Thus, option 1 is more ideal.
Aspect: Ability to edit the details of the trip
| Pros | Cons | |
|---|---|---|
Option 1 (Current) |
Easy to implement. Nothing depends on the trip title and budget. |
Users who need to change the dates or exchange rate of the trip need to delete and then set the trip which is troublesome. |
Option 2 |
More flexibility and convenience for the user. |
The schedule feature depends on the trip dates while the expense feature depends on the exchange rate. Thus, allowing these fields to be changed is very difficult to implement and likely to result in bugs. |
Reasons for choosing option 1:
-
The exchange rate of a trip does not tend to fluctuate much, thus the cons of option 2 outweigh the pros for the exchange rate.
-
As for the trip dates, the schedule feature is a big feature of E.T. and it depends on the trip dates. Given the limited time for implementation, we decided to opt for a less bug-prone approach that can showcase E.T.’s feature.
Activity Manager
(Contributed by Charlotte)
E.T. allows the user to keep track of their activities for his/her trip. The activity manager is one of the ListManager s (See [List-Manager]). On top of the basic operations provided by a ListManager, it also allows the user to search for their activities using the findacitivty command. The parameters of the findactivity command are keywords in the activity entries that the user wants to search for. E.g. findactivity sightseeing carnival will search and list all activity entries with sightseeing or carnival in their detail. Another similar command, findactivitytag has the same functionality but only searches for the tags of activity entries.
Rationale
The activity manager is an important feature to have because any oversea trip will be packed with activities for the traveller. Thus, we decided to create an activity manager as one of the ListManagers.
Current Implementation
The current implementation of the activity manager only allows the user to keep track of a list of activities for their trip. It does not allow the user to indicate the start and end time of an activity. Instead, the ability to indicate a start time for an activity will be in another feature known as the Schedule Feature (See [Schedule-Feature]).
In this section, we will outline the findactivity command of the activity manager which is summarised by the Activity Diagram below.
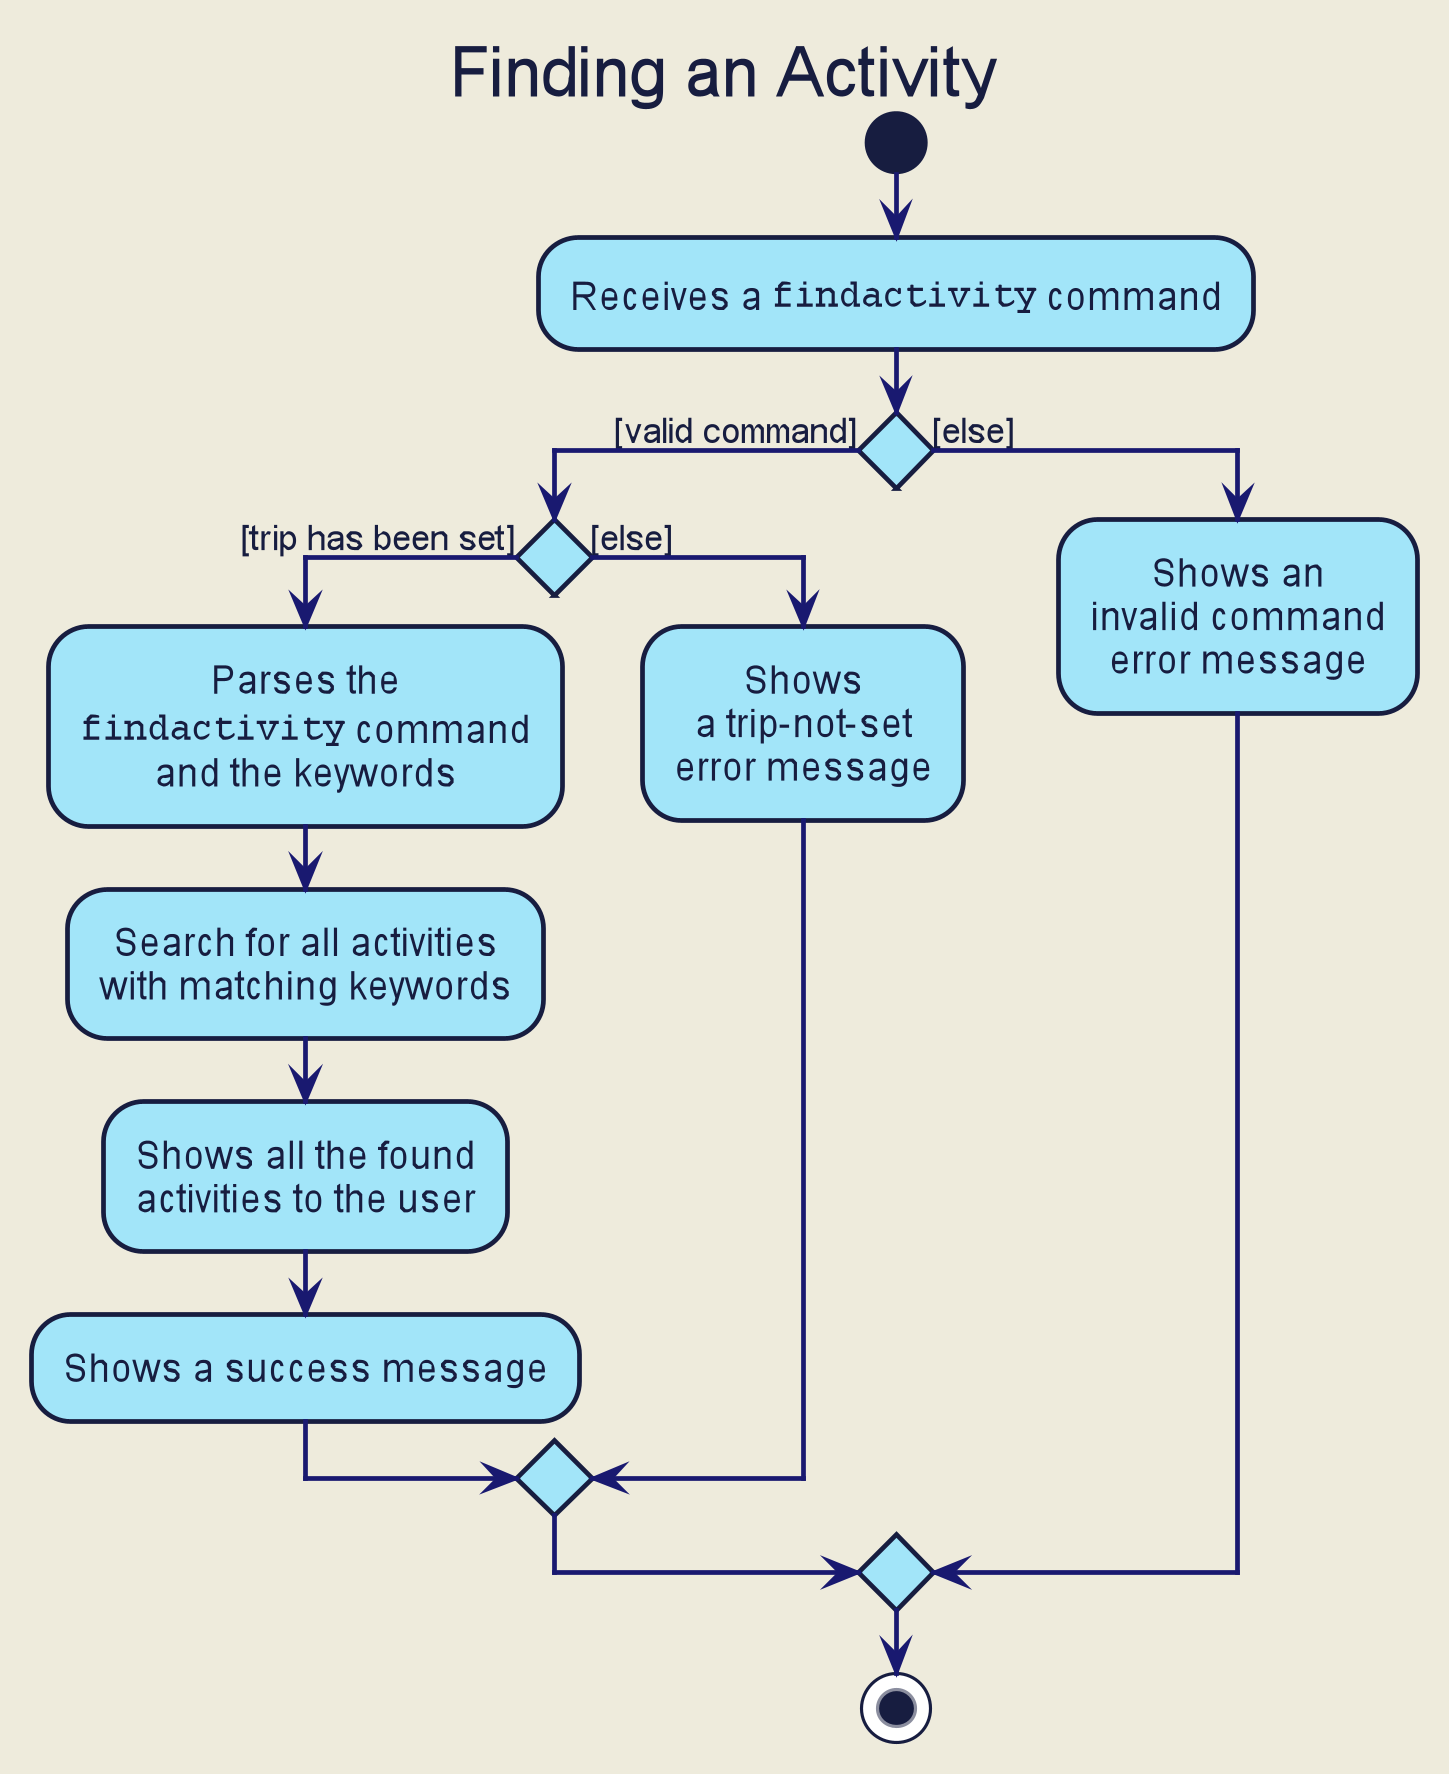
findactivity commandWhen the user enters the findactivity command to search for activities, the user input command undergoes the same command parsing as described in [Design-Logic]. During the parsing, a predicate is created. This predicate checks if a given Activity contains the user input keywords. The FindActivityCommand will then receive this predicate when it is created.
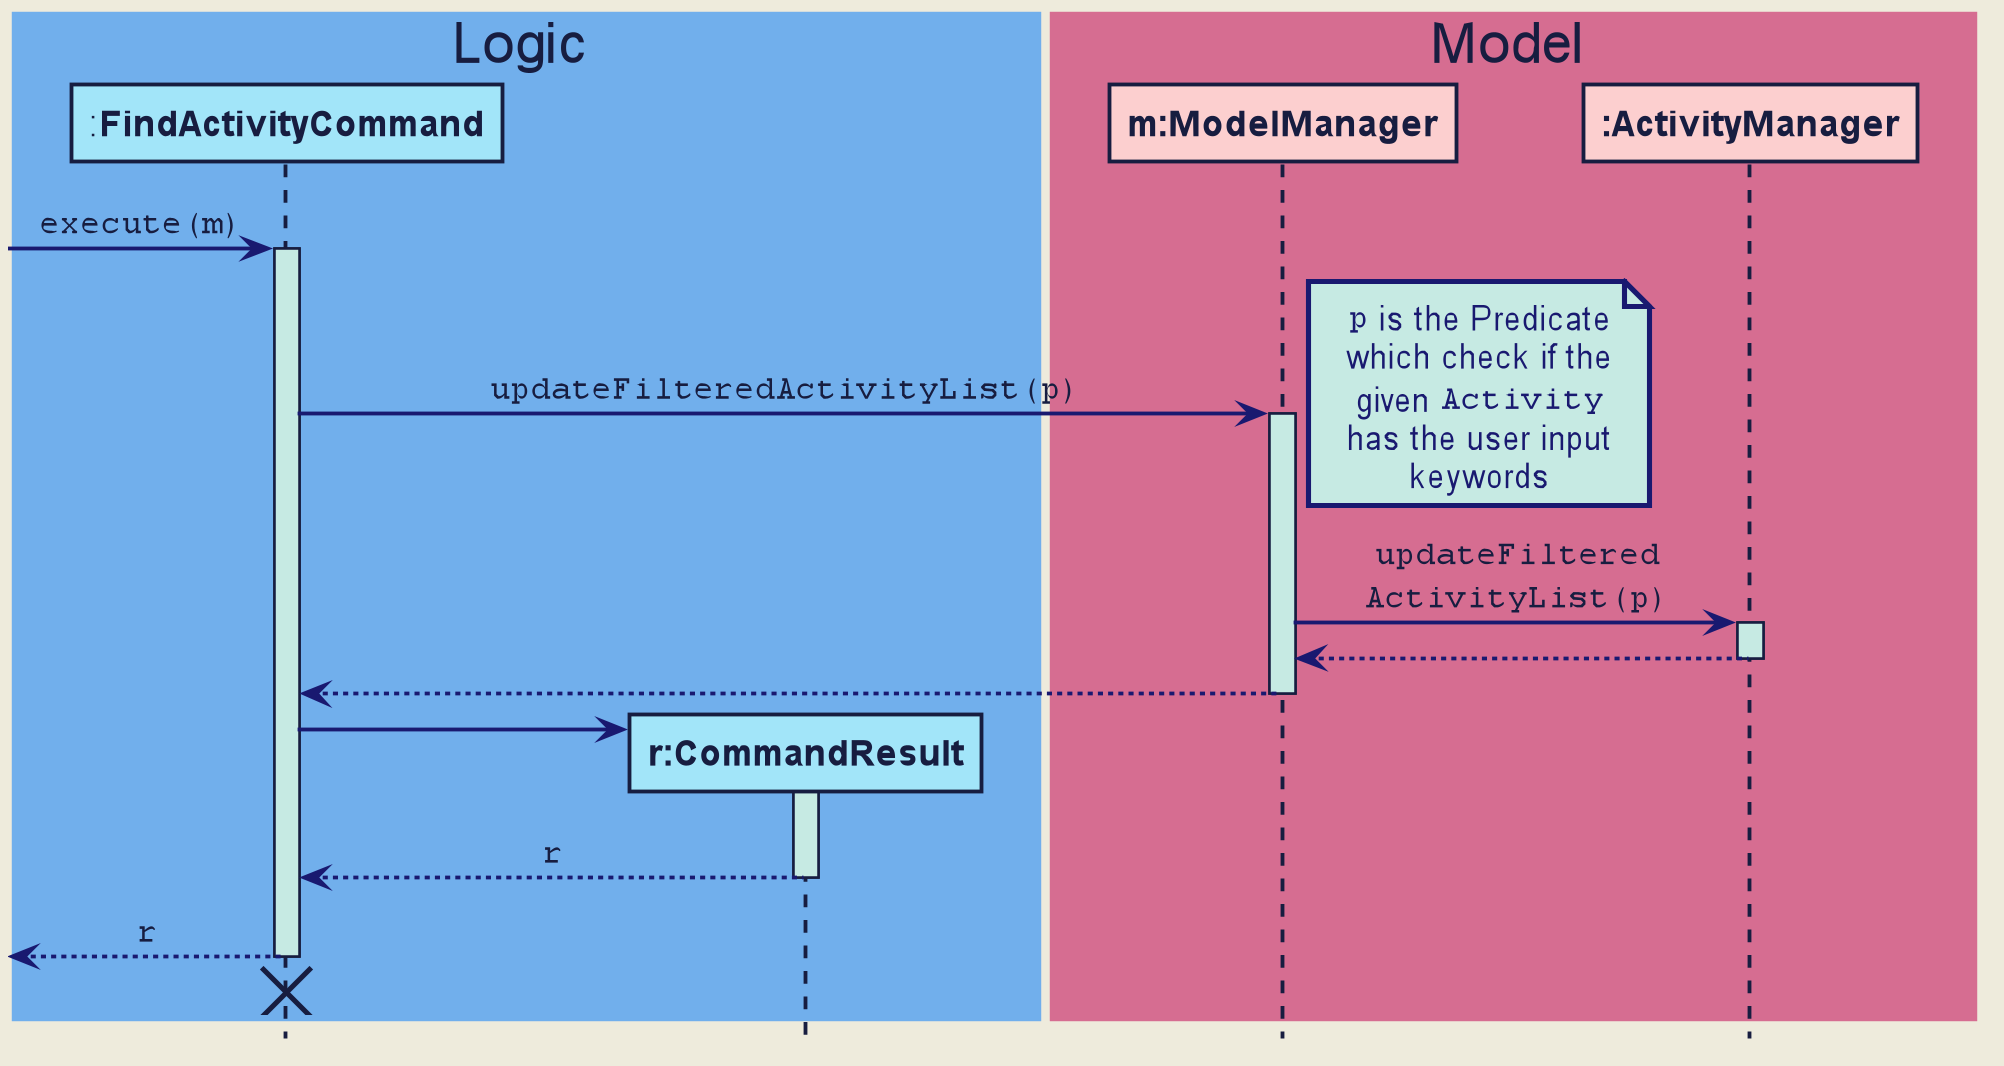
The following steps will describe the execution of the FindActivityCommand in detail, assuming that no error is encountered.
-
When the
execute()method of theFindActivityCommandis called, theModelManager’supdateFilteredActivityList()method is called. -
The
ModelManagerthen proceeds to call theupdateFilteredActivityList()method of theActivityManager. -
The
ActivityManagerwill then update its filtered list of `Activity`s to contain only `Activity`s that fulfil the given predicate. -
The
Uicomponent will detect this change and update the GUI. -
If the above steps are all successful, the
ScheduleCommandwill then create aCommandResultobject and return the result.
The Sequence Diagram below summarises the aforementioned steps.
FindActivityCommand|
The lifeline for the This sequence diagram does not take into consideration the possible exceptions which might occur during the |
Design Consideration
We do not have other implementation options for the FindActivityCommand as the current implementation is the only option that we came up with. This option is quite easy to understand and follows good coding principles.