PROJECT: Easy Travel
This portfolio aims to document the contributions that I have made to the E.T. Easy Travel project. The Github Link to E.T. Easy travel can be found here : https://github.com/AY1920S2-CS2103T-W17-3/main
Overview
E.T. is a desktop travel planning application to provide a simple an easy way for users to prepare for their trip. The user interacts with it using a CLI, and it has a GUI created with JavaFX. It is written in Java, and has about 10 kLoC.
Summary of contributions
-
Major enhancement:
Implemented Fixed Expense Tab along with its User Interface and commands (CRUD/Sort)
-
What it does: Enable to user to add and subsequently modify their fixed expenses prior to the trip.
-
Justification: This feature empowers the user to track their current expenses prior to their trip. By adding and subsequently modifying their expenses, the user would know how much of their budget they have spent thus far, resolving the problem that our users, tend to overspend during their trip. Also, users are provided with an avenue to view their fixed expenses in a readable and organised manner.
-
Highlights: The implementation too was challenging and time consuming as it required understanding existing commands within Address Book 3.
-
Credits: {Authors of Address Book 3 and Jeffry Lum for his guidance, time and support. }
-
Minor Enhancement: Created an interactive Pie Chart along with list for fixed expense.
-
What it does: Provides the user with a visual aid and breakdown of their current fixed expenses prior to the trip.
-
Justification: Allows users to determine which category of expenses they need to cut down if they are already over budget, or which categories they can spend more or less on.
-
Highlights: The implementation is time consuming as the documentation of javaFX was difficult to learn. Also the implementation the piechart was difficult in javaFX.
-
Code contributed: [All commits] [RepoSense Dashboard]
-
-
Other contributions:
-
Project management:
-
Set up Tasks for v1.1, closed v1.1 and v1.3 milestones.
-
-
Enhancements to existing features:
-
Documentation:
-
Contributed to the User and Developer Guides for this project. See below for more details.
-
-
Community:
-
Provided insight on PRs made by my group (PR Reviews)
-
Made a total of more than 30 PR’s (List of PR’s)
-
Along with my group, provided DG comments for other groups (#1)
-
-
Tools:
-
Integrated Travis CI in our code.
-
Contributions to the User Guide
Given below are sections I contributed to the User Guide. They showcase my ability to write documentation targeting end-users. |
Fixed Expense Management
(Contributed by Joshua Lay)
The Fixed Expense Manager comprises a list which allows you to set your fixed expenses before your trip. This would help you plan a suitable budget for your upcoming trip.
Examples of Fixed Expenses that you can include are as follows,
Fixed Expense Management Command Parameters
Before jumping into the various features the Fixed Expense Manager offers, it might be beneficial to take some time looking at the common command parameters that are used in this feature. This is shown in the table below.
| Parameter Name | Description |
|---|---|
|
The amount of money for your fixed expense. It must be a positive number with at most 2 decimal places. It must also be less than 1,000,000,000. Example: |
|
Currency the fixed expense is in. It can only take the value of |
|
The description of the fixed expense. It must be words made up of alphanumeric characters not more than 50 characters long. Example: Plane Tickets |
|
The category of the fixed expense. It can take the value of |
|
The index number of the fixed expense entry in the displayed list.
The first entry of the list has an index of It must be a valid index. |
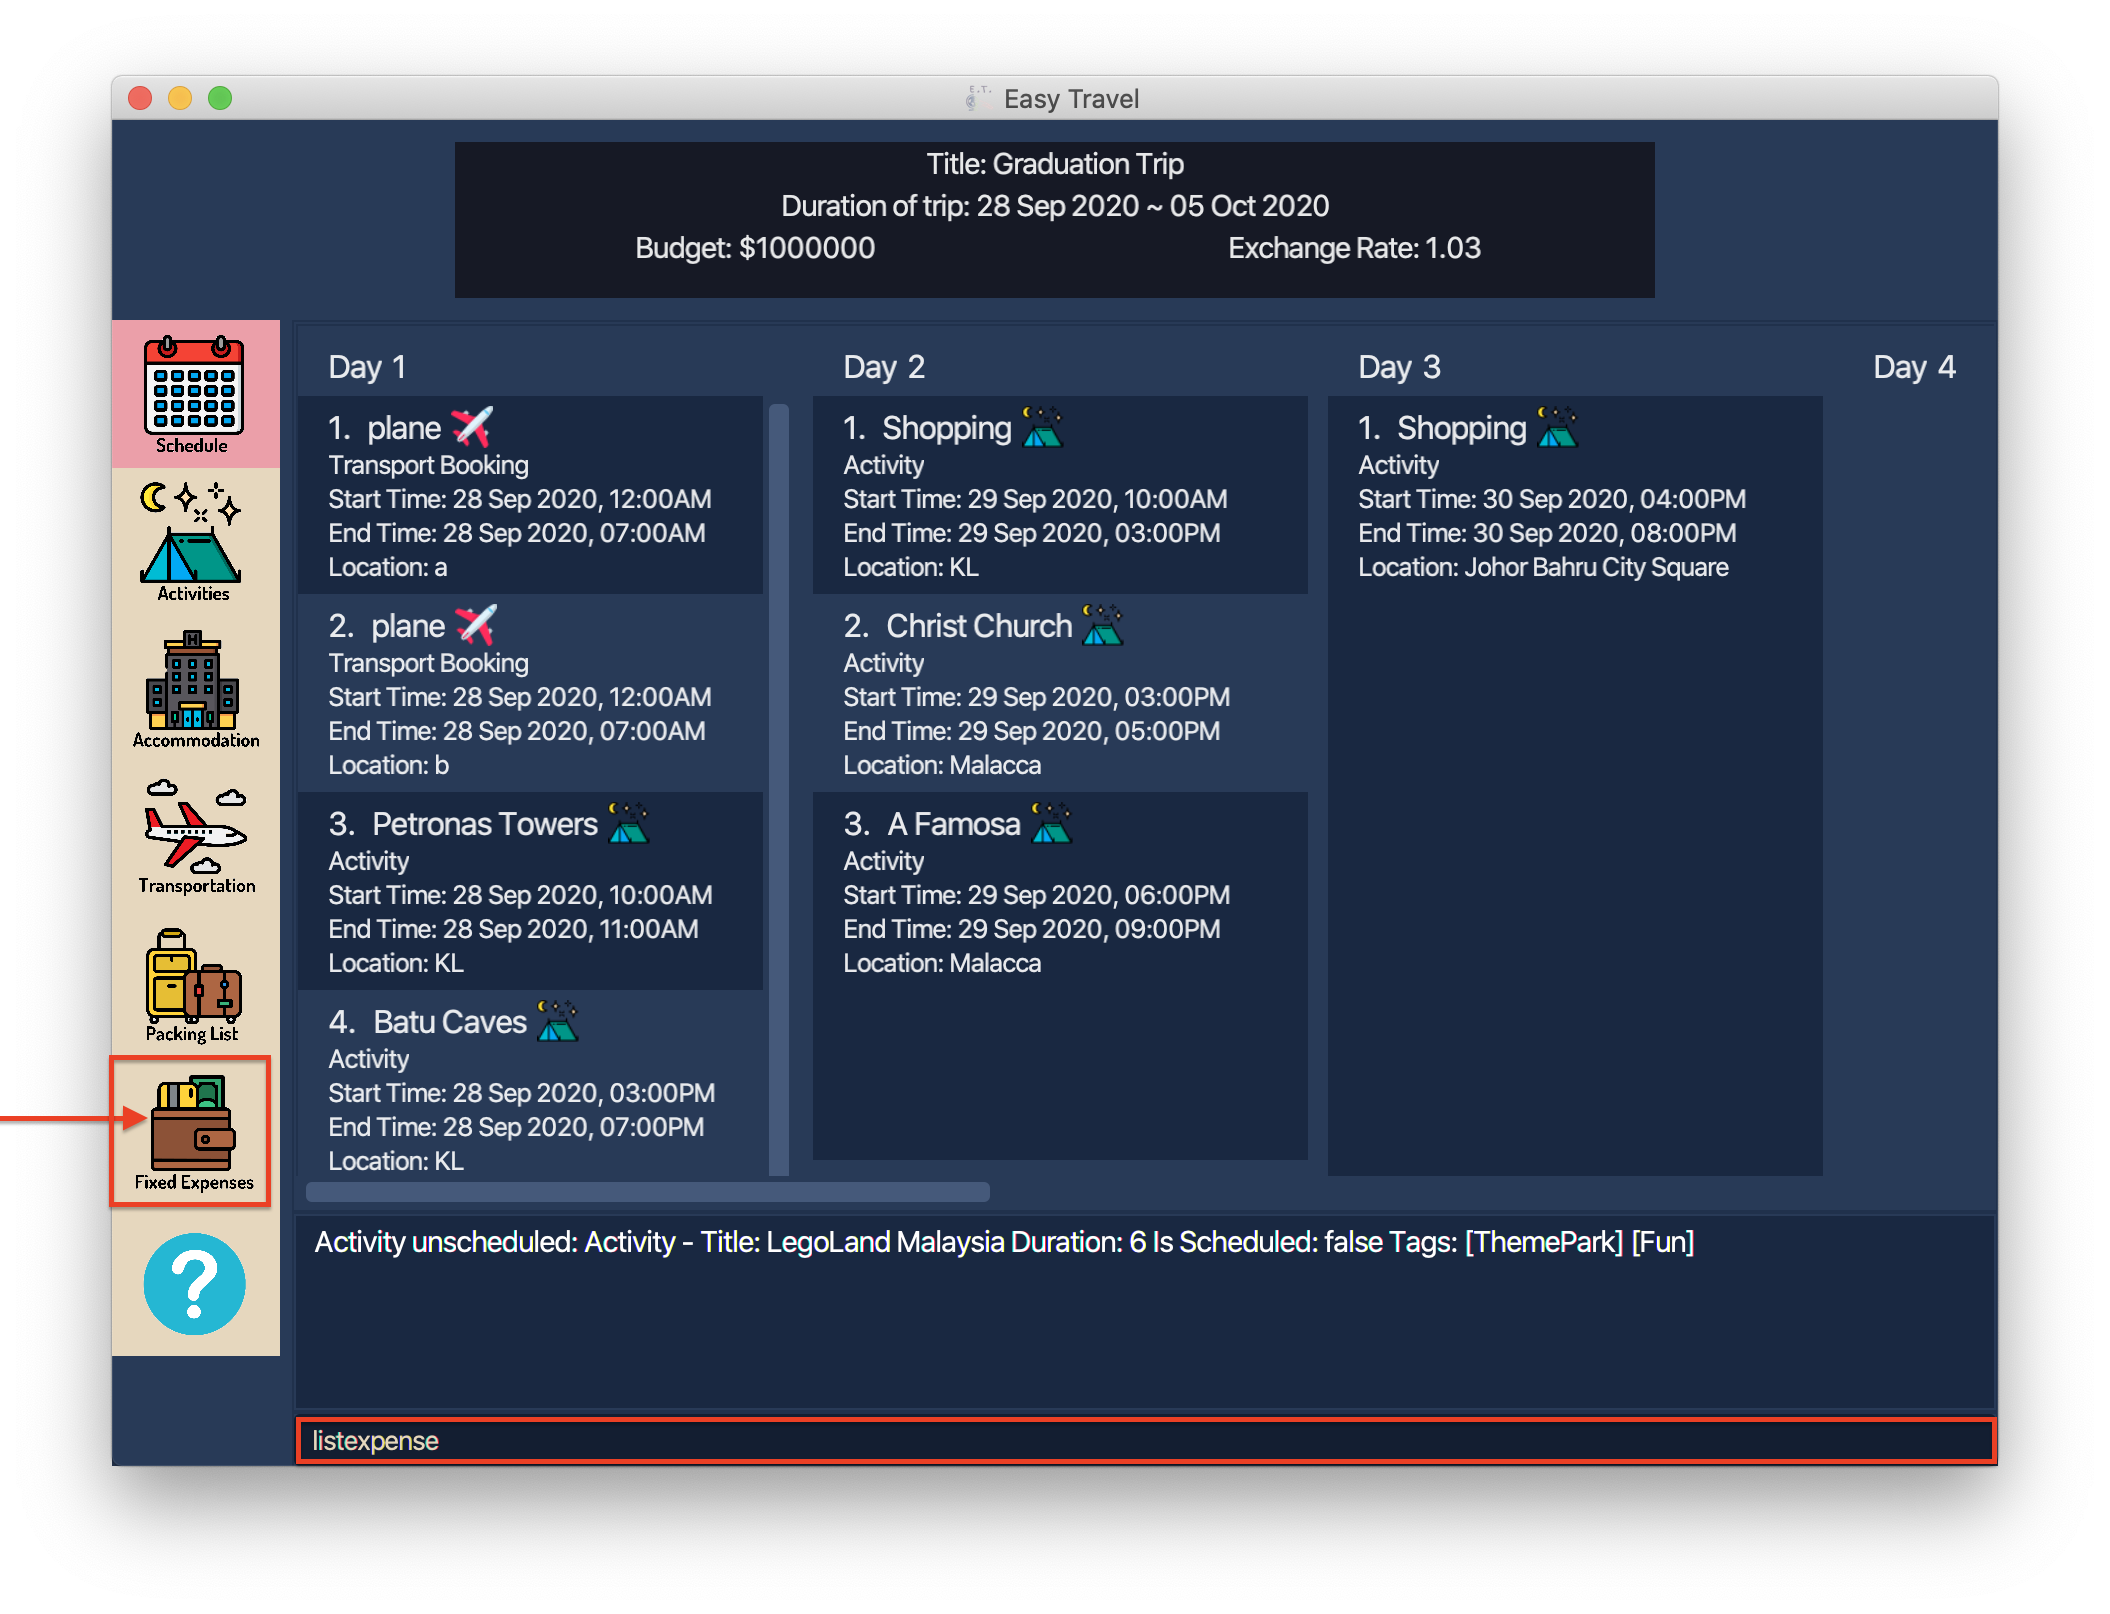
List your fixed expenses: listexpense
You can use the listexpense command to navigate to the Fixed Expenses Tab and list all fixed expenses entries.
Format:
listexpense
Example:
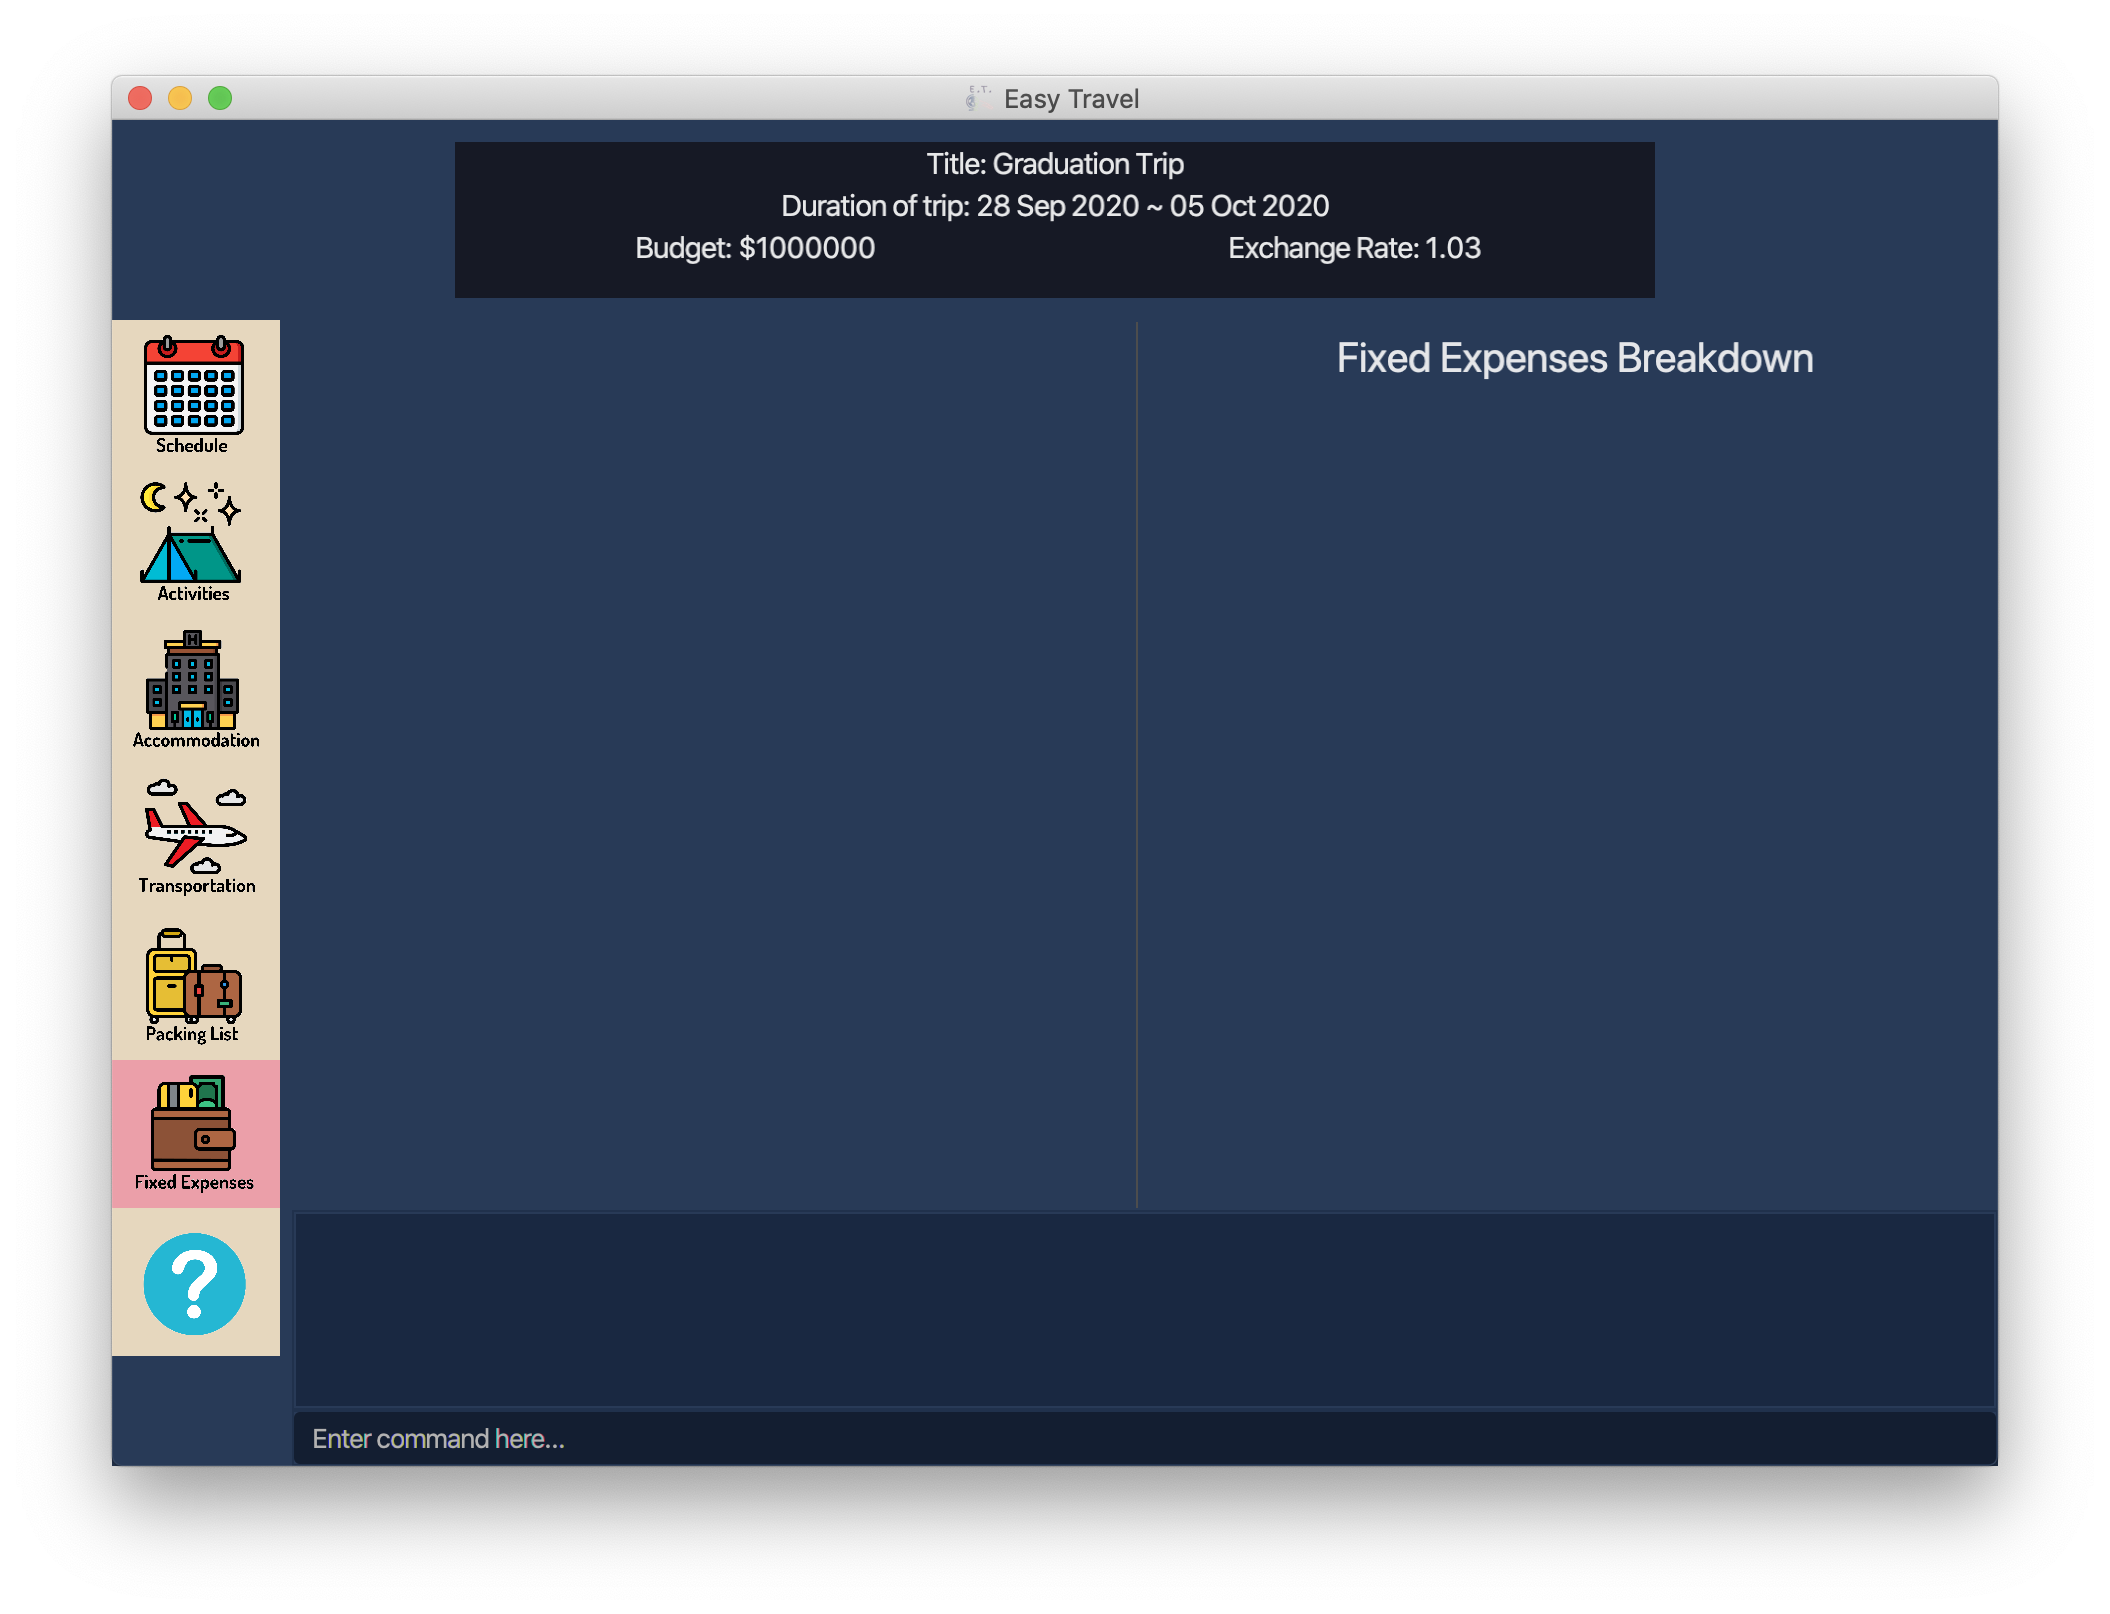
If you are in another tab and wish to navigate to the Fixed Expenses Tab to view all your fixed expense entries, you can follow these steps.
Listing all fixed expense entries:
-
Type
listexpneseinto the Command Box. -
Press
Enterto execute.
Outcome:
-
The Result Display will show a success message.
-
E.T. will switch to the Fixed Expenses Tab.
-
You can now see all your fixed expense entries.
listexpense commandThereafter, you will be able to add and subsequently modify your fixed expenses.
This would be further elaborated in Adding a new fixed expense entry: addexpense onwards.
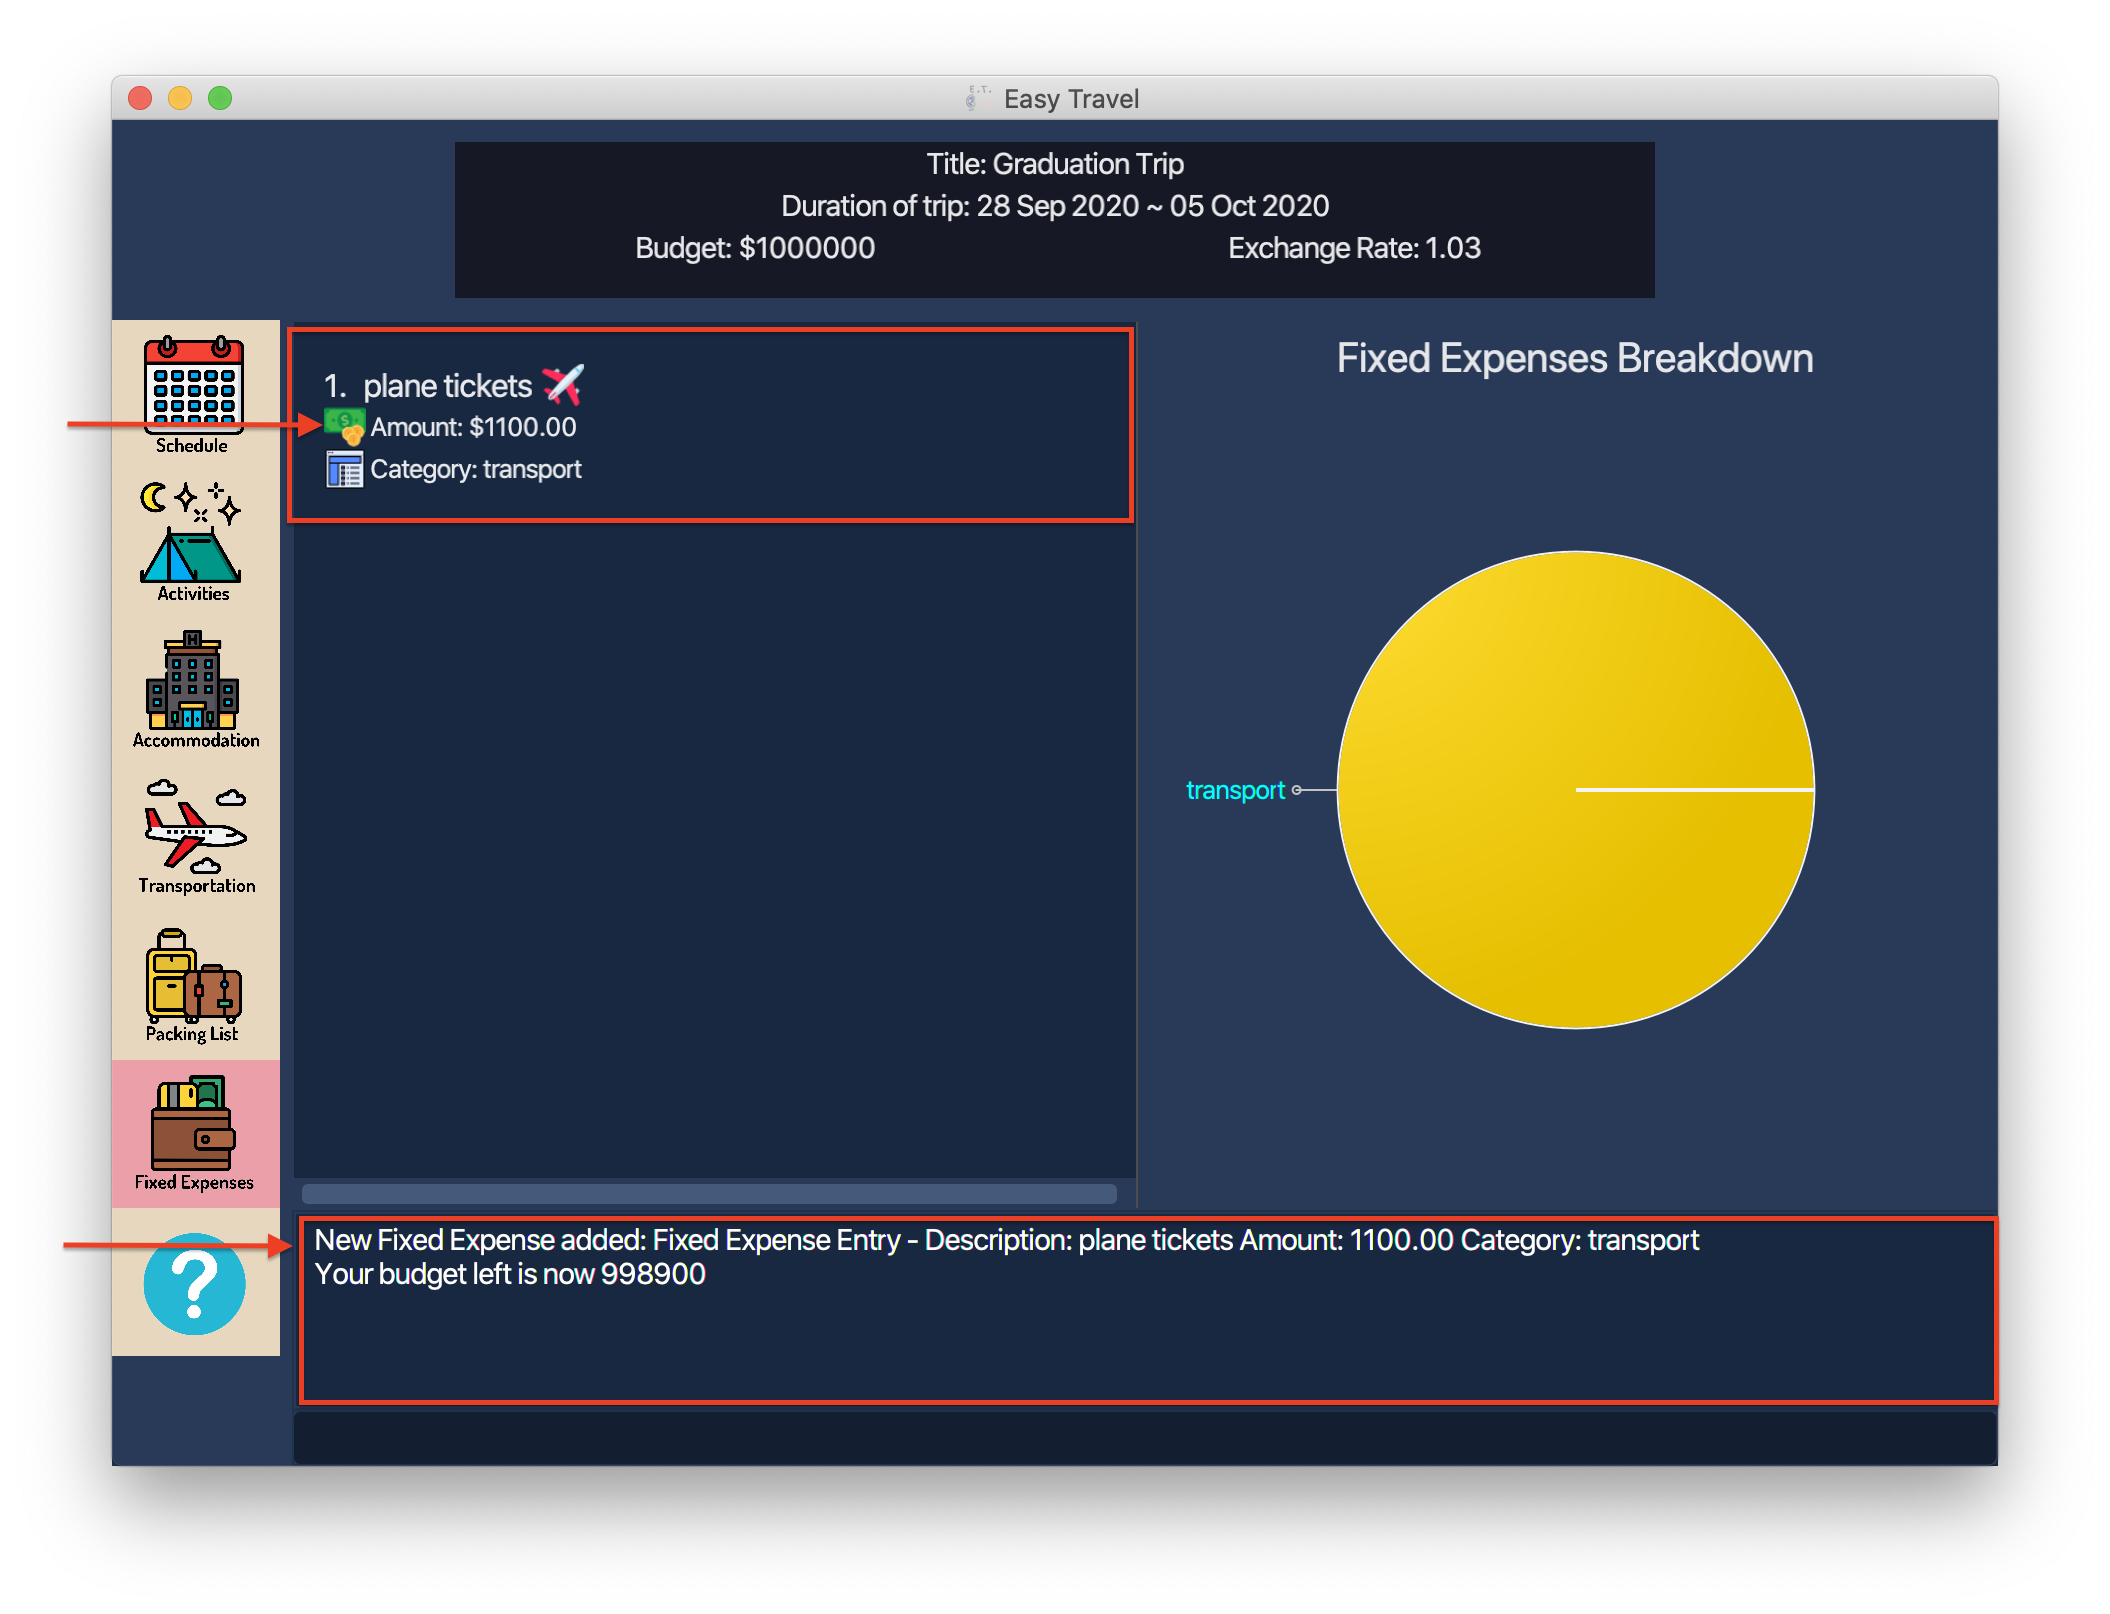
Adding a new fixed expense entry: addexpense
You can use this command to add a new fixed expense into the Fixed Expense Manager.
Format:
addexpense amount/AMOUNT currency/CURRENCY description/DESCRIPTION category/CATEGORY
|
Example:
Let’s say you wish to include a fixed expense entry with the following information and wish to add it in the Fixed Expense Manager.
|
1100 |
|
SGD |
|
Plane Tickets |
|
Transport |
Contributions to the Developer Guide
Given below are sections I contributed to the Developer Guide. They showcase my ability to write technical documentation and the technical depth of my contributions to the project._ |
Fixed Expense Manager
(Contributed by Joshua Lay)
E.T. allows the user to keep track of their fixed expenses for his/her trip. The fixed expense manager is one of the ListManagers (See [List-Manager]). On top of the basic operations provided by a ListManager, it also allows the user to set a budget for the trip and automatically converts any fixed expenses entered in foreign currency into Singapore Dollars (SGD).
Rationale
The fixed expense manager is an important feature to have because many travellers would want to manage their expense for an overseas trip. We also found out that most accommodations are commonly charged in a foreign currency instead of SGD. This prevented travelers from having a clearer picture of how much they have spent on these big ticket items before their trip. Thus, we decided to create a transport booking manager as one of the ListManagers with an automatic conversion feature.
The Activity Diagram below summarises what happens when the user adds a fixed expense entry using the addexpense command.
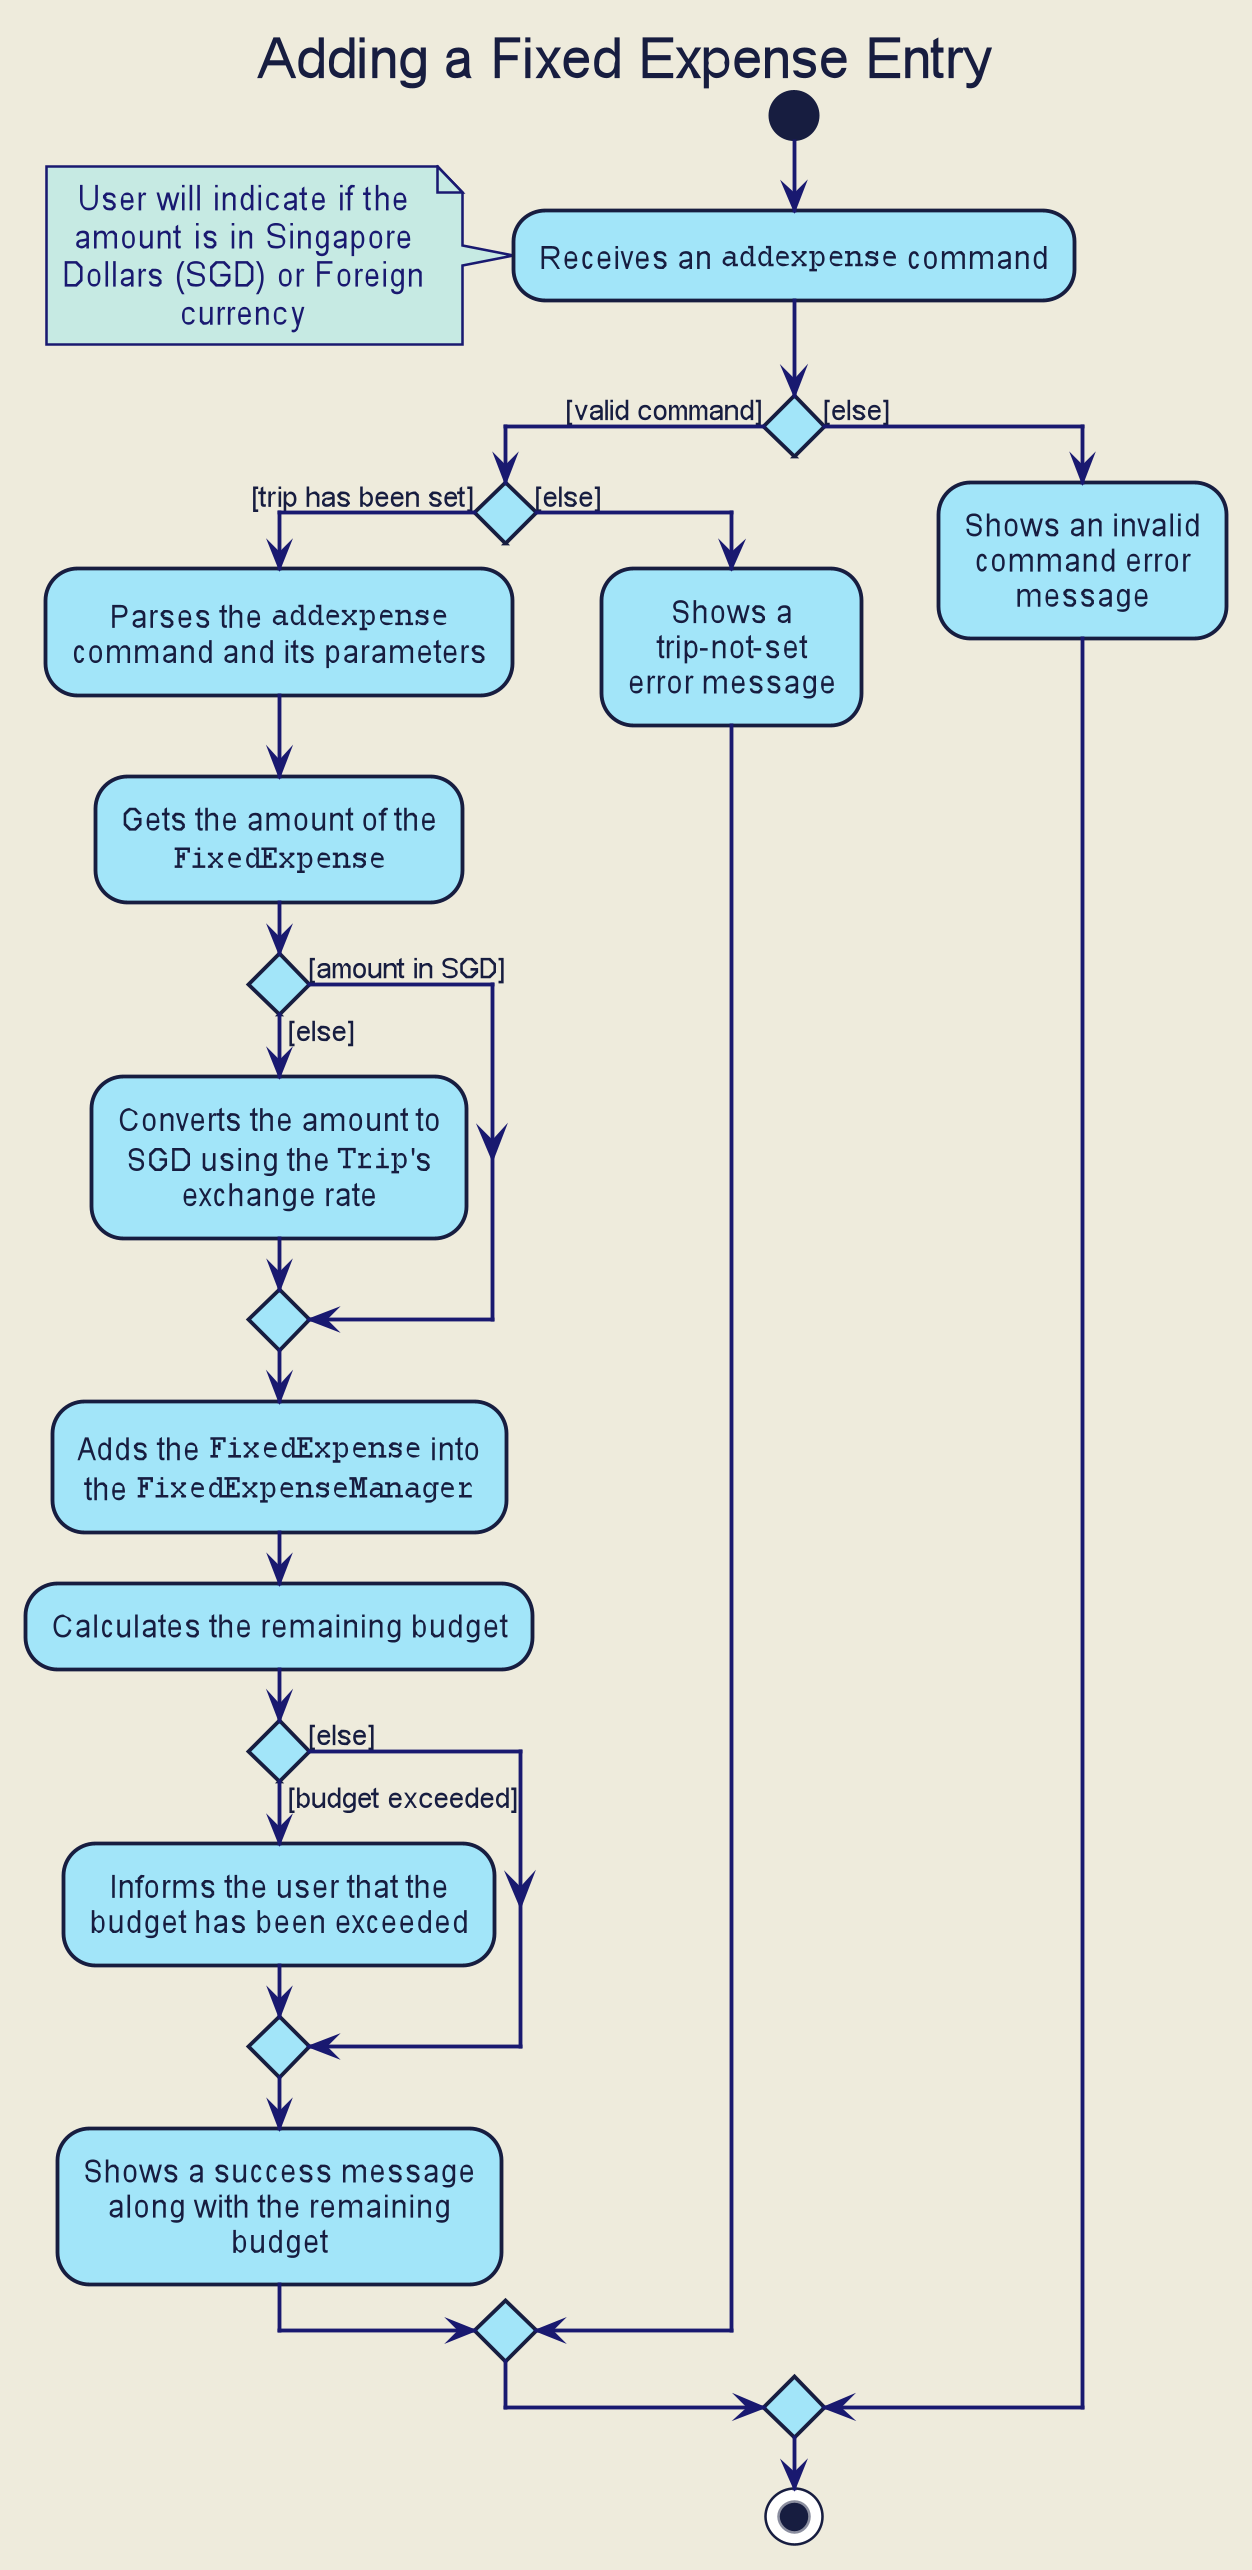
addexpense commandWhen a user enters the addexpense command, the Logic Component parses the user input and creates an AddExpenseCommand object. [Design-Logic]
The following steps describes the execution of the AddFixedExpenseCommand:
-
When
execute()of theAddExpenseCommandis called, the current exchange rate is obtained fromTripManagerthroughModelManager. -
A new
FixedExpenseobject is created. The amount will be converted to SGD if it is in foreign currency. -
The newly created
FixedExpenseobject is added to theFixedExpenseManagerthrough theModelManager’saddFixedExpense()method. -
The total sum of all expenses is obtained by calling the
getTotalExpense()method. -
The budget of the trip is obtained by calling the
getBudget()method. -
The remaining budget is calculated.
-
A
CommandResultobject which consists of a contains the success message along with the remaining budget is created and returned.
The following sequence diagram describes the execution of the AddExpenseCommand when its execute() method is called.

addexpense command|
The lifeline for the This sequence diagram does not take into consideration the possible exceptions which might occur during the |
Progress Checker
(Contributed by Joshua Lay)
This feature allows the user to keep track of the progress of his/her planning. It integrates multiple features to show the user what has been done and what needs to be done for his/her trip. The command to check the current progress is status. The following aspect of the trip will be shown to the user:
-
Accommodation- Accommodation coverage -
Schedule- Time clash in the schedule -
PackingList- Number of items packed or yet to be packed -
Expense- Remaining budget When a user enters thestatuscommand, theLogicComponent parses and creates aCheckStatusCommandobject. (See [Design-Logic]).
The execution of the CheckStatusCommand undergoes the following steps.
-
The
ModelManager’sgetStatus()will first be called. -
The
ModelManagercalls thegetScheduleStatus()method of theTripManager. -
The
ModelManagercalls thegetStatus()method of thePackingListManager. -
The
ModelManagercalls thegetStatus()method of theFixedExpenseManager. -
The
ModelManagercalls thegetStatus()method of theAccommodationBookingManager. -
After all the required data is obtained, the
ModelManagerwill return the data to theCheckStatusCommand. -
The
CheckStatusCommandwill then create a newCommandResultobject using the data obtained and return thisCommandResultobject.
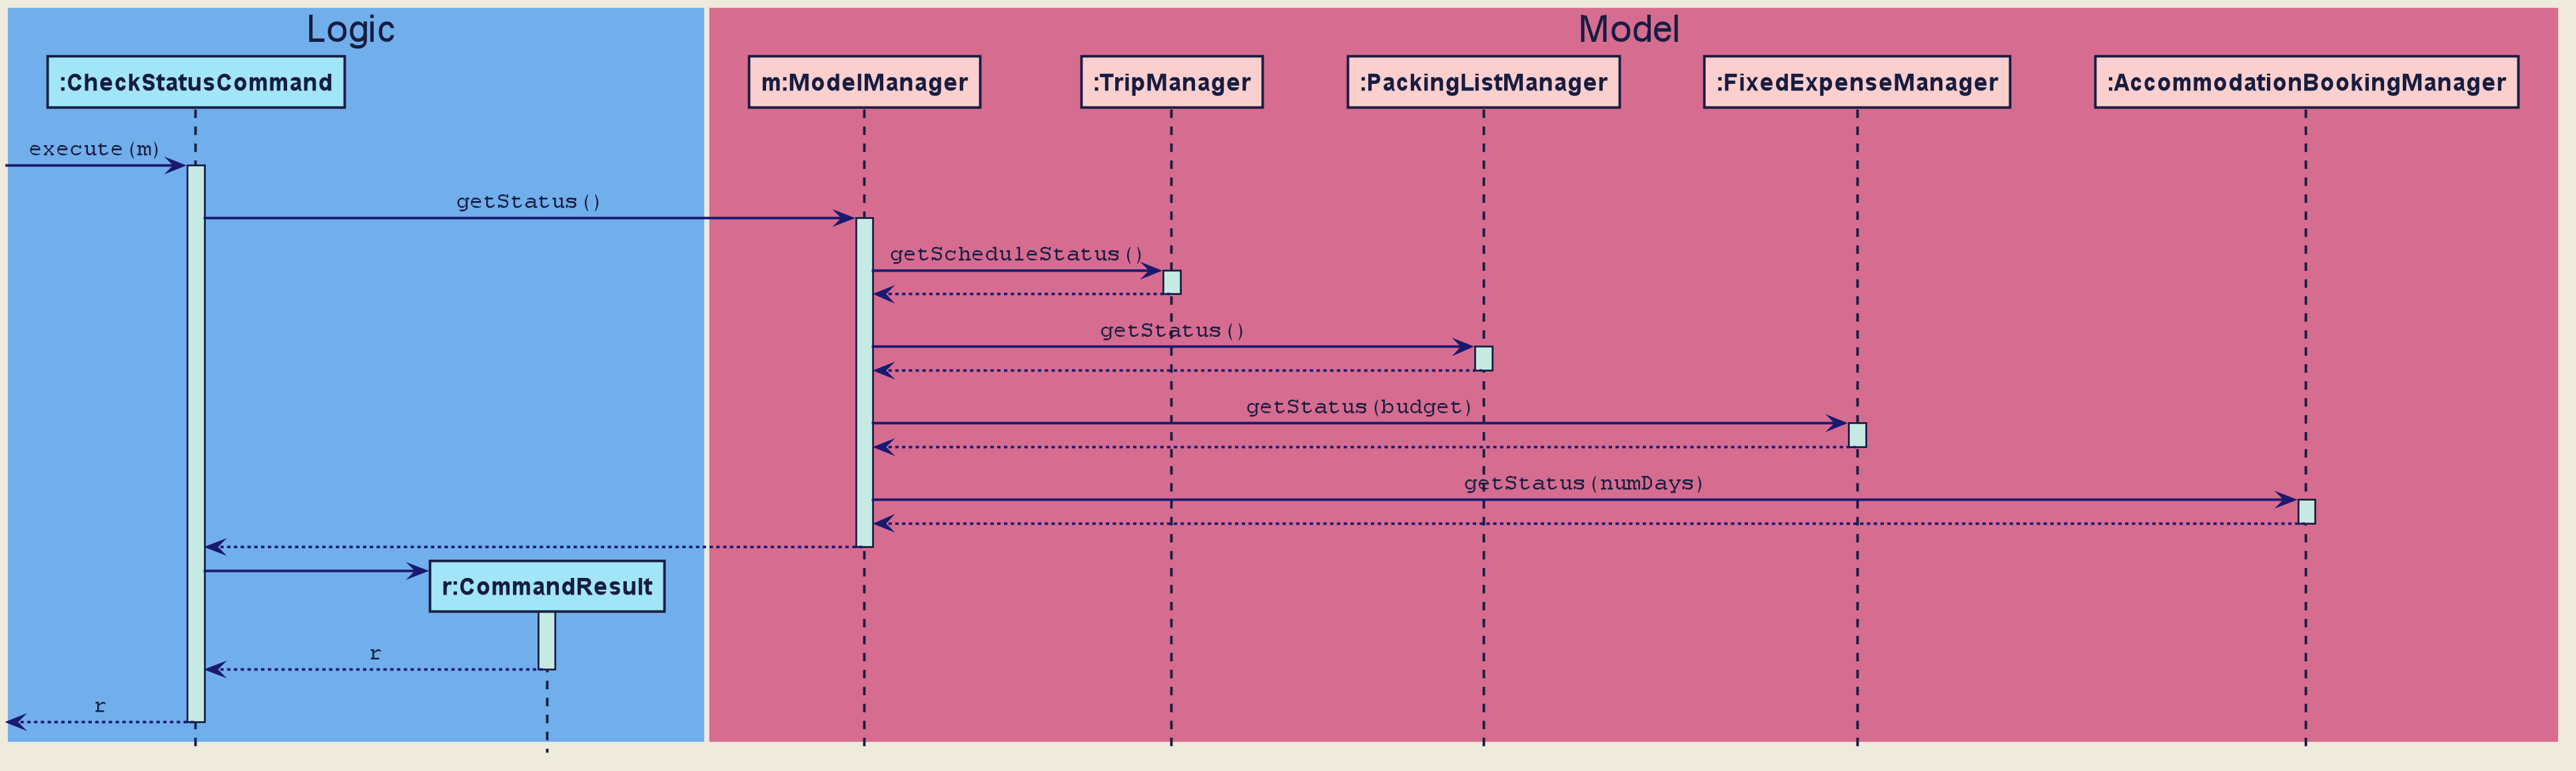
CheckStatusCommand